Is your external hard drive not showing up on your Mac? This issue can be frustrating, but don’t worry, WHY.EDU.VN is here to help. There are several reasons why your external storage device might not be recognized, and we’ll guide you through the most common causes and effective solutions to get your external hard drive working again, covering everything from connection issues to file system problems. Learn how to troubleshoot your hard drive, fix the underlying causes, and discover reliable data recovery techniques.
1. Basic Checks: Why My Mac Isn’t Recognizing My External Hard Drive?
Before diving into more complex solutions, let’s start with some basic checks to ensure the issue isn’t something simple.
1.1. Check the Physical Connection
- Cable: The USB cable might be faulty. Try a different USB cable to rule this out.
- Port: The USB port on your Mac might be malfunctioning. Try connecting the hard drive to a different USB port.
- Adapter: If you’re using a USB-C adapter, make sure it’s properly connected and functioning. Try a different adapter if possible.
1.2. Check Power Supply
- External Power: Some external hard drives require an external power source. Ensure the drive is properly connected to a power outlet and that the power adapter is working.
- Insufficient Power: Your Mac might not be providing enough power to the external hard drive. Try connecting it to a powered USB hub or directly to a wall outlet if it has its own power adapter.
1.3. Restart Your Mac
Restarting your Mac can resolve many minor software glitches that might be preventing the hard drive from being recognized.
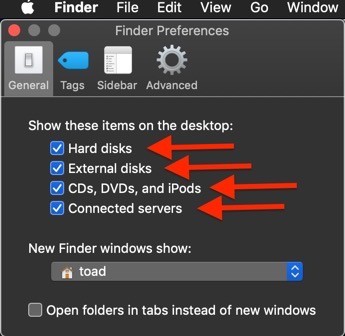
1.4. Check Finder Preferences
Finder preferences control what appears on your desktop. If external disks are not set to show, they won’t appear on your desktop even if they are connected.
- Open Finder.
- Go to Finder > Preferences.
- Click on the General tab.
- Make sure the External disks box is checked.
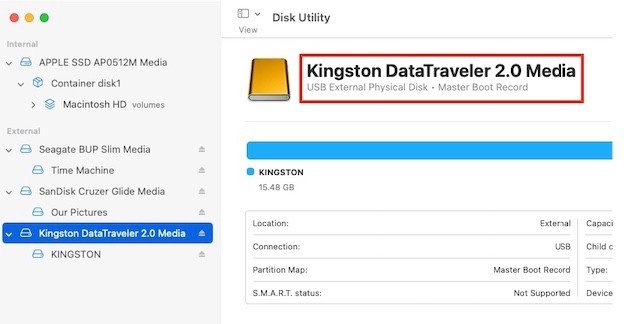
1.5. Check Disk Utility
Disk Utility can often detect a drive even if it’s not mounted.
- Open Disk Utility (Applications > Utilities).
- Check if the external hard drive appears in the left sidebar.
- If it appears but is grayed out, select the drive and click the Mount button at the top.
2. Advanced Troubleshooting: What To Do When Your External Hard Drive Won’t Mount on Mac
If the basic checks didn’t solve the problem, it’s time to move on to more advanced troubleshooting steps.
2.1. Disk Utility First Aid
Disk Utility’s First Aid feature can repair minor file system errors that might be preventing the drive from mounting.
- Open Disk Utility.
- Select the external hard drive from the left sidebar.
- Click First Aid at the top of the window.
- Click Run to start the repair process.
- Follow any on-screen instructions.
2.2. Reset SMC and NVRAM
Resetting the System Management Controller (SMC) and Non-Volatile RAM (NVRAM) can resolve hardware-related issues that might be preventing the drive from being recognized.
2.2.1. Reset SMC
The process for resetting the SMC varies depending on your Mac model:
- For Mac Laptops with Non-Removable Batteries:
- Shut down your Mac.
- Press and hold Control + Option (Alt) + Shift on the left side of the keyboard and the power button at the same time.
- Hold these keys for 10 seconds.
- Release all keys and press the power button to turn on your Mac.
- For Mac Desktops:
- Shut down your Mac and unplug the power cord.
- Wait 15 seconds.
- Plug the power cord back in.
- Wait 5 seconds, then press the power button to turn on your Mac.
2.2.2. Reset NVRAM
- Shut down your Mac.
- Turn on your Mac, then immediately press and hold Option + Command + P + R keys together.
- Hold these keys for about 20 seconds, during which your Mac might appear to restart.
- Release the keys and let your Mac start up normally.
2.3. Check File System Compatibility
The file system of the external hard drive might not be compatible with macOS. Common file systems include:
- APFS (Apple File System): Native to macOS High Sierra and later.
- HFS+ (Mac OS Extended): Older macOS file system.
- FAT32: Compatible with both macOS and Windows, but has a 4GB file size limit.
- exFAT: Compatible with both macOS and Windows and supports larger file sizes.
- NTFS: Primary file system for Windows. macOS can read NTFS drives, but writing to them requires third-party software.
To check the file system:
- Open Disk Utility.
- Select the external hard drive.
- Look for the File System information in the right pane.
If the file system is NTFS and you need to write to the drive, you’ll need to install a third-party NTFS driver for macOS, such as:
- NTFS for Mac by Paragon Software
- Mounty for NTFS
- FUSE for macOS
2.4. Update macOS
An outdated operating system can sometimes cause compatibility issues with external hard drives.
- Go to Apple menu > System Preferences > Software Update.
- Install any available updates.
2.5. Check for Driver Issues
Although macOS usually handles drivers automatically, sometimes a driver issue can prevent a hard drive from being recognized. This is more common with older drives or drives that require specific drivers. Check the manufacturer’s website for any driver updates.
3. Data Recovery: What If Your Mac Still Doesn’t Recognize Your Hard Drive?
If you’ve tried all the troubleshooting steps and your hard drive still isn’t showing up, the next step is to consider data recovery. This is especially important if the drive contains important files.
3.1. Data Recovery Software
Several data recovery software options can help you retrieve files from a failing or unreadable hard drive. Some popular choices include:
- EaseUS Data Recovery Wizard for Mac
- Disk Drill for Mac
- Stellar Data Recovery for Mac
- iBoysoft Data Recovery for Mac
- Recoverit Data Recovery for Mac
Here’s how to use data recovery software in general:
- Download and install the data recovery software on your Mac.
- Connect the problematic external hard drive to your Mac.
- Launch the data recovery software and select the external hard drive as the target drive.
- Start the scanning process. The software will scan the drive for recoverable files.
- Preview the recoverable files.
- Select the files you want to recover and choose a safe location to save them (ideally on a different drive).
- Start the recovery process.
Note: Data recovery software is not always guaranteed to recover all files, especially if the drive has severe physical damage or has been overwritten.
3.2. Professional Data Recovery Services
If the data on the drive is critical and the data recovery software doesn’t work, consider using a professional data recovery service. These services have specialized tools and expertise to recover data from severely damaged drives. Some well-known data recovery services include:
- DriveSavers
- Ontrack Data Recovery
- Secure Data Recovery
Professional data recovery can be expensive, but it might be the only option if the data is irreplaceable.
3.3. DIY Data Recovery Tips
While professional help is often the best course, here are a few DIY tips to try before seeking expert assistance. These are more suited for drives that are recognized but have trouble mounting or reading files:
- Chkdsk Utility (for Windows-formatted drives): If the drive is formatted in NTFS, you can connect it to a Windows computer and run the Chkdsk utility to attempt to repair file system errors.
- ddrescue (for advanced users): ddrescue is a command-line tool that can copy data from a failing drive to a new drive, skipping over bad sectors. This can be a good way to create a disk image for further analysis or recovery attempts.
Warning: DIY data recovery can be risky, and if done incorrectly, it could cause further damage to the drive and make data recovery more difficult or impossible. Proceed with caution and only if you’re comfortable with the technical aspects.
4. Preventative Measures: How To Keep Your Hard Drive Healthy
Prevention is always better than cure. Here are some tips to help keep your external hard drive healthy and avoid data loss:
4.1. Safely Eject the Drive
Always properly eject the external hard drive before disconnecting it from your Mac. Drag the drive icon to the Trash or right-click on the icon and select “Eject.” This prevents data corruption and file system errors.
4.2. Regular Backups
Regularly back up your data to another storage device or cloud service. This ensures that you have a copy of your files in case the hard drive fails.
4.3. Keep the Drive Clean and Cool
Keep the external hard drive in a clean and cool environment. Avoid exposing it to extreme temperatures, humidity, or dust.
4.4. Avoid Physical Shocks
Handle the external hard drive with care. Avoid dropping it or subjecting it to physical shocks, as this can damage the internal components.
4.5. Run Disk Utility Regularly
Periodically run Disk Utility’s First Aid feature to check for and repair any file system errors.
4.6. Monitor Drive Health
Use a disk monitoring utility to keep an eye on the health of the external hard drive. These utilities can alert you to potential problems before they cause data loss. Some options include:
- DriveDx
- SMART Utility
- Disk Health
5. Common Scenarios and Solutions: What To Do When Your Hard Drive Fails
Here are some common scenarios and solutions related to external hard drive issues on Macs:
5.1. New Hard Drive Not Showing Up
If you’ve just purchased a new external hard drive and it’s not showing up, it might need to be initialized and formatted.
- Open Disk Utility.
- Select the new hard drive from the left sidebar.
- Click the Erase button at the top of the window.
- Give the drive a name.
- Choose a file system format (APFS or exFAT are good choices).
- Click Erase to format the drive.
5.2. Hard Drive Shows Up But Can’t Be Opened
If the hard drive shows up but you can’t open it, it might have file system corruption or permission issues.
- Run First Aid in Disk Utility.
- If that doesn’t work, try repairing permissions:
- Select the drive in Finder.
- Go to File > Get Info.
- Scroll to the bottom and click the lock icon to unlock it.
- Enter your administrator password.
- Check the Ignore ownership on this volume box.
5.3. Intermittent Connectivity
If the hard drive connects and disconnects intermittently, it might be a problem with the USB cable, port, or power supply. Try the following:
- Use a different USB cable.
- Try a different USB port.
- Connect the drive to a powered USB hub or directly to a wall outlet if it has its own power adapter.
- Reset the SMC and NVRAM.
5.4. Hard Drive Making Clicking Noises
Clicking noises are often a sign of a failing hard drive. Back up your data immediately and consider replacing the drive.
5.5. Drive Not Recognized After macOS Update
Sometimes a macOS update can cause compatibility issues with external hard drives. Try the following:
- Check for macOS updates.
- Check the hard drive manufacturer’s website for driver updates.
- Reset the SMC and NVRAM.
- Try connecting the drive to a different Mac to see if it’s recognized.
6. Understanding Hard Drive Formats: APFS vs. Mac OS Extended vs. ExFAT
Choosing the right format for your external hard drive is crucial for compatibility and performance. Here’s a quick comparison of the most common formats:
| Feature | APFS (Apple File System) | Mac OS Extended (HFS+) | exFAT (Extended FAT) | NTFS (New Technology File System) |
|---|---|---|---|---|
| Compatibility | macOS 10.13 and later | macOS 10.12 and earlier | macOS, Windows | Windows (read-only on macOS) |
| File Size Limit | Virtually unlimited | Virtually unlimited | Virtually unlimited | Virtually unlimited |
| Performance | Optimized for SSDs | Good for HDDs | Good for SSDs/HDDs | Optimized for Windows |
| Journaling | Yes | Yes | No | Yes |
| Encryption | Yes | Yes | No | Yes |
| Best Use Case | macOS-only drives | Older macOS drives | Cross-platform drives | Windows-centric drives |
6.1. APFS (Apple File System)
APFS is the modern file system for macOS, introduced with High Sierra (10.13). It’s optimized for SSDs and offers better performance, security, and reliability compared to HFS+. APFS supports features like cloning, snapshots, and strong encryption.
6.2. Mac OS Extended (HFS+)
HFS+ is the older file system used by macOS before High Sierra. While it still works, it’s not as efficient as APFS, especially on SSDs. HFS+ is a good choice if you need to maintain compatibility with older macOS versions.
6.3. exFAT (Extended FAT)
exFAT is a cross-platform file system that’s compatible with both macOS and Windows. It doesn’t have the 4GB file size limit of FAT32 and is a good choice for external hard drives that you need to use with both operating systems. However, exFAT doesn’t support journaling or encryption.
6.4. NTFS (New Technology File System)
NTFS is the primary file system for Windows. macOS can read NTFS drives, but writing to them requires third-party software. If you primarily use Windows and occasionally need to access the drive on a Mac, NTFS might be a good choice.
7. Third-Party Software Conflicts: Troubleshooting External Drive Issues
Sometimes, third-party software installed on your Mac can interfere with the proper functioning of external hard drives. Identifying and resolving these conflicts can help your Mac recognize and mount your drives correctly.
7.1. Identify Potential Conflicts
Consider recently installed or updated software, especially those that interact with storage devices or the file system. Common culprits include:
- Antivirus Software: Some antivirus programs can aggressively scan external drives, preventing them from mounting correctly.
- Backup Utilities: Backup software might lock access to the drive while performing backups, causing mounting issues.
- Disk Management Tools: Utilities that manage or modify disk partitions can sometimes cause conflicts.
- Cloud Storage Sync Clients: Services like Dropbox, Google Drive, or OneDrive might attempt to sync with the external drive, leading to conflicts.
- Virtualization Software: Programs like VMware or Parallels can sometimes interfere with external drive detection.
7.2. Temporarily Disable Software
To determine if a specific program is causing the problem, temporarily disable it and see if the external drive mounts correctly. Here’s how:
- Quit the Application: Fully quit the application from the menu bar or Activity Monitor.
- Disable Startup Items: Prevent the application from launching automatically at startup by going to System Preferences > Users & Groups > Login Items and removing the application from the list.
- Uninstall the Software: If disabling the software resolves the issue, consider uninstalling it altogether or contacting the software vendor for support.
7.3. Safe Mode
Starting your Mac in Safe Mode can help you identify software conflicts. Safe Mode loads only essential system components, preventing third-party software from running at startup.
- Start in Safe Mode: Restart your Mac and immediately press and hold the Shift key until the Apple logo appears.
- Test the External Drive: Once in Safe Mode, connect the external drive and see if it mounts correctly.
- Restart Normally: If the drive works in Safe Mode, restart your Mac normally and troubleshoot the software conflicts.
7.4. Check System Logs
System logs can provide valuable information about software conflicts and other issues that might be preventing your external drive from mounting.
- Open Console: Launch the Console application from /Applications/Utilities.
- Filter for Errors: Use the search bar to filter for errors related to the external drive or specific software.
- Analyze Logs: Review the logs for clues about the cause of the problem.
7.5. Reinstall macOS
As a last resort, reinstalling macOS can resolve persistent software conflicts and other system-level issues.
- Back Up Your Data: Before reinstalling macOS, back up all your important files.
- Reinstall macOS: Follow Apple’s instructions to reinstall macOS from Recovery Mode.
- Test the External Drive: After reinstalling macOS, connect the external drive and see if it mounts correctly.
8. Addressing Specific Error Messages: Decoding Mac’s Hard Drive Warnings
When your Mac encounters issues with an external hard drive, it often displays error messages that can provide valuable clues about the nature of the problem. Understanding these error messages is key to troubleshooting effectively.
8.1. “Disk Not Ejected Properly”
This error message appears when you disconnect an external hard drive without properly ejecting it first. While it doesn’t always indicate a serious issue, it can lead to data corruption over time.
Solution: Always eject the drive by dragging its icon to the Trash or right-clicking and selecting “Eject” before disconnecting it.
8.2. “The Disk You Inserted Was Not Readable by This Computer”
This error message indicates that macOS can’t recognize the file system of the external hard drive. This can happen if the drive is formatted with a file system that macOS doesn’t support, such as NTFS without a third-party driver.
Solution:
- Check the File System: Use Disk Utility to determine the file system of the drive.
- Install Necessary Drivers: If the drive is formatted with NTFS, install an NTFS driver for macOS.
- Format the Drive: If the drive doesn’t contain important data, you can format it with a file system that macOS supports, such as APFS or exFAT.
8.3. “Disk Utility Can’t Repair This Disk”
This error message appears when Disk Utility’s First Aid feature is unable to repair file system errors on the external hard drive. This can indicate more serious problems, such as physical damage or severe corruption.
Solution:
- Try Data Recovery Software: Use data recovery software to attempt to retrieve files from the drive.
- Seek Professional Help: If data recovery software doesn’t work, consider using a professional data recovery service.
8.4. “The Operation Couldn’t Be Completed. (com.apple.DiskManagement.disenter error 0.)”
This error message often appears when macOS is unable to mount the external hard drive. It can be caused by various issues, such as file system corruption, driver problems, or hardware failures.
Solution:
- Try Mounting Manually: Open Disk Utility and try to mount the drive manually.
- Reset SMC and NVRAM: Reset the SMC and NVRAM.
- Check for Driver Issues: Check the hard drive manufacturer’s website for driver updates.
- Try Data Recovery Software: Use data recovery software to attempt to retrieve files from the drive.
8.5. “Resource Busy”
The “Resource Busy” error message indicates that another process is currently using the external hard drive, preventing macOS from accessing it.
Solution:
- Identify Conflicting Processes: Use Activity Monitor to identify processes that might be using the drive.
- Quit Conflicting Processes: Quit any unnecessary applications or processes that might be accessing the drive.
- Restart Your Mac: Restart your Mac to clear any lingering processes.
9. USB-C and Thunderbolt Issues: Why Your New Mac Isn’t Cooperating
If you’re using a newer Mac with USB-C or Thunderbolt ports, you might encounter specific issues when connecting external hard drives. Here’s how to troubleshoot them:
9.1. Check the USB-C/Thunderbolt Cable
Make sure you’re using a high-quality USB-C or Thunderbolt cable that supports data transfer. Some USB-C cables are only designed for charging and won’t work with external hard drives.
9.2. Try a Different USB-C/Thunderbolt Port
Some USB-C/Thunderbolt ports on your Mac might have different capabilities. Try connecting the external hard drive to a different port.
9.3. Use a USB-C/Thunderbolt Adapter
If your external hard drive has a USB-A connector, you’ll need to use a USB-C/Thunderbolt adapter. Make sure the adapter supports data transfer and is compatible with your Mac.
9.4. Check the Power Delivery
Some external hard drives require more power than a USB-C/Thunderbolt port can provide. Try using a powered USB hub or connecting the drive to a wall outlet if it has its own power adapter.
9.5. Update macOS
An outdated operating system can sometimes cause compatibility issues with USB-C/Thunderbolt devices.
9.6. Reset the SMC and NVRAM
Resetting the SMC and NVRAM can resolve hardware-related issues that might be preventing the drive from being recognized.
10. FAQ: Common Questions About External Hard Drives on Mac
10.1. Why is my external hard drive not showing up in Finder?
Make sure the “External disks” box is checked in Finder Preferences (Finder > Preferences > General).
10.2. How do I safely eject an external hard drive on a Mac?
Drag the drive icon to the Trash or right-click on the icon and select “Eject.”
10.3. What file system should I use for an external hard drive on a Mac?
APFS is the best choice for macOS-only drives, while exFAT is a good choice for cross-platform drives.
10.4. How do I format an external hard drive on a Mac?
Open Disk Utility, select the drive, click “Erase,” and choose a file system format.
10.5. How do I recover data from a failing external hard drive on a Mac?
Use data recovery software or seek professional data recovery services.
10.6. What does “Disk Utility can’t repair this disk” mean?
It means that Disk Utility is unable to repair file system errors on the drive, which might indicate a more serious problem.
10.7. How do I reset the SMC and NVRAM on a Mac?
The process varies depending on your Mac model. See the instructions in Section 2.2.
10.8. Why is my USB-C external hard drive not working on my Mac?
Make sure you’re using a high-quality USB-C cable, try a different port, and check the power delivery.
10.9. Can I use an NTFS-formatted external hard drive on a Mac?
Yes, but you’ll need to install a third-party NTFS driver for macOS to write to the drive.
10.10. How often should I back up my data?
Regularly, ideally daily or weekly, depending on how frequently you change your files.
Experiencing issues with your hard drive can be stressful, but remember that WHY.EDU.VN is here to support you. We provide detailed answers and expert insights to help you resolve any tech-related question. If you’re still facing problems or have further questions, don’t hesitate to reach out to our community of experts.
Do you have more questions about hard drive issues or other tech topics? Visit why.edu.vn at 101 Curiosity Lane, Answer Town, CA 90210, United States, or contact us via Whatsapp at +1 (213) 555-0101. Let our experts guide you to the answers you need.