Why Is My Flash Not Working On My Iphone? If your iPhone’s flash isn’t cooperating, it can be frustrating, especially when you need that extra light for a perfect shot. This comprehensive guide from WHY.EDU.VN delves into the common reasons behind a malfunctioning iPhone flash and provides detailed troubleshooting steps to get it working again. Whether it’s a simple settings adjustment or a more complex hardware issue, we’ll help you diagnose the problem and find a solution. Learn about flash settings, hardware checks, and software solutions, including LSI keywords like camera flash problems and iPhone photography tips.
1. Understanding the Basics of iPhone Flash
Before diving into troubleshooting, let’s understand how your iPhone’s flash works. The flash is a small but powerful light source designed to illuminate your subjects in low-light conditions. It’s controlled by software and hardware, and various settings can affect its performance. Understanding these basics is crucial for effective troubleshooting and problem-solving.
1.1 The iPhone Flash: An Overview
The iPhone flash is more than just a simple light. It’s a sophisticated component integrated into the camera system. It synchronizes with the camera’s shutter speed and aperture to provide the right amount of light for a well-exposed photo. Different iPhone models may have different types of flash, such as True Tone flash, which adjusts the color temperature for more natural-looking photos.
1.2 Key Settings That Control the Flash
Several settings on your iPhone control the flash. These include:
- Flash Mode: Auto, On, or Off.
- True Tone Flash: Adjusts color temperature.
- Night Mode: Affects flash behavior in low light.
Knowing how to adjust these settings is the first step in troubleshooting flash issues. Understanding the function of these settings can help you manage your iPhone photography more efficiently.
2. Common Reasons Why Your iPhone Flash Might Not Work
There are many reasons the flash might not be working on your iPhone. These can range from software glitches to hardware problems. Identifying the cause is essential to finding the right solution.
2.1 Software Glitches and Bugs
Sometimes, the problem isn’t with the hardware but with the software. A temporary glitch or bug in the iOS can cause the flash to malfunction. These issues can often be resolved with a simple restart or software update. According to Apple Support, keeping your iOS updated is essential for optimal performance.
2.2 Incorrect Flash Settings
The most common reason for a non-working flash is incorrect settings. Make sure the flash is set to “On” or “Auto.” If it’s set to “Off,” the flash won’t fire, even in low light.
2.3 Overheating
iPhones can overheat, especially when used for extended periods or in hot environments. When an iPhone overheats, some functions, including the flash, may be disabled to protect the device. Let your iPhone cool down before trying to use the flash again.
2.4 Low Battery
If your iPhone’s battery is critically low, the flash might not work. This is because the flash requires a significant amount of power to operate. Charge your iPhone and try again. Apple recommends keeping your battery charged above 20% for optimal performance.
2.5 Camera App Issues
The problem might be specific to the Camera app. Closing and reopening the app, or even resetting the app’s settings, can sometimes resolve the issue.
2.6 Third-Party App Conflicts
Some third-party apps can interfere with the Camera app and cause the flash to malfunction. If you’ve recently installed a new app, try uninstalling it to see if that resolves the problem.
2.7 Hardware Damage
In some cases, the flash might not work due to hardware damage. This could be due to a drop, water damage, or other physical trauma. If you suspect hardware damage, it’s best to take your iPhone to a professional for repair.
3. Step-by-Step Troubleshooting Guide
When your iPhone flash is not working, there are several troubleshooting steps you can take to diagnose and fix the problem. This section provides a detailed, step-by-step guide to help you resolve common flash issues.
3.1 Check the Flash Settings
The first and most basic step is to check your flash settings.
- Open the Camera app.
- Look for the flash icon at the top left corner of the screen.
- Tap the icon to cycle through the flash modes: Auto, On, and Off.
- Select On to force the flash to fire, or Auto to let the iPhone decide when to use the flash.
 iPhone Flash Settings
3.2 Restart Your iPhone
Restarting your iPhone can resolve many software glitches.
- Press and hold the power button and either volume button until the power-off slider appears.
- Drag the slider to turn off your iPhone.
- Wait for about 30 seconds.
- Press and hold the power button again until you see the Apple logo.
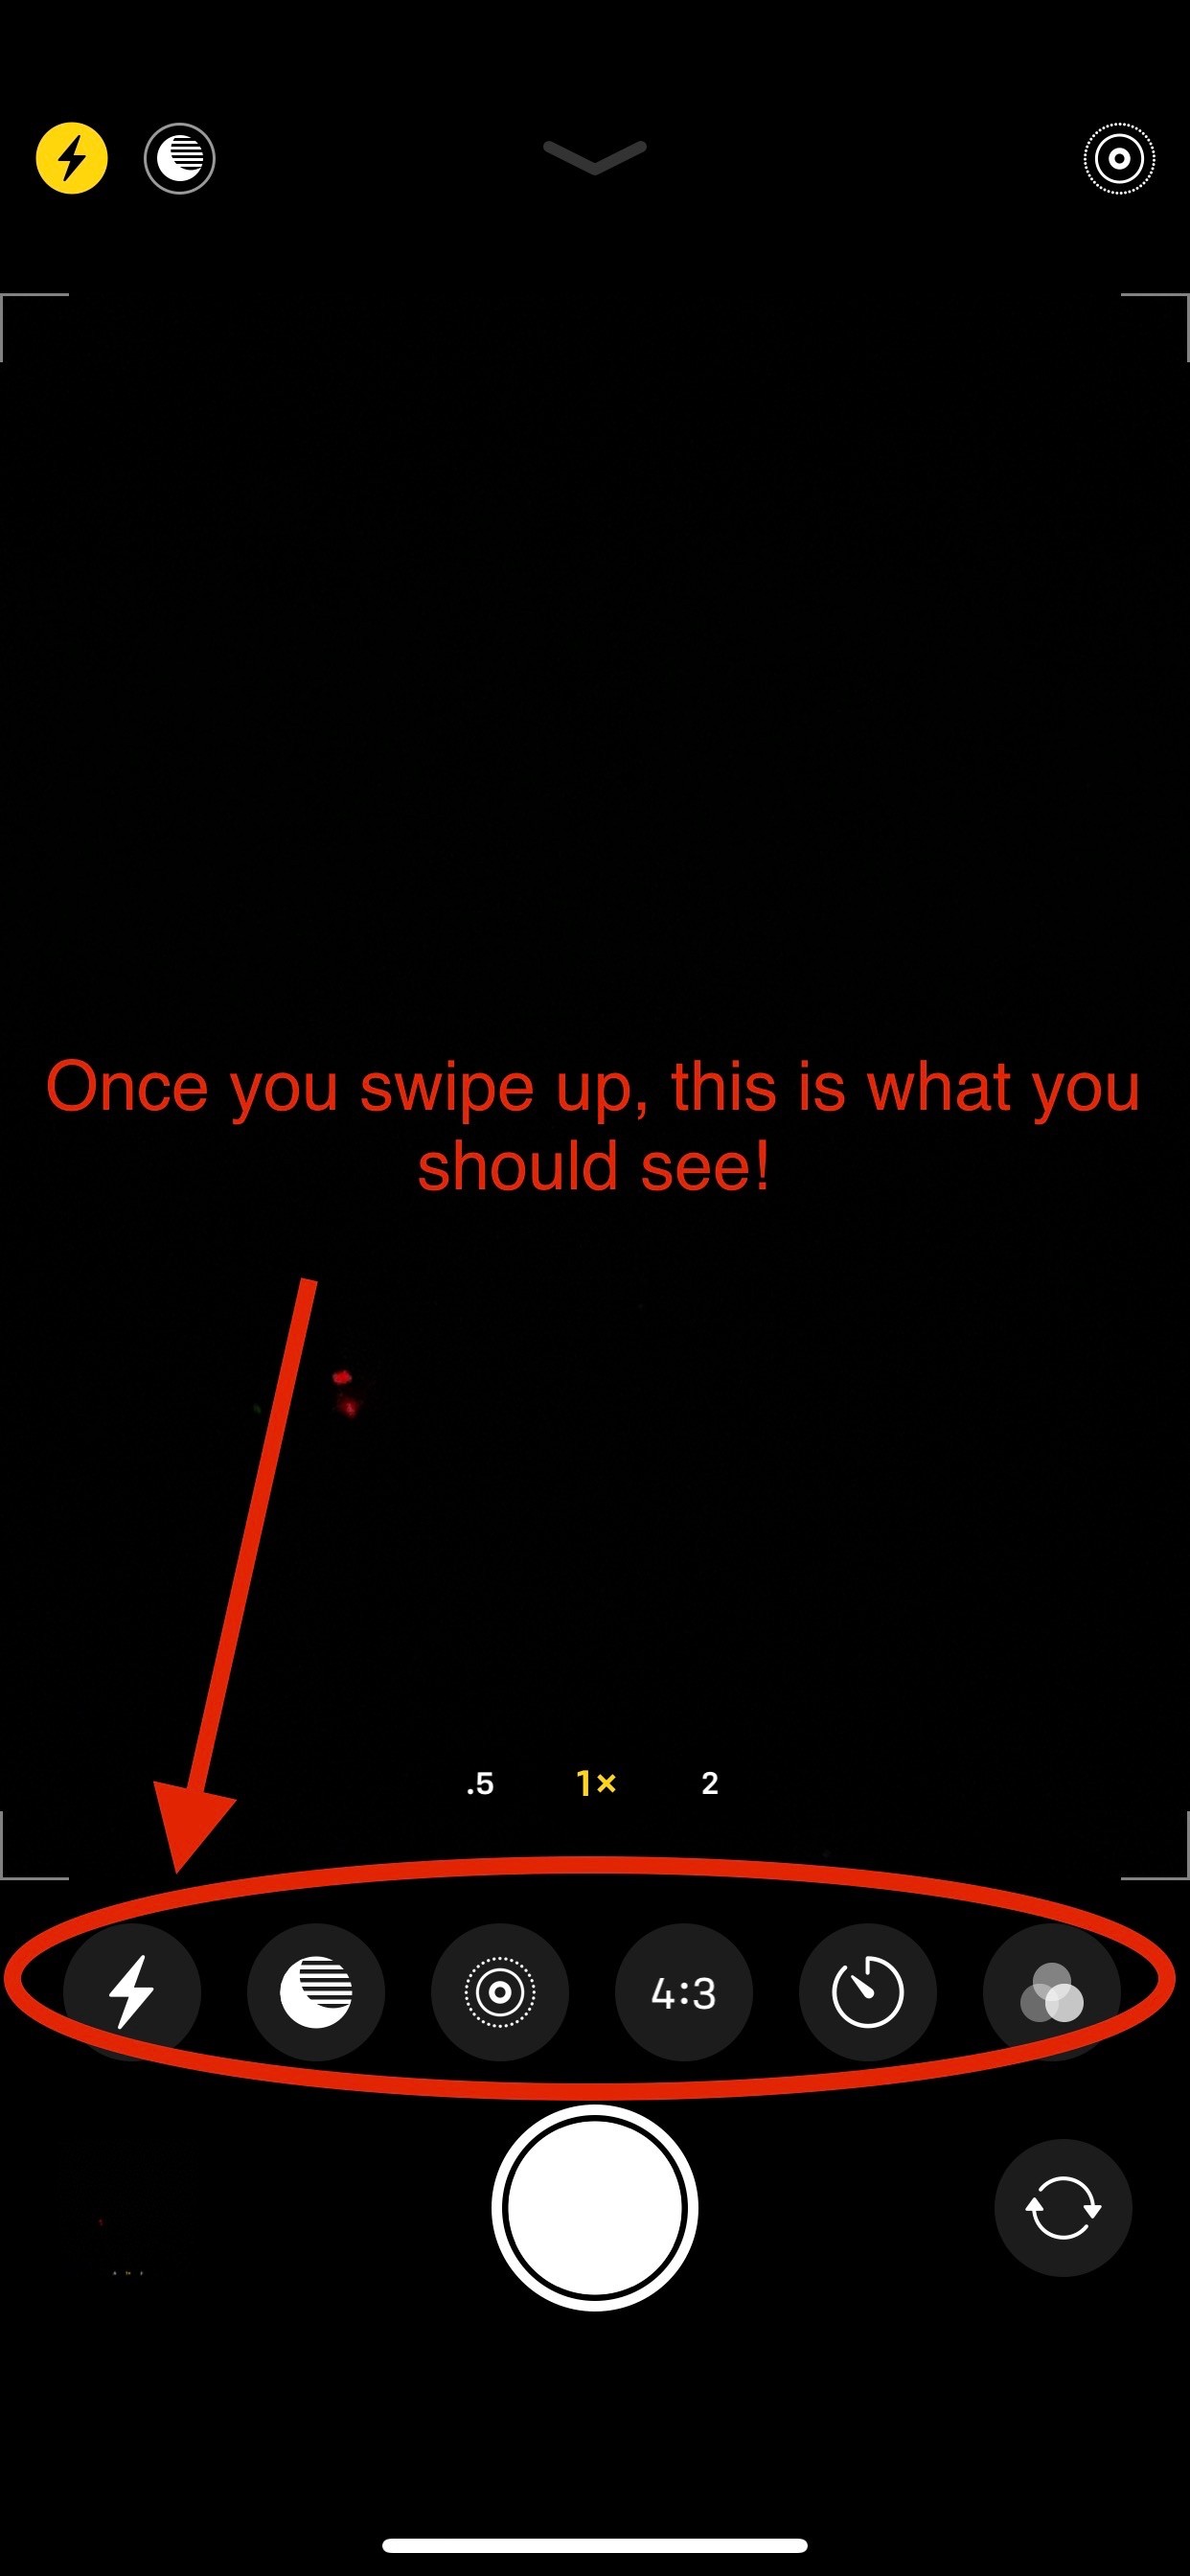
3.3 Close and Reopen the Camera App
Sometimes, simply closing and reopening the Camera app can fix the problem.
- Swipe up from the bottom of the screen (or double-press the Home button on older models) to open the App Switcher.
- Swipe up on the Camera app preview to close it.
- Reopen the Camera app.
3.4 Update to the Latest iOS Version
Keeping your iPhone’s software up to date ensures you have the latest bug fixes and improvements.
- Go to Settings > General > Software Update.
- If an update is available, tap Download and Install.
- Follow the on-screen instructions.
3.5 Check for Overheating
If your iPhone feels hot to the touch, it might be overheating.
- Turn off your iPhone.
- Remove any case that might be trapping heat.
- Move your iPhone to a cooler environment.
- Wait for it to cool down before turning it back on.
3.6 Reset All Settings
Resetting all settings can resolve conflicts without deleting your data.
- Go to Settings > General > Transfer or Reset iPhone.
- Tap Reset > Reset All Settings.
- Enter your passcode if prompted.
3.7 Restore Your iPhone to Factory Settings
As a last resort, you can restore your iPhone to factory settings. This will erase all data, so make sure to back up your iPhone first.
- Go to Settings > General > Transfer or Reset iPhone.
- Tap Erase All Content and Settings.
- Follow the on-screen instructions.
4. Advanced Troubleshooting Techniques
If the basic troubleshooting steps don’t work, you might need to try some advanced techniques. These steps are more technical and should be performed with caution.
4.1 DFU Restore
A DFU (Device Firmware Update) restore is a more thorough restore that can resolve deeper software issues.
- Connect your iPhone to your computer.
- Open Finder on macOS or iTunes on Windows.
- Put your iPhone into DFU mode (the process varies depending on your iPhone model; search online for specific instructions).
- Follow the on-screen instructions to restore your iPhone.
4.2 Checking Hardware
Visually inspect the flash module for any signs of damage. If you see any cracks or other damage, it’s likely a hardware issue that requires professional repair.
4.3 Using Diagnostic Tools
Apple has diagnostic tools that can help identify hardware issues. You’ll need to take your iPhone to an Apple Store or authorized service provider to run these tests.
5. When to Seek Professional Help
If you’ve tried all the troubleshooting steps and your iPhone flash still isn’t working, it’s time to seek professional help. Hardware issues, such as a damaged flash module, often require specialized tools and expertise to repair.
5.1 Identifying Hardware Problems
Common signs of hardware problems include:
- Visible damage to the flash module.
- The flash doesn’t fire at all, even when set to “On.”
- The flash is dim or inconsistent.
5.2 Finding an Authorized Repair Service
To ensure quality repairs, it’s best to take your iPhone to an Apple Store or an authorized service provider. You can find a list of authorized service providers on Apple’s website.
5.3 Estimating Repair Costs
Repair costs can vary depending on the type of damage and your iPhone model. Contact the repair service for an estimate before proceeding with the repair.
6. Tips to Prevent Flash Problems in the Future
Preventing flash problems is better than having to fix them. Here are some tips to keep your iPhone flash working properly.
6.1 Keep Your iPhone Cool
Avoid using your iPhone in hot environments for extended periods. Overheating can damage the flash module and other components.
6.2 Protect Your iPhone from Physical Damage
Use a protective case and screen protector to prevent damage from drops and impacts.
6.3 Keep Your Software Up to Date
Regularly update your iPhone’s software to ensure you have the latest bug fixes and improvements.
6.4 Avoid Third-Party Camera Apps
Stick to the stock Camera app whenever possible. Some third-party apps can cause conflicts and lead to flash problems.
7. Understanding iPhone Camera Modes and Flash Behavior
Different camera modes on your iPhone can affect how the flash behaves. Understanding these modes can help you use the flash more effectively and avoid unexpected issues.
7.1 Portrait Mode
In Portrait mode, the flash might not fire in certain lighting conditions. This is because Portrait mode is designed to create a shallow depth of field, and the flash can sometimes interfere with this effect.
7.2 Night Mode
Night mode automatically adjusts the camera settings for low-light conditions. In some cases, it might disable the flash to capture more natural-looking photos.
7.3 Video Recording
The flash can be used as a continuous light source when recording videos. However, using the flash for extended periods can cause the iPhone to overheat.
8. Exploring Third-Party Apps for Flash Control
If you’re not satisfied with the built-in flash controls, several third-party apps offer more advanced options.
8.1 Features to Look For
When choosing a third-party camera app, look for features like:
- Manual flash intensity control.
- Adjustable color temperature.
- Flash modes for different scenarios.
8.2 Recommended Apps
Some popular third-party camera apps include:
- ProCamera
- Halide Camera
- Camera+ 2
9. iPhone Flash Alternatives
If your iPhone flash is consistently not working, there are alternatives you can use to improve your photos in low-light conditions.
9.1 Using External Lights
External lights, such as LED panels or ring lights, can provide more consistent and powerful illumination than the built-in flash.
9.2 Adjusting Exposure Settings
Manually adjusting the exposure settings in the Camera app can help brighten your photos without using the flash.
9.3 Utilizing Reflectors
Reflectors can bounce available light onto your subject, creating a softer and more natural look than direct flash.
10. DIY iPhone Flash Hacks
If you’re feeling adventurous, there are some DIY hacks you can try to improve your iPhone flash.
10.1 Diffusing the Flash
Covering the flash with a piece of tissue or parchment paper can diffuse the light, creating a softer and more flattering effect.
10.2 Creating a Makeshift Reflector
Using a piece of white cardboard or aluminum foil as a reflector can bounce available light onto your subject.
11. Case Studies: Real-World Flash Problems and Solutions
To illustrate common flash problems and their solutions, here are some real-world case studies.
11.1 The Case of the Dim Flash
Problem: An iPhone user reported that their flash was very dim, even when set to “On.”
Solution: The user cleaned the flash module with a soft cloth, removing a layer of dirt and grime that was blocking the light.
11.2 The Case of the Randomly Failing Flash
Problem: An iPhone user reported that their flash would randomly fail to fire.
Solution: The user discovered that a third-party app was interfering with the Camera app. Uninstalling the app resolved the problem.
12. The Future of iPhone Flash Technology
iPhone flash technology is constantly evolving. Apple is always working on new ways to improve the flash and camera system.
12.1 Advancements in True Tone Flash
The True Tone flash has been improved over the years to provide more accurate color temperature and better lighting in various conditions.
12.2 Integration with Computational Photography
Apple is increasingly integrating the flash with computational photography techniques to create better photos in low light.
13. Flash Not Working on iPhone: User Experiences and Community Insights
Looking at user experiences and community insights can provide additional perspectives and solutions for flash problems.
13.1 Common User Complaints
Some common user complaints about the iPhone flash include:
- The flash is too harsh.
- The flash washes out colors.
- The flash doesn’t work in certain modes.
13.2 Community Solutions
Some community-suggested solutions include:
- Using a flash diffuser.
- Adjusting exposure settings manually.
- Using third-party camera apps.
14. Why Flash Photography Matters on iPhones
Despite advancements in low-light photography, flash photography still matters on iPhones for several reasons.
14.1 Freezing Motion
The flash can freeze motion, capturing sharp photos of moving subjects in low light.
14.2 Adding Fill Light
The flash can add fill light to brighten shadows and improve the overall exposure of your photos.
14.3 Creating Special Effects
The flash can be used creatively to create special effects, such as light trails or silhouettes.
15. Understanding the iPhone Camera App Interface
Navigating the iPhone Camera app interface is essential for using the flash effectively. Here’s a breakdown of the key elements:
15.1 Flash Icon
The flash icon, typically located in the top-left corner of the screen, allows you to toggle between Auto, On, and Off modes.
15.2 Live Photos Button
The Live Photos button captures a few seconds of video along with your photo, which can affect flash behavior.
15.3 Camera Modes
Different camera modes, such as Photo, Video, Portrait, and Panorama, can affect how the flash works.
16. How iPhone Flash Interacts with Smart HDR
Smart HDR is an iPhone feature that combines multiple exposures to create a photo with better dynamic range. Here’s how it interacts with the flash:
16.1 Balancing Highlights and Shadows
Smart HDR works with the flash to balance highlights and shadows, creating a more evenly exposed photo.
16.2 Reducing Noise
Smart HDR can reduce noise in low-light photos taken with the flash.
16.3 Enhancing Details
Smart HDR enhances details in both bright and dark areas of the photo.
17. iPhone Flash and Third-Party Accessories
Using third-party accessories can enhance your iPhone flash photography experience.
17.1 Flash Diffusers
Flash diffusers soften the light from the flash, reducing harsh shadows and creating a more flattering effect.
17.2 External Flashes
External flashes provide more power and control than the built-in flash.
17.3 Reflectors
Reflectors bounce available light onto your subject, creating a softer and more natural look.
18. iPhone Flash: Frequently Asked Questions
Here are some frequently asked questions about the iPhone flash:
18.1 Why is my flash grayed out?
The flash might be grayed out if the iPhone is overheating, the battery is low, or if the flash is disabled in certain modes.
18.2 How do I turn on the flash for video recording?
To turn on the flash for video recording, open the Camera app, switch to Video mode, and tap the flash icon to select “On.”
18.3 Why does my flash look yellow?
The True Tone flash adjusts the color temperature to match the ambient light, which can sometimes result in a yellow tint.
18.4 How do I fix a blurry flash photo?
To fix a blurry flash photo, try holding the iPhone steady, using a tripod, or increasing the shutter speed.
18.5 Can I adjust the intensity of the flash?
Some third-party camera apps allow you to adjust the intensity of the flash.
18.6 Why does my flash not sync with the camera?
If the flash is not syncing with the camera, try restarting your iPhone or resetting the Camera app settings.
18.7 Is there a way to disable the flash completely?
Yes, you can disable the flash by setting it to “Off” in the Camera app.
18.8 How does Night mode affect the flash?
Night mode automatically adjusts the camera settings for low-light conditions and may disable the flash in some cases.
18.9 Can water damage affect the flash?
Yes, water damage can affect the flash and other components of the iPhone.
18.10 What should I do if my flash is flickering?
If your flash is flickering, try restarting your iPhone or restoring it to factory settings. If the problem persists, it might be a hardware issue.
19. Conclusion: Mastering Your iPhone Flash
Mastering your iPhone flash involves understanding its capabilities, troubleshooting common issues, and using it creatively to capture better photos. Whether it’s adjusting settings, seeking professional help, or exploring third-party apps, there are many ways to get the most out of your iPhone flash.
20. Need More Answers? Ask WHY.EDU.VN
Still have questions about your iPhone flash or other tech issues? Visit WHY.EDU.VN to ask questions and get answers from experts. We provide detailed, easy-to-understand explanations and connect you with professionals who can help resolve your tech problems.
At WHY.EDU.VN, we understand the frustration of dealing with tech issues. That’s why we’re dedicated to providing reliable, expert answers to all your questions. Our platform offers a wealth of information, covering everything from iPhone troubleshooting to advanced tech topics.
If you’re still experiencing issues with your iPhone flash, don’t hesitate to reach out. Our team of experts is here to help you diagnose the problem and find the best solution. Whether it’s a software glitch, a hardware malfunction, or simply a setting you need to adjust, we’ve got you covered.
Visit WHY.EDU.VN today to ask your questions and get the answers you need. Our community of experts is ready to assist you with any tech issue, big or small. We’re committed to providing accurate, reliable, and easy-to-understand information to help you make the most of your technology.
Don’t let tech problems slow you down. Trust WHY.EDU.VN to provide the answers you need to stay connected and productive. Our comprehensive resources and expert advice are just a click away.
Contact Us:
- Address: 101 Curiosity Lane, Answer Town, CA 90210, United States
- WhatsApp: +1 (213) 555-0101
- Website: WHY.EDU.VN
Let why.edu.vn be your go-to source for all your tech questions. We’re here to help you navigate the ever-evolving world of technology with confidence and ease.