Are you asking yourself, “Why Is Apple Charging Me?” You’re not alone. Unexpected charges from Apple can be confusing and frustrating. At why.edu.vn, we’re here to help you understand why these charges might appear and guide you through the steps to investigate and resolve them. Learn about common reasons for Apple billing discrepancies, how to review your purchase history, and ways to prevent future unexpected costs.
1. How Can I View My Apple Purchase History To Identify Charges?
To view your Apple purchase history and identify the source of a charge, follow these steps:
-
Online via reportaproblem.apple.com:
- Go to reportaproblem.apple.com.
- Sign in with your Apple ID and password.
- A list of your purchases will be displayed.
- If you know the charge amount but not the item, search for the amount in your purchase history.
-
On your iPhone:
- Open the App Store app.
- Tap your profile icon or the sign-in button at the top.
- Tap “Purchase History”. You might need to sign in.
- Search for the charge amount if you’re unsure what it’s for.
- Filter purchases by tapping “Last 90 days” to view older transactions.
-
On your iPad:
- Open the App Store app.
- Tap your profile icon or the sign-in button.
- Tap “Purchase History”. Sign in if prompted.
- Search for the charge amount if you’re unsure what it’s for.
- Filter purchases by tapping “Last 90 days” to view older transactions.
-
On your Mac:
- Open the App Store app.
- Click your name at the bottom of the sidebar.
- Click “Account Settings”. You may need to sign in.
- Scroll to “Purchase History” and click “See All”.
- Filter purchases by clicking “Last 90 Days” to view older transactions.
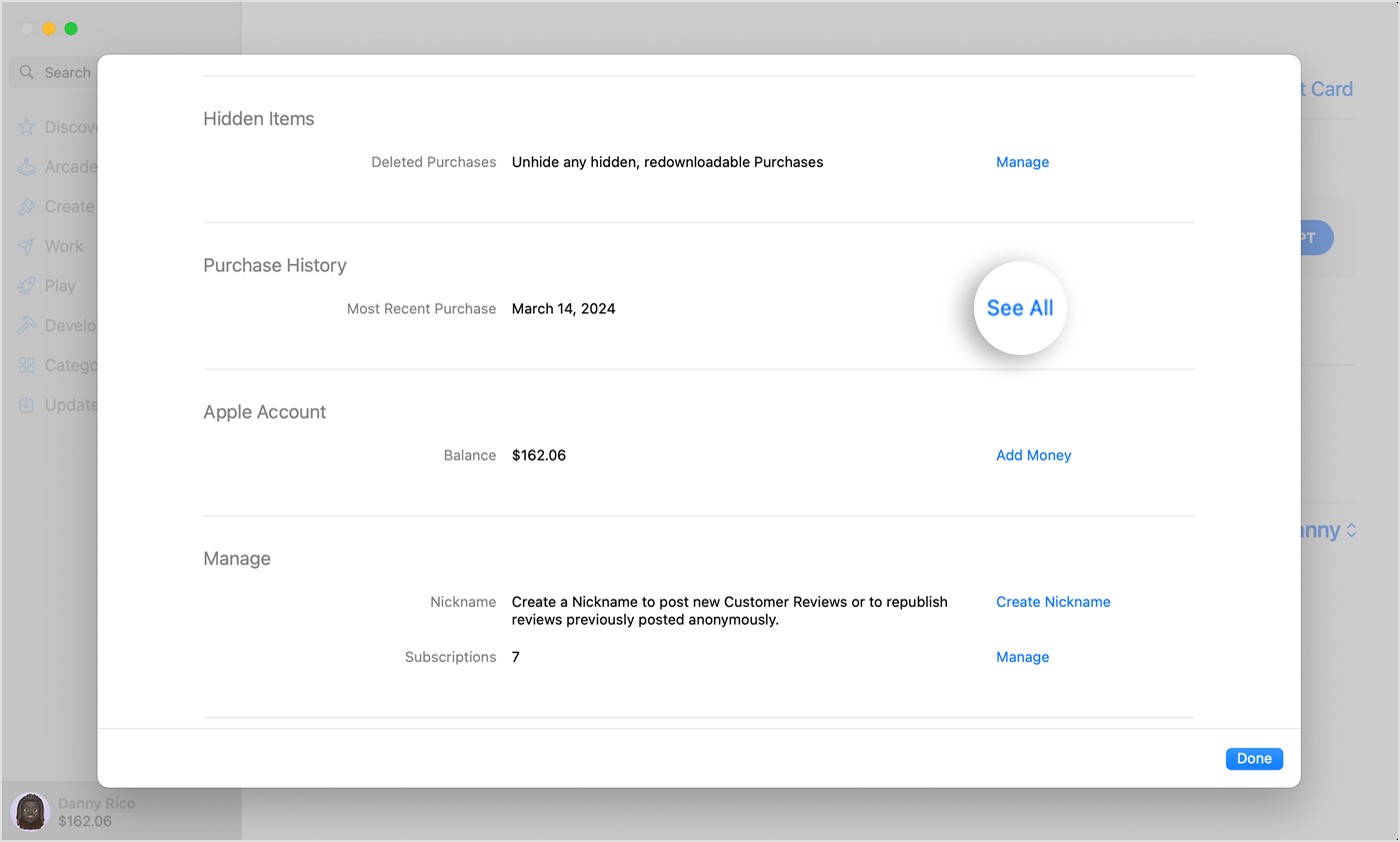 An image showing Account Settings in the App Store on macOS. A button to See All is highlighted.
 -
On your Windows PC:
- Open the Apple Music app or Apple TV app.
- Click your name at the bottom of the sidebar, then choose “View My Account”. Sign in if needed.
- Scroll to the “Purchase History” section and click “See All”.
- Filter purchases by clicking “Last 90 days” to view older transactions.
By reviewing your purchase history using these methods, you can identify the specific item or service you were charged for and better understand why Apple is charging you.
2. What Are Common Reasons For Unexpected Apple Charges?
Unexpected Apple charges can arise from several sources. Here are some of the most common:
- Subscriptions: Many apps and services offer subscriptions that automatically renew.
- In-App Purchases: Games and apps often have in-app purchases that can add up quickly, especially if children have access to the device.
- Family Sharing: If you’re part of a Family Sharing group, purchases made by other family members might be charged to your account.
- Multiple Apple IDs: You might have made a purchase with a different Apple ID and forgotten about it.
- Pending Transactions: Sometimes, a charge might appear as pending and then disappear, only to reappear later.
- Gift Cards: Check if you’ve used a gift card, as charges might resume after the gift card balance is depleted.
- Fraudulent Charges: In rare cases, unauthorized charges might appear due to a compromised account.
Understanding these common reasons can help you narrow down the source of the unexpected charges.
2.1. How Auto-Renewing Subscriptions Lead to Unexpected Charges
Auto-renewing subscriptions are a primary cause of unexpected Apple charges. When you subscribe to an app or service, such as Apple Music, iCloud storage, or various productivity and entertainment apps, the subscription is often set to automatically renew at the end of the billing cycle. This means you’ll be charged again unless you manually cancel the subscription.
Why Auto-Renewal Causes Confusion
- Forgotten Subscriptions: People often forget about subscriptions they signed up for months or years ago.
- Free Trials Converting to Paid Subscriptions: Many apps offer free trials that automatically convert to paid subscriptions if you don’t cancel before the trial period ends.
- Lack of Awareness of Renewal Dates: It’s easy to lose track of when subscriptions are set to renew, leading to unexpected charges on your billing date.
Example of Auto-Renewing Subscriptions
Consider a user who signs up for a free trial of a streaming service. The trial lasts for one month, and the user enjoys the service. However, they forget to cancel the subscription before the trial ends. As a result, they are automatically charged the monthly subscription fee. This charge can be unexpected if the user wasn’t aware of the auto-renewal policy or simply forgot to cancel.
Managing Auto-Renewing Subscriptions
To avoid unexpected charges from auto-renewing subscriptions, it’s essential to manage your subscriptions actively:
- Review Subscriptions Regularly: Check your Apple ID subscriptions regularly to see which ones are active.
- Set Reminders: Set reminders for when free trials are about to end or when subscriptions are due to renew.
- Cancel Unwanted Subscriptions: Cancel any subscriptions you no longer use or want.
By taking these steps, you can stay on top of your subscriptions and prevent unwanted charges.
2.2. The Role of In-App Purchases in Generating Unfamiliar Charges
In-app purchases are another significant source of unexpected Apple charges. Many free-to-download apps, especially games, offer additional content, features, or virtual items for purchase within the app. These purchases can range from small amounts to substantial sums, and they can quickly add up if you’re not careful.
How In-App Purchases Lead to Surprises
- Impulse Buys: The ease of making in-app purchases can lead to impulsive spending, especially in games where virtual currency or items can enhance gameplay.
- Child Spending: If children have access to devices with in-app purchase capabilities, they may unknowingly make purchases that result in unexpected charges.
- Lack of Awareness: Users may not always be fully aware that they are making a real-money purchase within an app.
Examples of In-App Purchases
- Gaming Apps: In a popular mobile game, a player might purchase gems or coins to speed up progress or acquire special items. These purchases can range from a few dollars to hundreds of dollars.
- Productivity Apps: A user might pay for premium features in a note-taking app, such as additional storage or advanced editing tools.
- Entertainment Apps: A user might purchase virtual tickets or access to exclusive content within a streaming app.
Managing In-App Purchases
To avoid unexpected charges from in-app purchases, consider the following:
- Enable Purchase Restrictions: Set up parental controls or purchase restrictions on your devices to prevent unauthorized in-app purchases.
- Review Purchases Regularly: Monitor your purchase history to keep track of in-app purchases.
- Be Mindful of Spending: Be aware of the costs associated with in-app purchases and avoid making impulsive buys.
2.3. How Family Sharing Affects Billing and Unexpected Charges
Family Sharing is a feature that allows up to six family members to share purchases from the App Store, iTunes Store, and Apple Books. While Family Sharing can be convenient, it can also lead to unexpected charges if you’re not aware of how it affects billing.
The Impact of Family Sharing on Charges
- Shared Payment Method: The family organizer’s payment method is used for all purchases made by family members. This means that if a family member makes a purchase, the charge will appear on the organizer’s account.
- Lack of Awareness: The family organizer may not always be aware of purchases made by other family members, leading to unexpected charges.
Examples of Family Sharing Charges
- App Purchases: A child in the family group might purchase a new app, and the charge will appear on the family organizer’s account.
- In-App Purchases: A family member might make in-app purchases within a game, and the charges will be billed to the organizer’s payment method.
- Subscription Services: If a family member signs up for a subscription service, the recurring charges will be billed to the family organizer.
Managing Family Sharing Purchases
To avoid unexpected charges from Family Sharing:
- Enable Ask to Buy: Use the “Ask to Buy” feature to approve purchases made by children in the family group.
- Review Purchases Regularly: Monitor the purchase history to keep track of purchases made by family members.
- Communicate with Family Members: Discuss spending habits and set guidelines for purchases within the family group.
2.4. Unintentional Use of Multiple Apple IDs and their Impact on Charges
Many users unintentionally create and use multiple Apple IDs, which can lead to confusion and unexpected charges. This often happens when users forget their original Apple ID credentials and create a new account.
How Multiple Apple IDs Cause Confusion
- Forgotten Accounts: Users may forget which Apple ID they used to make specific purchases or sign up for subscriptions.
- Mixed Purchases: Purchases can be spread across multiple Apple IDs, making it difficult to track spending and manage subscriptions.
- Incorrect Billing: Charges may appear on one Apple ID when the user expects them to be on another.
Examples of Multiple Apple ID Issues
- Subscription Confusion: A user might sign up for a streaming service with one Apple ID and then try to access it with another, leading to billing issues and access problems.
- App Purchases: A user might purchase an app with one Apple ID and then try to update it with another, resulting in compatibility issues and the need to repurchase the app.
- iCloud Storage: A user might have iCloud storage plans on multiple Apple IDs, leading to unnecessary charges and storage management challenges.
Managing Multiple Apple IDs
To avoid issues with multiple Apple IDs:
- Identify All Apple IDs: Try to identify all Apple IDs you may have created.
- Consolidate Purchases: If possible, consolidate purchases and subscriptions under a single Apple ID. Contact Apple Support for assistance with transferring purchases between accounts.
- Update Sign-In Information: Ensure that you are signed in with the correct Apple ID on all your devices.
2.5. Understanding Pending Transactions and Billing Delays
Pending transactions and billing delays can also contribute to unexpected Apple charges. Sometimes, a charge might appear as pending on your account and then disappear, only to reappear later. This can be confusing and make it difficult to track your spending.
How Pending Transactions Work
- Authorization Holds: When you make a purchase, Apple may place an authorization hold on your payment method to ensure that funds are available. This hold is temporary and usually disappears within a few days.
- Billing Delays: In some cases, there may be delays in processing the transaction, which can cause the charge to appear later than expected.
- Subscription Renewals: Subscription renewal charges may not appear immediately on your statement but can show up several days later.
Examples of Pending Transaction Issues
- App Store Purchases: A user might purchase an app, and the charge appears as pending on their credit card statement. After a few days, the pending charge disappears, only to reappear as a finalized transaction a week later.
- Subscription Services: A user might sign up for a free trial of a streaming service, and the authorization hold appears on their statement. After the trial ends, the actual subscription charge appears, which can be unexpected if the user forgot about the trial.
- In-App Purchases: A user might make an in-app purchase, and the charge appears as pending. The final transaction may not show up until the end of the billing cycle.
Managing Pending Transactions
To better understand pending transactions:
- Monitor Your Statements: Regularly check your credit card and bank statements for pending transactions.
- Contact Your Bank: If you have questions about a pending transaction, contact your bank or credit card company.
- Check Apple Support: Review Apple’s support documentation for information on pending transactions and billing delays.
2.6. Exhausted Gift Card Balances Leading to New Charges
Using Apple Gift Cards can be a convenient way to pay for apps, subscriptions, and other services. However, if you’re not careful, you might encounter unexpected charges when your gift card balance is exhausted.
How Gift Cards Affect Billing
- Initial Funding: When you redeem an Apple Gift Card, the balance is added to your Apple ID account and used for purchases.
- Automatic Transition to Payment Method: Once the gift card balance is depleted, Apple automatically charges your default payment method for any subsequent purchases or subscription renewals.
- Lack of Notification: You may not receive a notification when your gift card balance is running low or when Apple starts charging your payment method.
Examples of Gift Card Billing Issues
- Subscription Renewal: A user might use an Apple Gift Card to pay for the first few months of a subscription service. Once the gift card balance is exhausted, Apple automatically charges the user’s credit card for the renewal fee.
- App Purchases: A user might use an Apple Gift Card to purchase several apps. After the gift card balance is depleted, Apple charges the user’s payment method for any new app purchases.
- iCloud Storage: A user might use an Apple Gift Card to pay for iCloud storage. Once the gift card balance is used up, Apple automatically charges the user’s credit card for the storage plan.
Managing Gift Card Balances
To avoid unexpected charges related to gift cards:
- Monitor Your Balance: Regularly check your Apple ID account balance to see how much credit you have remaining.
- Set Up Notifications: If possible, set up notifications to alert you when your gift card balance is running low.
- Update Payment Information: Ensure that your payment information is up to date in case Apple needs to charge your payment method.
2.7. Recognizing and Addressing Fraudulent Charges on Your Account
While relatively rare, fraudulent charges can appear on your Apple account. These charges are unauthorized transactions made by someone who has gained access to your Apple ID or payment information.
Identifying Fraudulent Charges
- Unfamiliar Transactions: Look for transactions that you don’t recognize or didn’t authorize.
- Unexpected Amounts: Be wary of charges for amounts that don’t match your usual spending habits.
- Suspicious Emails: Watch out for suspicious emails or messages asking for your Apple ID or payment information.
Steps to Take If You Suspect Fraud
- Change Your Password: Immediately change your Apple ID password to prevent further unauthorized access.
- Review Your Security Settings: Check your security settings and enable two-factor authentication for added protection.
- Contact Apple Support: Report the fraudulent charges to Apple Support and request a refund.
- Contact Your Bank: Notify your bank or credit card company about the unauthorized transactions and consider canceling your card to prevent future fraud.
By being vigilant and taking prompt action, you can minimize the impact of fraudulent charges on your Apple account.
3. How Do I Request a Refund From Apple For a Mistaken Charge?
If you believe you’ve been mistakenly charged, you can request a refund from Apple. Here’s how:
- Go to reportaproblem.apple.com: Visit reportaproblem.apple.com in your web browser.
- Sign In: Log in with your Apple ID and password.
- Find the Charge: Locate the item or charge you want a refund for.
- Report the Problem: Click “Report a Problem” next to the charge.
- Choose a Reason: Select the reason for your refund request from the dropdown menu. Common reasons include “I didn’t authorize this purchase” or “I was charged for something I didn’t download”.
- Provide Details: Explain why you’re requesting a refund in the text box provided. Be clear and concise.
- Submit Your Request: Click “Submit”.
Apple will review your request and respond within a few days. Keep an eye on your email for updates.
3.1. Step-by-Step Guide to Requesting a Refund via Report a Problem
Requesting a refund from Apple for a mistaken charge is a straightforward process using the “Report a Problem” tool. Here’s a detailed, step-by-step guide to help you through the process:
Step 1: Access the Report a Problem Website
- Open Your Web Browser: Start by opening your preferred web browser on your computer, tablet, or smartphone.
- Navigate to Report a Problem: In the address bar, type in or paste the following URL: reportaproblem.apple.com. Press Enter to load the page.
Step 2: Sign In with Your Apple ID
- Enter Your Credentials: On the “Report a Problem” page, you will be prompted to sign in with your Apple ID. Enter the email address and password associated with your Apple account.
- Two-Factor Authentication: If you have two-factor authentication enabled, you will need to enter the verification code sent to your trusted device.
- Sign In Securely: Ensure that you are on the legitimate Apple website by verifying the URL and looking for the padlock icon in the address bar, indicating a secure connection.
Step 3: Locate the Item You Want to Report
- Review Your Purchase History: After signing in, you will see a list of your recent purchases. Scroll through the list to find the specific item or charge that you believe is mistaken.
- Filter Purchases (If Necessary): If you have a long purchase history, you can use the filter options at the top of the page to narrow down your search. You can filter by date range, app type, or device.
Step 4: Report the Problem
- Click “Report a Problem”: Once you have located the item, click the “Report a Problem” link next to the charge. This will redirect you to another page with more options.
- If No “Report a Problem” Link: If you don’t see the “Report a Problem” link, it could mean that the item is not eligible for a refund or that the purchase was made more than 90 days ago. In such cases, you may need to contact Apple Support directly.
Step 5: Choose a Reason for Your Refund Request
- Select a Reason: On the “Report a Problem” page, you will see a dropdown menu with various reasons for requesting a refund. Choose the reason that best fits your situation. Common reasons include:
- “I didn’t authorize this purchase”
- “I was charged for something I didn’t download”
- “My child made this purchase without my permission”
- “I meant to purchase a different item”
- “The item doesn’t work as expected”
- Provide Additional Information (If Required): Depending on the reason you select, you may be prompted to provide additional information or details about the issue.
Step 6: Explain Your Situation
- Use the Text Box: In the text box provided, explain why you are requesting a refund. Be clear, concise, and provide as much detail as possible. Include information such as:
- The date of the purchase
- The name of the app or item
- The reason why you believe you are entitled to a refund
- Any relevant details about the issue you experienced
- Be Polite and Professional: While it can be frustrating to deal with mistaken charges, it’s important to remain polite and professional in your explanation. This can help ensure that your request is taken seriously and processed efficiently.
Step 7: Submit Your Request
- Click “Submit”: Once you have filled out the form and provided all the necessary information, click the “Submit” button. This will send your refund request to Apple for review.
- Confirmation Message: After submitting your request, you should see a confirmation message on the screen indicating that your request has been received.
Step 8: Check Your Email for Updates
- Monitor Your Inbox: Keep an eye on your email inbox for updates from Apple regarding your refund request. Apple will typically send you an email to confirm that your request has been received and another email once a decision has been made.
- Response Time: The response time for refund requests can vary, but it usually takes a few days to a week.
Step 9: Follow Up (If Necessary)
- If No Response: If you haven’t received a response from Apple within a week, you may want to follow up on your request. You can do this by visiting the “Report a Problem” website again and checking the status of your request or by contacting Apple Support directly.
By following these step-by-step instructions, you can effectively request a refund from Apple for a mistaken charge using the “Report a Problem” tool.
3.2. What Information Do I Need To Provide When Requesting A Refund?
When requesting a refund from Apple, providing accurate and detailed information is crucial for a successful outcome. Here’s a list of the key information you should include:
- Apple ID: The Apple ID (email address) used to make the purchase.
- Date of Purchase: The exact date when the charge occurred.
- Item Name: The name of the app, subscription, or item you were charged for.
- Order Number: The order number associated with the purchase (if available).
- Amount Charged: The exact amount of the charge.
- Reason for Refund: A clear and concise explanation of why you’re requesting a refund.
- Supporting Details: Any additional information that supports your case, such as screenshots, error messages, or relevant correspondence.
Providing this information will help Apple process your refund request more efficiently.
3.3. How Long Does It Usually Take To Get A Refund From Apple?
The time it takes to receive a refund from Apple can vary depending on several factors, including the reason for the refund, the payment method used, and Apple’s current processing times. However, here are some general guidelines:
- Review Period: Apple typically takes a few days to review refund requests. This period can range from 48 hours to a week.
- Processing Time: Once the refund is approved, the processing time depends on your payment method:
- Credit/Debit Cards: Refunds to credit or debit cards usually take 1-7 business days to appear on your statement.
- Apple Account Balance: Refunds to your Apple Account balance are typically processed within 48 hours.
- Other Payment Methods: Refund times for other payment methods can vary.
Keep in mind that these are estimates, and actual refund times may vary.
3.4. What Are The Common Reasons For Apple Refund Request Denials?
Apple may deny refund requests for various reasons. Understanding these reasons can help you avoid common pitfalls and increase your chances of getting a refund approved. Here are some common reasons for denial:
- Policy Violation: The refund request violates Apple’s terms and conditions or refund policies.
- Excessive Refund Requests: A history of frequent refund requests may raise suspicion and lead to denials.
- Time Limit Exceeded: The refund request is made too long after the purchase date. Apple typically has a limited time frame for refunds.
- Insufficient Information: The refund request lacks sufficient information or explanation.
- Abuse of the System: Apple suspects abuse of the refund system, such as attempting to get free access to apps or services.
- Technical Issues Not Reported Promptly: Technical issues were not reported to Apple or the app developer in a timely manner.
- Purchase Made by Family Member: The purchase was made by a family member, and “Ask to Buy” was not enabled.
3.5. How To Appeal A Denied Refund Request From Apple?
If your refund request is denied, you have the option to appeal the decision. Here’s how you can appeal a denied refund request from Apple:
Step 1: Review the Denial Reason
- Understand the Reason: Carefully read the email or notification from Apple that explains why your refund request was denied. Understanding the reason for denial is the first step in preparing your appeal.
- Identify the Issue: Pinpoint the specific issue that led to the denial. Was it a lack of information, a policy violation, or some other reason?
Step 2: Gather Additional Information
- Collect Evidence: Gather any additional information or evidence that supports your case. This might include:
- Screenshots: If you experienced technical issues, gather screenshots of error messages or other relevant issues.
- Communication Logs: If you communicated with the app developer or Apple Support, collect any email exchanges or chat logs.
- Purchase Details: Ensure you have all the details of the purchase, including the date, item name, and order number.
- Prepare a Detailed Explanation: Write a detailed explanation of why you believe you are entitled to a refund, addressing the specific reasons for the denial.
Step 3: Contact Apple Support
- Visit Apple Support: Go to the Apple Support website (support.apple.com).
- Choose the Appropriate Topic: Navigate to the section related to refunds and billing.
- Contact Options: You can contact Apple Support via phone, chat, or email, depending on your preference and availability.
Step 4: Explain Your Appeal
- Be Polite and Professional: When contacting Apple Support, be polite, professional, and respectful. Explain that you are appealing a denied refund request and provide the details of your case.
- Provide Detailed Information: Clearly explain why you believe the denial was incorrect and provide any additional information or evidence you have gathered.
- Reference the Denial Reason: Specifically address the reason for denial provided by Apple and explain why it does not apply in your case.
Step 5: Escalate If Necessary
- If Initial Response Is Unhelpful: If the initial response from Apple Support is not helpful, you can ask to escalate your case to a higher level of support.
- Persistence Pays Off: Sometimes, it may take multiple attempts to get your appeal approved. Be persistent but always remain polite and professional.
By following these steps, you can effectively appeal a denied refund request from Apple and increase your chances of getting a favorable outcome.
4. How Can I Prevent Future Unexpected Charges From Apple?
Preventing unexpected charges from Apple involves a combination of vigilance, proactive management, and utilizing available tools and settings. Here are some practical steps you can take to minimize the risk of encountering surprise charges in the future:
4.1. Enable Purchase Restrictions and Parental Controls
- Activate “Ask to Buy”: If you have children using devices linked to your Apple ID, enable the “Ask to Buy” feature. This requires them to get your approval before making any purchases.
- Set Content Restrictions: Use content restrictions to limit the types of apps and content that can be downloaded or purchased on your devices.
4.2. Regularly Review Subscription and Purchase History
- Check Subscriptions: Periodically review your active subscriptions in the App Store or iTunes Store. Cancel any subscriptions you no longer need or use.
- Monitor Purchase History: Regularly check your purchase history for any unfamiliar or unauthorized charges.
4.3. Use Two-Factor Authentication For Enhanced Security
- Enable Two-Factor Authentication: Protect your Apple ID by enabling two-factor authentication. This adds an extra layer of security by requiring a verification code from a trusted device when signing in.
4.4. Be Cautious With Free Trials And Promotional Offers
- Read the Fine Print: Before signing up for a free trial or promotional offer, carefully read the terms and conditions. Understand when the trial period ends and whether you’ll be automatically charged afterward.
- Set Reminders: Set reminders to cancel free trials before they convert to paid subscriptions.
4.5. Keep Payment Information Up To Date
- Update Payment Details: Ensure that your payment information is current and accurate. Expired or incorrect payment details can lead to failed transactions and potential service interruptions.
4.6. Educate Family Members About Responsible Spending
- Discuss Spending Habits: If you share your Apple ID with family members, discuss responsible spending habits and set guidelines for purchases.
- Enable Family Sharing Features: Utilize Family Sharing features to monitor and manage purchases made by family members.
By implementing these preventative measures, you can significantly reduce the likelihood of encountering unexpected charges from Apple and maintain better control over your spending.
4.7. How To Set Up And Use “Ask To Buy” For Family Sharing
“Ask to Buy” is a feature within Apple’s Family Sharing that allows parents or guardians to approve purchases made by children under a certain age. This feature is especially useful for preventing accidental or unauthorized purchases. Here’s how to set up and use “Ask to Buy”:
Step 1: Set Up Family Sharing
- If You Haven’t Already: If you haven’t already, set up Family Sharing. Go to Settings > [Your Name] > Family Sharing on your iPhone or iPad. Follow the prompts to invite family members to join your family group.
Step 2: Enable “Ask to Buy”
- For Each Child: Once Family Sharing is set up, you can enable “Ask to Buy” for each child in the family group.
- Go to Family Sharing Settings: Go to Settings > [Your Name] > Family Sharing on your iPhone or iPad.
- Select the Child’s Name: Tap on the child’s name in the list of family members.
- Tap “Ask to Buy”: Toggle the “Ask to Buy” switch to the “on” position.
Step 3: How “Ask to Buy” Works
- Child Initiates a Purchase: When the child attempts to make a purchase in the App Store, iTunes Store, or through in-app purchases, a notification is sent to the family organizer (usually the parent or guardian).
- Notification to Organizer: The family organizer receives a notification on their iPhone, iPad, or Mac.
- Review the Request: The organizer can review the details of the purchase, including the item name, price, and the child’s request message.
- Approve or Decline: The organizer can choose to approve or decline the purchase directly from the notification.
- Approval Process: If the organizer approves the purchase, it will be charged to the family’s shared payment method, and the child can proceed with the download or purchase.
- Decline Process: If the organizer declines the purchase, the child will receive a notification that their request was denied.
Step 4: Managing “Ask to Buy” Requests
- Notifications: Make sure that notifications are enabled for Family Sharing so that you receive purchase requests promptly.
- Review Requests Regularly: Check for pending “Ask to Buy” requests regularly to ensure that your child is not waiting too long for approval.
- Discuss Purchases: Use “Ask to Buy” as an opportunity to discuss purchases with your child and teach them about responsible spending habits.
4.8. How To Review And Manage Your Apple Subscriptions Effectively
Effectively managing your Apple subscriptions is crucial for avoiding unexpected charges and staying in control of your spending. Here’s a detailed guide on how to review and manage your Apple subscriptions:
Step 1: Access Your Subscriptions
- On Your iPhone or iPad:
- Open the App Store app.
- Tap your profile icon or the sign-in button at the top right.
- Tap “Subscriptions.” You may be asked to sign in.
- On Your Mac:
- Open the App Store app.
- Click your name at the bottom of the sidebar.
- Click “Account Settings” at the top right. You may be asked to sign in.
- Scroll down to the “Manage” section and click “Manage” next to “Subscriptions.”
Step 2: View Your Active Subscriptions
- Review the List: You will see a list of your active and expired subscriptions. Active subscriptions are those that are currently being billed to your Apple ID.
- Subscription Details: Tap or click on a subscription to view more details, such as the renewal date, billing frequency, and price.
Step 3: Manage Your Subscriptions
- Cancel Subscriptions: If you want to cancel a subscription, tap or click on it and then tap or click the “Cancel Subscription” button.
- Confirmation: You may be asked to confirm your cancellation. Follow the prompts to complete the process.
- Cancellation Timing: Keep in mind that cancellations typically take effect at the end of the current billing cycle. You will usually continue to have access to the subscription until then.
- Change Subscription Options: Some subscriptions offer different tiers or options. You can change your subscription by selecting a different plan or package.
- Resubscribe to Expired Subscriptions: If you have expired subscriptions that you want to renew, you can resubscribe from the same screen.
Step 4: Set Renewal Reminders
- No Built-In Reminders: Apple does not offer built-in renewal reminders for subscriptions. However, you can set your own reminders using your device’s calendar or a third-party app.
- Calendar Reminders: Create calendar events for each of your subscriptions with reminders set a few days before the renewal date.
Step 5: Review Expired Subscriptions
- Expired Subscriptions List: The subscriptions management screen also shows a list of your expired subscriptions.
- Reactivate If Desired: You can reactivate an expired subscription if you wish to renew it.
Step 6: Stay Organized
- Regularly Review: Make it a habit to regularly review your subscriptions to ensure that you are only paying for services that you actively use.
- Keep a Record: Keep a record of your subscriptions, including the renewal dates, prices, and cancellation policies.
By following these steps, you can effectively manage your Apple subscriptions, avoid unexpected charges, and stay in control of your spending.
5. Understanding Apple’s Billing Practices and Policies
Understanding Apple’s billing practices and policies is crucial for managing your account and avoiding unexpected charges. Here are some key aspects to be aware of:
- Billing Cycle: Apple’s billing cycle typically aligns with the date you started a subscription or made a purchase. Charges are usually processed on the same day each month or year.
- Payment Methods: Apple accepts various payment methods, including credit cards, debit cards, Apple Account balance, and Apple Gift Cards.
- Automatic Renewals: Subscriptions automatically renew unless you cancel them. Be sure to manage your subscriptions to avoid unwanted charges.
- Refund Policies: Apple has specific refund policies that vary depending on the type of purchase and the reason for the refund. Review these policies to understand your rights.
- Family Sharing: With Family Sharing, one adult organizes the family, and up to five family members can share purchases. Be aware of how purchases are billed within the family group.
- Pending Transactions: Sometimes, you may see pending transactions on your account. These are temporary holds that will be finalized once the purchase is processed.
5.1. Key Points In Apple’s Terms And Conditions Regarding Billing
Apple’s Terms and Conditions contain important information regarding billing practices that all users should be aware of. Here are some key points to consider:
- Agreement to Pay: By using Apple’s services, you agree to pay for all purchases and subscriptions made through your account.
- Payment Authorization: You authorize Apple to charge your selected payment method for any purchases you make.
- Automatic Renewal: Subscriptions automatically renew unless you cancel them before the renewal date. You will be charged for the
