Why Does My Pilot Light Keep Going Out? This is a common question, and at WHY.EDU.VN, we understand how frustrating it can be to deal with a constantly failing pilot light on your gas appliance. This article will guide you through the common causes and effective troubleshooting steps to resolve the issue. Addressing these issues promptly ensures the continuous operation of your appliances and prevents potential gas leaks. For personalized assistance and expert solutions, explore WHY.EDU.VN to connect with qualified professionals and gain further insights on gas appliance maintenance.
1. What is a Pilot Light and How Does It Work?
A pilot light is a small, continuous flame in gas-powered appliances like water heaters, furnaces, and stoves. Its primary function is to ignite the main burner when the appliance is turned on. The pilot light ensures that when gas is supplied to the main burner, it immediately ignites, providing consistent and reliable heat.
1.1. The Importance of a Continuous Flame
The continuous flame of the pilot light is crucial for the proper functioning of gas appliances. Without it, the main burner cannot ignite, rendering the appliance useless. This is why maintaining a stable pilot light is essential for consistent operation.
1.2. Modern Alternatives: Electronic Ignition Systems
Many modern appliances now use electronic ignition systems as an alternative to traditional pilot lights. These systems use an electrical spark to ignite the gas, eliminating the need for a continuous flame. Electronic ignition is more energy-efficient and safer because it only ignites the gas when needed. According to the U.S. Department of Energy, switching to electronic ignition can reduce energy consumption and lower utility bills.
2. Quick Checks to See If Your Pilot Light is Working Properly
Before diving into troubleshooting, perform these quick checks to assess your pilot light’s condition:
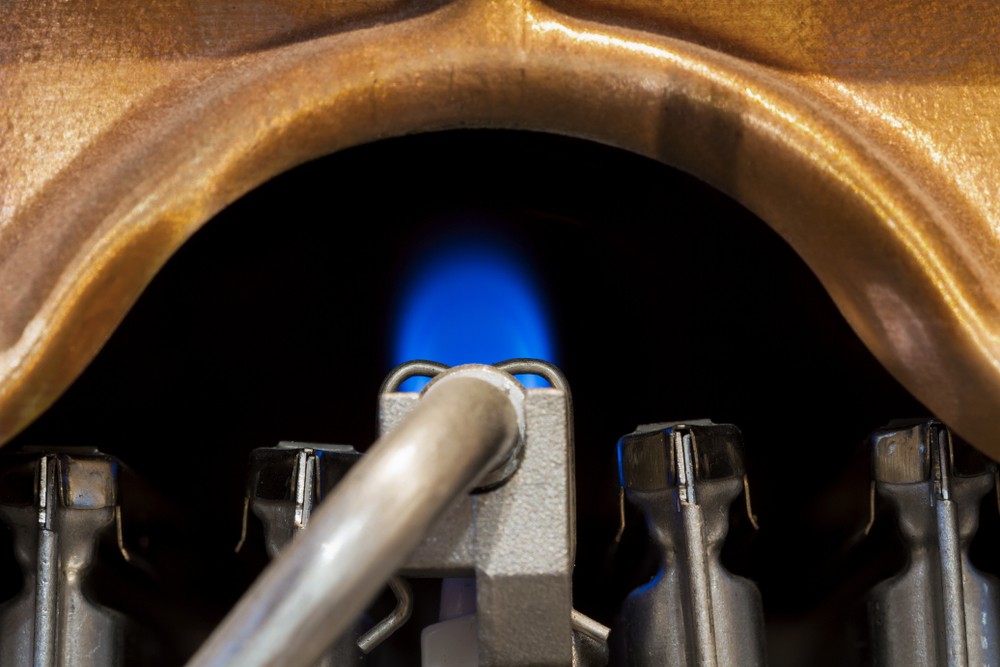
2.1. Flame Color
A healthy pilot light should burn with a clear, blue flame. A yellow or orange flame indicates incomplete combustion, often due to impurities in the gas or insufficient air supply. According to the National Fire Protection Association (NFPA), abnormal flame colors can signify potential safety hazards.
2.2. Flame Consistency
The flame should be steady and consistent, not flickering or wavering. Flickering can indicate drafts, low gas pressure, or a dirty burner. Consistent monitoring of the flame’s stability is key to identifying underlying issues.
2.3. Flame Appearance
The pilot light should be a single, well-defined flame. If the flame splits or appears weak, it could be due to dirt or debris in the gas line or burner. Regular inspection of the flame’s structure helps ensure optimal performance.
2.4. Flame Strength
A strong, robust flame is necessary for reliable ignition. A weak flame might not be hot enough to ignite the main burner, leading to operational issues. Ensuring adequate flame strength is vital for the appliance’s functionality.
3. Common Reasons Why a Pilot Light Keeps Going Out
Several factors can cause a pilot light to repeatedly extinguish. Understanding these issues is the first step in effective troubleshooting.
3.1. Drafts and Airflow Issues
Drafts can easily extinguish a pilot light, especially if the appliance is located in a windy area.
3.1.1. Identifying Draft Sources
Check for open windows, doors, or vents near the appliance. Even small drafts can disrupt the pilot light flame.
3.1.2. Solutions
Shield the appliance from drafts using screens or windbreaks. Ensure adequate ventilation to prevent carbon monoxide buildup. According to the Environmental Protection Agency (EPA), proper ventilation is crucial for maintaining indoor air quality and preventing carbon monoxide poisoning.
3.2. Dirty Pilot Light Orifice
A clogged pilot light orifice can restrict gas flow, leading to a weak or unstable flame.
3.2.1. Cleaning the Orifice
Turn off the gas supply and use a small wire or needle to gently clean the orifice. Be careful not to enlarge the opening, as this can affect the flame’s performance.
3.2.2. Safety Precautions
Always turn off the gas supply before cleaning any gas appliance components. Follow manufacturer instructions and consult a professional if needed.
3.3. Faulty Thermocouple
The thermocouple is a safety device that senses the pilot light flame and keeps the gas valve open. If the thermocouple is faulty, it will shut off the gas supply, extinguishing the pilot light.
3.3.1. Testing the Thermocouple
Use a multimeter to test the thermocouple’s voltage output. A reading below the manufacturer’s specification indicates a faulty thermocouple.
3.3.2. Replacement
Replace the thermocouple if it fails the voltage test. Ensure the replacement is compatible with your appliance model.
3.4. Low Gas Pressure
Insufficient gas pressure can result in a weak pilot light that easily goes out.
3.4.1. Checking Gas Pressure
A qualified technician should check the gas pressure using a manometer. Low gas pressure can indicate issues with the gas regulator or supply line.
3.4.2. Addressing Gas Pressure Issues
Contact your gas company to resolve gas pressure problems. Do not attempt to adjust the gas regulator yourself, as this can be dangerous.
3.5. Condensation
Moisture can drip onto the pilot light, causing it to extinguish.
3.5.1. Identifying Condensation Sources
Check for condensation on pipes or surfaces near the appliance. Ensure proper insulation to minimize condensation.
3.5.2. Solutions
Improve ventilation and insulation to reduce condensation. Use a drip pan to catch any water that may drip onto the pilot light.
3.6. Blocked Venting or Air Supply
Restricted airflow can lead to incomplete combustion and pilot light failure.
3.6.1. Inspecting Vents
Check vents for obstructions such as debris, nests, or collapsed sections. Ensure proper airflow to the appliance.
3.6.2. Clearing Blockages
Remove any obstructions from the vents to ensure proper ventilation. Repair or replace damaged vent components.
3.7. Dirty Flame Sensor
A dirty flame sensor can prevent the pilot light from staying lit.
3.7.1. Cleaning the Flame Sensor
Turn off the gas supply and gently clean the flame sensor with fine-grit sandpaper or steel wool. Remove any carbon buildup or deposits.
3.7.2. Reinstallation
Reinstall the flame sensor and ensure it is properly positioned to sense the pilot light flame.
3.8. Gas Leaks
Gas leaks can cause the pilot light to go out and pose a significant safety risk.
3.8.1. Detecting Gas Leaks
Use a gas leak detector or soapy water to check for leaks around gas connections. If you suspect a gas leak, evacuate the area and contact your gas company immediately.
3.8.2. Safety Measures
Never use an open flame to check for gas leaks. Follow all safety protocols and consult a qualified technician for leak repairs.
4. Troubleshooting Steps When the Pilot Light Doesn’t Light
If the pilot light fails to ignite, follow these troubleshooting steps:
4.1. Check the Gas Supply
Ensure the gas supply is turned on and there are no interruptions to the gas service.
4.1.1. Verifying Gas Flow
Check other gas appliances to confirm gas flow. If other appliances are not working, there may be an issue with the gas supply.
4.1.2. Contacting the Gas Company
Contact your gas company to investigate any gas supply problems.
4.2. Inspect the Igniter
The igniter may be faulty, preventing the pilot light from lighting.
4.2.1. Testing the Igniter
Use a multimeter to test the igniter’s continuity. A lack of continuity indicates a faulty igniter that needs replacement.
4.2.2. Replacement
Replace the igniter with a compatible replacement part.
4.3. Clear Blockages in the Gas Line
Blockages can prevent gas from reaching the pilot light.
4.3.1. Identifying Blockages
Inspect the gas line for kinks, bends, or obstructions.
4.3.2. Clearing Blockages
Carefully clear any blockages in the gas line. Replace damaged or obstructed sections of the gas line.
4.4. Check the Wiring Connections
Loose or corroded wiring can prevent the pilot light from igniting.
4.4.1. Inspecting Wiring
Check wiring connections for tightness and corrosion. Clean corroded connections and tighten loose connections.
4.4.2. Repair or Replacement
Repair or replace damaged wiring to ensure proper electrical flow.
4.5. Address Soot or Carbon Buildup
Soot and carbon buildup can interfere with the pilot light’s operation.
4.5.1. Cleaning Soot and Carbon
Use a brush or sandpaper to remove soot and carbon buildup from the pilot light assembly.
4.5.2. Prevention
Ensure proper ventilation and gas combustion to prevent future soot and carbon buildup.
5. Troubleshooting Steps When the Pilot Light Won’t Stay Lit
If the pilot light ignites but quickly goes out, consider these steps:
5.1. Clean the Pilot Light Tube
A dirty pilot light tube can disrupt gas flow and extinguish the flame.
5.1.1. Cleaning the Tube
Use a small brush or wire to clean the pilot light tube. Remove any debris or obstructions.
5.1.2. Reassembly
Reassemble the pilot light tube and ensure it is properly connected.
5.2. Ensure Adequate Gas Flow
Insufficient gas flow can cause the pilot light to go out.
5.2.1. Checking Gas Flow
Verify that the gas valve is fully open and there are no restrictions in the gas line.
5.2.2. Addressing Gas Flow Issues
Contact a qualified technician to address any gas flow problems.
5.3. Replace a Broken Thermocouple
A faulty thermocouple can cause the pilot light to extinguish shortly after ignition.
5.3.1. Testing the Thermocouple
Use a multimeter to test the thermocouple’s voltage output. Replace the thermocouple if it fails the voltage test.
5.3.2. Installation
Install a new thermocouple according to the manufacturer’s instructions.
5.4. Bleed Air from the Gas Line
Air in the gas line can prevent the pilot light from staying lit.
5.4.1. Bleeding the Line
Carefully bleed air from the gas line by loosening a connection near the pilot light until gas flows freely.
5.4.2. Safety Precautions
Follow all safety precautions when working with gas lines.
5.5. Check the Thermostat
A malfunctioning thermostat can affect the pilot light’s operation.
5.5.1. Testing the Thermostat
Use a multimeter to test the thermostat’s continuity. Replace the thermostat if it is faulty.
5.5.2. Calibration
Calibrate the thermostat to ensure accurate temperature readings.
5.6. Inspect the Gas Control Valve
A faulty gas control valve can cause intermittent pilot light problems.
5.6.1. Testing the Valve
Use a multimeter to test the gas control valve’s functionality. Replace the valve if it is faulty.
5.6.2. Professional Assistance
Contact a qualified technician to replace the gas control valve.
6. Pilot Light Safety Tips
Adhering to safety guidelines is crucial when dealing with pilot lights.
6.1. Never Ignore Gas Odors
If you smell gas, immediately evacuate the area and contact your gas company.
6.2. Regular Maintenance
Schedule regular maintenance checks for your gas appliances to prevent pilot light issues.
6.3. Carbon Monoxide Detectors
Install carbon monoxide detectors to protect against carbon monoxide poisoning.
6.4. Professional Inspections
Have your gas appliances inspected annually by a qualified technician.
7. DIY vs. Professional Repair
Deciding whether to tackle pilot light issues yourself or hire a professional depends on your comfort level and expertise.
7.1. When to DIY
Simple tasks like cleaning the pilot light orifice or checking for drafts can be done safely by homeowners.
7.2. When to Call a Professional
Complex issues like gas leaks, faulty thermocouples, or gas pressure problems require professional expertise.
7.3. Safety First
Always prioritize safety and consult a professional if you are unsure about any repair procedures.
8. Common Misconceptions About Pilot Lights
Several misconceptions surround pilot lights. Let’s debunk a few:
8.1. Pilot Lights Are Always On
While traditional pilot lights burn continuously, modern electronic ignition systems eliminate the need for a constant flame.
8.2. Pilot Lights Are Energy Efficient
Pilot lights consume gas, contributing to energy costs. Electronic ignition systems are more energy-efficient.
8.3. Pilot Lights Are Safe
While generally safe, pilot lights can pose risks if not properly maintained. Gas leaks and carbon monoxide poisoning are potential hazards.
9. Pilot Light Troubleshooting Checklist
Use this checklist to systematically troubleshoot pilot light issues:
| Step | Action |
|---|---|
| 1. Initial Inspection | Check flame color, consistency, and strength. |
| 2. Drafts | Identify and eliminate drafts near the appliance. |
| 3. Orifice Cleaning | Clean the pilot light orifice with a small wire. |
| 4. Thermocouple Test | Test the thermocouple voltage output and replace if necessary. |
| 5. Gas Pressure | Verify adequate gas pressure and contact the gas company if low. |
| 6. Vent Inspection | Inspect and clear any obstructions from the vents. |
| 7. Flame Sensor Cleaning | Clean the flame sensor with fine-grit sandpaper. |
| 8. Gas Leak Detection | Check for gas leaks using a gas leak detector or soapy water. |
| 9. Wiring Check | Inspect and tighten or replace loose wiring connections. |
| 10. Soot Removal | Remove soot and carbon buildup from the pilot light assembly. |
| 11. Tube Cleaning | Clean the pilot light tube to ensure proper gas flow. |
| 12. Thermostat Calibration | Calibrate the thermostat for accurate temperature readings. |
| 13. Gas Control Valve Inspection | Inspect the gas control valve for proper functionality. |

10. Frequently Asked Questions (FAQs) About Pilot Lights
Here are some frequently asked questions about pilot lights:
10.1. Why Does My Pilot Light Keep Going Out After I Light It?
This can be due to a dirty pilot light orifice, a faulty thermocouple, or drafts affecting the flame.
10.2. Can I Relight My Pilot Light Myself?
Yes, if you follow the manufacturer’s instructions and safety precautions. If you’re uncomfortable, call a professional.
10.3. How Often Should I Have My Gas Appliance Serviced?
It’s recommended to have your gas appliance serviced annually by a qualified technician.
10.4. What Should I Do If I Smell Gas?
Evacuate the area immediately and contact your gas company.
10.5. Are Pilot Lights Safe?
Pilot lights are generally safe if properly maintained and inspected regularly.
10.6. What Is a Thermocouple, and Why Is It Important?
A thermocouple is a safety device that senses the pilot light flame and keeps the gas valve open. It prevents gas leaks if the flame goes out.
10.7. How Do I Know If My Thermocouple Is Bad?
Use a multimeter to test the thermocouple’s voltage output. A low reading indicates a faulty thermocouple.
10.8. What Are the Benefits of Electronic Ignition Over Pilot Lights?
Electronic ignition is more energy-efficient and eliminates the need for a continuous flame, reducing energy costs.
10.9. Can Low Gas Pressure Cause Pilot Light Problems?
Yes, low gas pressure can result in a weak pilot light that easily goes out.
10.10. How Can I Prevent Soot Buildup on My Pilot Light?
Ensure proper ventilation and gas combustion to prevent soot buildup.
Dealing with a pilot light that repeatedly goes out can be a hassle, but understanding the potential causes and solutions can save you time and money. Remember to prioritize safety and consult a professional when needed. At WHY.EDU.VN, we are dedicated to providing accurate and comprehensive information to help you resolve your home maintenance issues efficiently.
Still have questions or need expert advice? Don’t struggle alone! Visit WHY.EDU.VN today and connect with our community of experts ready to provide personalized answers and solutions to all your questions. Whether it’s about pilot lights, gas appliances, or any other household issue, we’re here to help. Contact us at 101 Curiosity Lane, Answer Town, CA 90210, United States, or reach out via WhatsApp at +1 (213) 555-0101. Let why.edu.vn be your trusted resource for all your informational needs.