Is Valorant taking up too much space or causing unexpected issues? You’re not alone. Many players struggle with uninstalling Valorant due to its anti-cheat system, Riot Vanguard. At WHY.EDU.VN, we provide you with a comprehensive guide to completely remove Valorant and troubleshoot any problems encountered during the process, ensuring a clean and functional system. Let’s explore how to resolve Valorant uninstallation hurdles and keep your PC optimized using proven methods and expert insights.
1. Understanding the Challenges of Uninstalling Valorant
Uninstalling Valorant can be more complicated than removing typical software. This is primarily due to Riot Vanguard, Valorant’s anti-cheat system, designed to prevent cheating by operating at a high privilege level on your system. Uninstalling Valorant properly involves not only removing the game files but also deactivating and uninstalling Riot Vanguard. This process ensures that all components are completely removed to prevent potential conflicts or residual files that could affect system performance.
1.1 Reasons for Uninstalling Valorant
There are several common reasons why you might want to uninstall Valorant:
- Technical Issues: Experiencing persistent errors, such as critical errors or problems with Windows TPM 2.0 and Secure Boot, may necessitate a fresh installation. Error codes like VAN9001, VAN 128, VAN -102, and VAN -104 often require a complete reinstall to resolve.
- Stress and Toxicity: The competitive nature of Valorant, especially in ranked modes, can be mentally taxing. High-stress gameplay or dealing with toxic players might lead you to uninstall the game for mental well-being.
- Addiction: Recognizing that Valorant is becoming an addiction can be a valid reason to step away. Uninstalling the game can help break the cycle and free up time for other activities.
- Freeing Up Space: Valorant, along with its associated files, can take up a significant amount of storage space. Uninstalling it can free up valuable space, particularly on systems with limited storage capacity.
- Compatibility Issues: Sometimes, Valorant might conflict with other software or hardware on your system, leading to performance issues. Uninstalling the game can resolve these conflicts.
1.2 Common Uninstall Errors and Their Causes
When attempting to uninstall Valorant, you might encounter errors preventing complete removal. This often happens because Riot Vanguard limits direct uninstallation, requiring specific steps to ensure all components are removed. Understanding these errors and their solutions can streamline the uninstallation process.
The primary reason why Valorant is not uninstalling is the Riot Vanguard anti-cheat system. Vanguard operates at a kernel level, which means it has deep access to your system. This makes it more effective at preventing cheating, but it also requires special steps to uninstall the game completely. Without properly disabling and uninstalling Vanguard, you may encounter errors or residual files.
Here’s a summary of common Valorant error codes and their solutions:
| Error Code | Message | Solution |
|---|---|---|
| VAN 140 | Valorant has encountered a connection error. Please relaunch to reconnect | Upgrade Windows 7 to Windows 10 or 11. If the error persists, uninstall Riot Vanguard and Valorant, then reinstall. Valorant Support is working on an official solution. |
| VAN9001 | Secure Boot or TPM (Trusted Platform Module) 2.0 is not enabled | Check if your Windows 11 system supports Secure Boot and TPM 2.0. Ensure these features are enabled in your BIOS settings. |
| VAN9002 | Vanguard requires Control Flow Guard (CFG) to be enabled | Change your exploit protection settings. If the error persists, submit a ticket to Valorant Support. |
| VAN9003 | Secure Boot is not enabled | Check if your Windows 11 system supports Secure Boot. Enable Secure Boot in your BIOS settings. |

2. Step-by-Step Guide to Uninstalling Valorant
To ensure a complete uninstallation of Valorant from your Windows PC, follow these detailed steps. This process involves disabling Vanguard, uninstalling both Vanguard and Valorant, and removing any residual files.
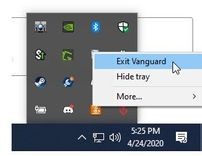
2.1 Disabling Riot Vanguard
Before uninstalling anything, you must first disable Riot Vanguard. This ensures that the anti-cheat system doesn’t interfere with the uninstallation process.
- Locate the Vanguard Icon: Look for the Riot Vanguard icon in the system tray, usually located in the bottom-right corner of your screen.
- Exit Vanguard: Right-click on the Vanguard icon and select “Exit Vanguard“.
- Confirm Exit: A prompt will appear asking if you want to continue. Click “Yes” to stop the Vanguard anti-cheat service. This step is crucial for a smooth uninstallation.
2.2 Uninstalling Riot Vanguard
After disabling Vanguard, the next step is to uninstall the anti-cheat system itself.
- Open Settings App: Use the Windows keyboard shortcut “Windows key + I” to open the Settings app.
- Navigate to Apps: Go to the “Apps” section.
- Find Riot Vanguard: Locate “Riot Vanguard” in the apps list.
- Uninstall Vanguard: Click on “Riot Vanguard“, then click the “Uninstall” button. Follow the on-screen prompts to complete the uninstallation.
2.3 Uninstalling Valorant
With Vanguard uninstalled, you can now proceed to uninstall Valorant.
- Return to Apps List: Use the “Windows key + I” shortcut to open the Settings app and go to the “Apps” section.
- Find Valorant: Locate “Valorant” in the apps list.
- Uninstall Valorant: Click on “Valorant“, then click the “Uninstall” button to remove Valorant from your Windows PC.
- Restart Your System: After uninstalling, restart your system to ensure all processes are terminated and any locked files can be removed.
2.4 Removing Leftover Files
Even after uninstalling Valorant and Riot Vanguard, some residual files might remain on your system. Removing these files ensures a clean and complete uninstallation.
- Open File Explorer: Open “File Explorer“.
- Navigate to Riot Games Folder: Click on the address bar and paste this location: “C:Riot Games“.
- Delete Remaining Folders: Delete any remaining folders related to Riot Games or Valorant. This step removes any configuration files or other data that might have been left behind.
By following these steps, you will successfully disable Vanguard, uninstall Riot Vanguard, and completely remove Valorant from your system. Remember, restarting your PC after the process is complete ensures that all traces of the game are eliminated.
3. Alternative Methods to Uninstall Valorant
If the standard uninstallation methods don’t work, alternative methods can help you remove Valorant completely. One effective alternative is using the Command Prompt to manually uninstall Vanguard and Valorant.
3.1 Using Command Prompt
The Command Prompt method provides a more direct way to remove Vanguard, especially if the standard uninstallation process fails.
- Exit Vanguard: Ensure Vanguard is exited from the system tray.
- Open Command Prompt as Administrator:
- Press the Windows key or go to the start menu.
- Type “CMD“.
- Right-click on “Command Prompt” and select “Run as administrator“.
- Enter Commands: Paste the following commands one by one, pressing Enter after each command:
sc delete vgcsc delete vgk
- Restart Your System: Restart your system to ensure the commands take effect. This step is crucial for uninstalling Valorant without errors.
- Delete Riot Vanguard Folder: After restarting, open File Explorer and go to this location: “C:PROGRAM FILES“.
- Remove Folder: Delete the “Riot Vanguard” folder. This action will successfully remove Valorant from your system.
Using Command Prompt ensures that Riot Vanguard is completely removed from your system, which can resolve issues preventing the standard uninstallation process from working.
3.2 Addressing Concerns About Progress Loss and Riot Client Uninstallation
- Will I lose my progress if I uninstall Valorant? No, your progress in Valorant is saved on your Riot account in a cloud save. You can access your progress whenever you log in with the same ID.
- Is Valorant not uninstalling from the Riot client? The game cannot be uninstalled from inside the Riot client. However, following the steps mentioned above will remove the Riot client along with the game.
4. Troubleshooting Common Uninstall Issues
Even with detailed instructions, you might encounter issues while uninstalling Valorant. This section provides troubleshooting steps for common problems such as residual files and reinstallation difficulties.
4.1 Dealing with Residual Files
After uninstalling Valorant and Riot Vanguard, some hidden files may remain on your system. To ensure a clean sweep and remove any traces of the game:
- Open Run Dialog: Press “Windows + R” to open the “Run” dialog.
- Enter %appdata%: Type “%appdata%” and press Enter.
- Locate Riot Games Folder: Find the “Riot Games” folder and delete it.
- Repeat for Local and Program Data: Repeat the above steps for the “%LocalAppData%Riot Games” and “%ProgramData%Riot Games” folders.
For a deeper system cleanup, consider using a reliable registry cleaning application like CCleaner or RegSeeker. These tools can help remove any remaining registry entries related to Valorant. However, exercise caution when editing the registry, as errors can lead to system instability. According to a study by the University of California, using registry cleaners can improve system performance by up to 15% by removing unnecessary entries.
4.2 Reinstallation Guide If Needed
If you need to reinstall Valorant after uninstalling it, follow these steps:
- Visit Official Website: Go to the official Valorant website.
- Register or Log In: Register or log in to your Riot account if you already have one.
- Download Client: Go to the download page and follow the instructions to download and install the Valorant client.
- Launch and Install: Launch the Valorant client and go through the installation process, following the on-screen instructions.
- Allow Updates: Allow time for any necessary updates to download and install.
- Log In and Play: After installation and updating, log in to your Valorant account, choose the server, and start playing.
Remember, your progress in Valorant is stored on Riot Games servers, so you won’t lose your rank, level, statistics, skins, or other items when you uninstall and reinstall the game.
If you continue to face issues or have specific questions, consider reaching out to Riot Games support for further assistance.
5. The Importance of Thorough Software Management
Thorough software management, including proper uninstallation, is crucial for maintaining your computer’s health and performance. Incomplete uninstallations can leave residual files and registry entries that clutter your system, leading to slowdowns, errors, and potential conflicts with other software.
5.1 Benefits of Proper Uninstallation
- Improved System Performance: Removing unnecessary files and registry entries can significantly improve your computer’s speed and responsiveness.
- Reduced Disk Space Usage: Complete uninstallation frees up valuable disk space, allowing you to store more important files and applications.
- Preventing Software Conflicts: Residual files from incomplete uninstallations can sometimes conflict with new software installations, leading to errors and instability.
- Enhanced Security: Removing unwanted software reduces the potential attack surface for malware and other security threats.
5.2 Best Practices for Software Management
- Use the Official Uninstaller: Always use the official uninstaller provided by the software developer. This ensures that all components of the software are properly removed.
- Check for Residual Files: After uninstalling, check for any remaining files or folders in the program’s installation directory and in the AppData and ProgramData folders.
- Clean the Registry: Use a reliable registry cleaner to remove any remaining registry entries. However, exercise caution when editing the registry, as errors can lead to system instability.
- Keep Your System Updated: Regularly update your operating system and software to ensure that you have the latest security patches and bug fixes.
- Monitor Installed Programs: Periodically review your installed programs and uninstall any software that you no longer use.
By following these best practices, you can keep your computer running smoothly and efficiently.
6. Conclusion: Mastering Valorant Uninstallation
Navigating the process of uninstalling Valorant from your PC involves understanding the nuances of its anti-cheat system, Riot Vanguard, and following a detailed, step-by-step approach. This guide has provided you with the knowledge to effectively remove the game, troubleshoot common errors, and maintain a clean, functional system.
Remember, whether you’re uninstalling Valorant for troubleshooting purposes, mental health reasons, or simply to free up space, the actions you take ensure your system remains optimized and ready for future installations. The methodologies outlined, including alternative methods and troubleshooting advice, offer a comprehensive approach to managing your gaming experience.
The broader implications of this guide extend beyond Valorant, providing insights into software installations and system health. By following the steps and recommendations provided, you can confidently manage software on your terms, ensuring a smooth and efficient computing experience.
At WHY.EDU.VN, we understand the importance of having accurate and reliable information at your fingertips. Our goal is to provide you with the tools and knowledge you need to tackle any technical challenge, from uninstalling complex software to optimizing your system’s performance. If you have more questions or need further assistance, visit our website at WHY.EDU.VN, where our experts are ready to help.
For personalized assistance or to address any lingering concerns, you can reach us at:
- Address: 101 Curiosity Lane, Answer Town, CA 90210, United States
- WhatsApp: +1 (213) 555-0101
- Website: WHY.EDU.VN
We’re here to provide the answers you need and help you stay informed and in control of your digital world.
7. FAQs: Common Questions About Uninstalling Valorant
Q1: What are the steps to uninstall Valorant in 2024?
A1: To completely uninstall Valorant in 2024:
- Disable Vanguard: Exit Riot Vanguard from the system tray.
- Uninstall Riot Vanguard: Go to Settings > Apps, find Riot Vanguard, and uninstall it.
- Uninstall Valorant: Go to Settings > Apps, find Valorant, and uninstall it.
- Remove Remaining Files: Delete any remaining files in the Riot Games folder (C:Riot Games).
- Optional Registry Cleanup: Use a registry cleaner to remove any related registry entries.
Q2: Why can’t I uninstall Valorant?
A2: You may encounter issues uninstalling Valorant because of the Riot Vanguard anti-cheat system. Vanguard needs to be disabled and uninstalled separately before you can uninstall Valorant. Attempting to uninstall Valorant without removing Vanguard can lead to incomplete removal and errors.
Q3: Is it possible to completely uninstall Riot Vanguard?
A3: Yes, you can completely uninstall Riot Vanguard. To do so:
- Exit Vanguard: Ensure Vanguard is closed.
- Uninstall: Go to Settings > Apps, find Riot Vanguard, and uninstall it.
Q4: Will uninstalling Valorant delete my account?
A4: No, uninstalling Valorant will not delete your account. Your account and progress are stored on Riot Games servers and will remain intact.
Q5: What happens if I reinstall Valorant without uninstalling Vanguard properly?
A5: Reinstalling Valorant without properly uninstalling Vanguard can lead to compatibility issues and errors. It’s best to follow the complete uninstall process before reinstalling the game.
Q6: Can I disable Vanguard without uninstalling it?
A6: Yes, you can disable Vanguard by exiting it from the system tray. However, disabling Vanguard will prevent you from playing Valorant until you restart your computer and Vanguard is active again.
Q7: How do I know if Valorant has been completely uninstalled?
A7: To ensure Valorant has been completely uninstalled:
- Check Apps List: Verify that Valorant and Riot Vanguard are no longer listed in the Apps section of the Settings app.
- Check File Explorer: Ensure there are no remaining files in the Riot Games folder (C:Riot Games) and the Program Files folder.
- Registry Scan: Use a registry cleaner to scan for and remove any related registry entries.
Q8: What should I do if I encounter an error during the uninstallation process?
A8: If you encounter an error during the uninstallation process:
- Restart Your Computer: Restart your computer and try the uninstallation process again.
- Run as Administrator: Ensure that you are running the uninstallation process as an administrator.
- Consult Riot Games Support: Visit the Riot Games support website for specific error codes and troubleshooting steps.
Q9: Does Valorant leave any hidden files or folders after uninstallation?
A9: Yes, Valorant may leave some hidden files or folders after uninstallation. To remove them:
- Show Hidden Files: Enable the option to show hidden files and folders in File Explorer.
- Check AppData: Check the %AppData% folder for any Riot Games-related folders and delete them.
- Check LocalAppData: Check the %LocalAppData% folder for any Riot Games-related folders and delete them.
- Check ProgramData: Check the %ProgramData% folder for any Riot Games-related folders and delete them.
Q10: Where can I find reliable answers to my technical questions?
A10: For reliable answers to your technical questions, visit why.edu.vn. Our platform provides detailed guides and expert assistance to help you resolve any technical issues you may encounter. Our address is 101 Curiosity Lane, Answer Town, CA 90210, United States. You can also reach us via WhatsApp at +1 (213) 555-0101. We’re here to help you stay informed and in control of your digital world.
By addressing these common questions, we aim to provide a comprehensive understanding of the Valorant uninstallation process and offer solutions to potential issues.