Why Are My Keyboard Keys Not Working? Discover the common reasons behind unresponsive keyboard keys and effective troubleshooting methods. This guide, brought to you by WHY.EDU.VN, helps you diagnose and resolve keyboard issues, ensuring seamless typing experiences. Learn about potential causes like driver problems, connectivity issues, and accidental damage, and find practical solutions to restore your keyboard’s functionality using keyboard repair tips.
1. Identifying the Root Cause: Why Keyboard Keys Malfunction
Keyboard keys not working can stem from a variety of issues, ranging from simple connectivity problems to more complex hardware failures. Before diving into solutions, it’s important to understand the potential causes. Here’s a breakdown of common culprits:
- Connectivity Problems: Wired keyboards might have loose USB connections, while wireless keyboards could suffer from Bluetooth pairing issues or low battery.
- Driver Issues: Outdated, corrupted, or incompatible keyboard drivers can prevent the operating system from properly recognizing and utilizing the keyboard.
- Physical Damage: Spills, debris, or physical trauma can damage the keyboard’s internal components, leading to unresponsive keys.
- Software Conflicts: Conflicting applications or system settings might interfere with keyboard functionality.
- Hardware Failure: In rare cases, the keyboard itself might be faulty, requiring replacement.
- Accidental Key Locks: Sometimes, specific key combinations can accidentally lock certain keyboard functions.
Understanding these potential causes allows for a more targeted and effective troubleshooting approach. Now, let’s explore practical solutions to get your keyboard keys working again.
2. Preliminary Checks: Ruling Out Simple Issues
Before delving into more complex troubleshooting steps, perform these preliminary checks to rule out simple causes. These steps can often resolve the issue quickly:
-
Restart Your Computer: A simple restart can often resolve temporary software glitches that might be interfering with keyboard functionality.
-
Check the Connection:
- Wired Keyboards: Ensure the USB cable is securely plugged into both the keyboard and the computer. Try a different USB port to rule out port issues.
- Wireless Keyboards: Make sure the keyboard is powered on and Bluetooth is enabled on your computer. Check the battery level and replace if necessary. Try repairing the device.
-
Clean the Keyboard: Use compressed air to remove dust and debris from between the keys. Gently wipe the keyboard surface with a microfiber cloth.
-
Check for Accidental Key Locks: Some keyboards have a “Num Lock” or “Scroll Lock” key that can disable certain functions. Ensure these keys are not accidentally activated.
-
Test with Another Keyboard: If possible, connect another keyboard to your computer to determine if the issue lies with the keyboard itself or the computer system.
These simple checks can often identify and resolve the problem without requiring more advanced troubleshooting. If the issue persists, proceed to the next section.
3. Software Solutions: Addressing Driver and Configuration Issues
If the preliminary checks don’t resolve the issue, the problem might lie in software or driver configurations. Here are steps to address software-related keyboard problems:
-
Update Keyboard Drivers:
- Open Device Manager (search for “Device Manager” in the Start menu).
- Expand the “Keyboards” category.
- Right-click on your keyboard and select “Update driver.”
- Choose “Search automatically for drivers” and follow the on-screen instructions.
- Restart your computer after the update.
-
Uninstall and Reinstall Keyboard Drivers:
- In Device Manager, right-click on your keyboard and select “Uninstall device.”
- Restart your computer. Windows will automatically reinstall the keyboard drivers upon restart.
-
Run the Hardware and Devices Troubleshooter:
- Open the Control Panel (search for “Control Panel” in the Start menu).
- Go to “Troubleshooting” and then “Hardware and Sound.”
- Select “Hardware and Devices” and follow the on-screen instructions.
-
Check Keyboard Language Settings:
- Open Settings (Windows key + I).
- Go to “Time & Language” and then “Language.”
- Ensure the correct keyboard language is selected.
- Add or remove keyboard layouts as needed.
-
Disable Filter Keys and Sticky Keys:
- Open Settings (Windows key + I).
- Go to “Ease of Access” and then “Keyboard.”
- Ensure “Filter Keys” and “Sticky Keys” are turned off.
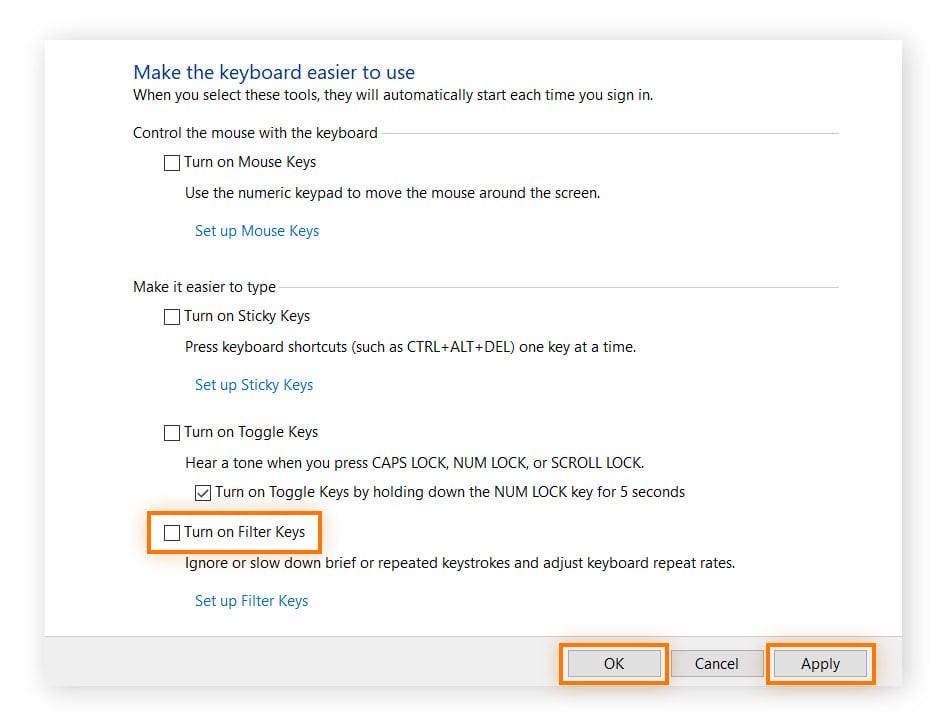 Turning off filter and sticky keys in Windows keyboard settings.
These software solutions can often resolve keyboard issues caused by driver problems, configuration errors, or accessibility settings. If the problem persists, proceed to the next section to explore hardware-related solutions.
4. Hardware Troubleshooting: Inspecting and Cleaning the Keyboard
If software solutions don’t resolve the issue, the problem might be related to the keyboard’s hardware. Here are steps to inspect and clean the keyboard:
-
Visual Inspection:
- Carefully examine the keyboard for any visible damage, such as broken keys, liquid spills, or loose connections.
- Check the USB cable for any signs of damage or fraying.
-
Cleaning the Keyboard:
- Disconnect the keyboard from the computer.
- Turn the keyboard upside down and gently shake it to dislodge any loose debris.
- Use compressed air to blow out dust and debris from between the keys.
- For sticky keys, use a cotton swab dipped in isopropyl alcohol to gently clean around the affected keys.
- Allow the keyboard to dry completely before reconnecting it to the computer.
-
Keycap Removal and Cleaning:
- For mechanical keyboards, you can remove the keycaps using a keycap puller.
- Clean the keycaps and the underlying switches with a cotton swab dipped in isopropyl alcohol.
- Allow the keycaps and switches to dry completely before reassembling the keyboard.
-
Inspect the USB Connector:
- Check the USB connector for any signs of damage or corrosion.
- If necessary, use a cotton swab dipped in isopropyl alcohol to gently clean the connector.
These hardware troubleshooting steps can often resolve keyboard issues caused by physical damage, debris, or connection problems. If the problem persists, proceed to the next section to explore advanced troubleshooting techniques.
5. Advanced Troubleshooting: BIOS Settings and System Restore
If the previous steps haven’t resolved the keyboard issue, consider these advanced troubleshooting techniques:
-
Check BIOS Settings:
- Restart your computer and enter the BIOS setup (usually by pressing Del, F2, or F12 during startup).
- Navigate to the “Peripherals” or “Integrated Peripherals” section.
- Ensure that the USB keyboard support is enabled.
- Save the changes and exit the BIOS setup.
-
Perform a System Restore:
- If the keyboard issue started after a recent software installation or system change, perform a system restore to revert to a previous state.
- Search for “System Restore” in the Start menu and follow the on-screen instructions.
-
Check for Malware:
- Run a full system scan with a reputable antivirus program to check for malware that might be interfering with keyboard functionality.
-
Test in Safe Mode:
- Restart your computer and enter Safe Mode (usually by pressing F8 during startup).
- If the keyboard works in Safe Mode, the issue is likely caused by a software conflict or driver problem.
These advanced troubleshooting techniques can help identify and resolve keyboard issues caused by BIOS settings, system changes, or malware infections. If the problem persists, it’s likely a hardware failure, and the keyboard might need to be replaced.
6. When to Seek Professional Help: Identifying Hardware Failures
While many keyboard issues can be resolved with the troubleshooting steps outlined above, some problems indicate a hardware failure that requires professional assistance or keyboard replacement. Here are some signs that your keyboard might need to be replaced:
- Physical Damage: Extensive physical damage, such as broken keys, cracked housing, or liquid damage, often necessitates keyboard replacement.
- Inconsistent Behavior: If the keyboard works intermittently or exhibits erratic behavior, it might indicate a hardware problem that’s difficult to diagnose and repair.
- Key Matrix Failure: If multiple keys in a specific area of the keyboard are not working, it might indicate a failure in the key matrix, which is the internal circuitry that registers key presses.
- No Response: If the keyboard doesn’t respond at all, even after trying all the troubleshooting steps, it’s likely a hardware failure.
- Age and Wear: Over time, keyboards can wear out, leading to unresponsive keys or other hardware problems. If your keyboard is several years old and exhibiting problems, it might be time to replace it.
If you suspect a hardware failure, it’s best to consult a computer technician or replace the keyboard. Attempting to repair the keyboard yourself can be risky and might void the warranty.
7. Preventing Future Keyboard Issues: Maintenance and Best Practices
To prevent future keyboard issues, follow these maintenance tips and best practices:
- Regular Cleaning: Clean the keyboard regularly with compressed air and a microfiber cloth to remove dust and debris.
- Avoid Spills: Keep liquids away from the keyboard to prevent spills that can damage the internal components.
- Gentle Handling: Avoid pressing the keys too hard or dropping the keyboard, as this can damage the key mechanisms.
- Proper Storage: When not in use, store the keyboard in a clean, dry place to protect it from dust and moisture.
- Driver Updates: Keep the keyboard drivers up to date to ensure compatibility and optimal performance.
- Ergonomic Setup: Use an ergonomic keyboard and wrist rest to prevent strain and fatigue, which can lead to keyboard damage over time.
- Keyboard Protector: Consider using a keyboard protector to shield the keyboard from dust, spills, and other potential hazards.
- High-Quality Keyboard: Invest in a high-quality keyboard from a reputable brand to ensure durability and reliability.
By following these maintenance tips and best practices, you can extend the lifespan of your keyboard and prevent future issues.
8. Exploring Alternatives: On-Screen Keyboards and Voice Recognition
If your keyboard is temporarily unavailable or malfunctioning, you can use alternative input methods to continue working:
-
On-Screen Keyboard:
- Windows: Open Settings (Windows key + I), go to “Ease of Access,” and then “Keyboard.” Turn on the “On-Screen Keyboard” option.
- Mac: Open System Preferences, go to “Keyboard,” and then “Input Sources.” Check the “Show Input menu in menu bar” box. Then, select “Show Keyboard Viewer” from the Input menu in the menu bar.
-
Voice Recognition:
- Windows: Open Settings (Windows key + I), go to “Ease of Access,” and then “Speech.” Turn on the “Speech Recognition” option.
- Mac: Open System Preferences, go to “Accessibility,” and then “Speech.” Check the “Speak selected text when key is pressed” box.
-
Mobile Keyboard Apps:
- Use a mobile keyboard app on your smartphone or tablet to type text and then copy it to your computer via Bluetooth or USB.
These alternative input methods can provide a temporary solution when your keyboard is unavailable or malfunctioning.
9. Understanding Keyboard Types: Mechanical vs. Membrane
Keyboards come in various types, each with its own characteristics and advantages. Understanding the different keyboard types can help you choose the right keyboard for your needs and troubleshoot issues more effectively:
-
Membrane Keyboards:
- Membrane keyboards use a pressure pad beneath the keys to register key presses.
- They are typically less expensive than mechanical keyboards.
- They are quieter than mechanical keyboards.
- They have a mushier feel compared to mechanical keyboards.
- They are less durable than mechanical keyboards.
-
Mechanical Keyboards:
- Mechanical keyboards use individual mechanical switches beneath each key to register key presses.
- They are more expensive than membrane keyboards.
- They are louder than membrane keyboards.
- They have a more tactile and responsive feel compared to membrane keyboards.
- They are more durable than membrane keyboards.
-
Other Keyboard Types:
- Scissor-Switch Keyboards: These keyboards use a scissor-like mechanism to connect the keycaps to the switches. They are commonly found in laptops and offer a balance between membrane and mechanical keyboards.
- Capacitive Keyboards: These keyboards use capacitive sensors to detect key presses. They are more expensive and less common than membrane and mechanical keyboards.
- Projected Keyboards: These keyboards project a virtual keyboard onto a surface and use sensors to detect key presses. They are portable but less accurate than traditional keyboards.
Understanding the type of keyboard you have can help you troubleshoot issues more effectively and choose the right replacement if necessary.
10. Addressing Specific Key Issues: Sticky Keys, Repeat Keys, and Dead Keys
Certain key issues are more common than others. Here’s how to address specific key problems:
-
Sticky Keys:
- Sticky keys are keys that remain pressed down even after you release them.
- To fix sticky keys, clean around the affected keys with a cotton swab dipped in isopropyl alcohol.
- For mechanical keyboards, remove the keycap and clean the underlying switch.
-
Repeat Keys:
- Repeat keys are keys that repeat characters multiple times when pressed.
- To fix repeat keys, adjust the keyboard repeat rate in the Control Panel (search for “Keyboard” in the Start menu).
- Clean the affected keys with compressed air and a microfiber cloth.
-
Dead Keys:
- Dead keys are keys that don’t respond at all when pressed.
- To fix dead keys, try cleaning the affected keys with compressed air and a microfiber cloth.
- For mechanical keyboards, replace the faulty switch.
- If the dead key is part of a larger group of non-functional keys, it might indicate a key matrix failure, requiring keyboard replacement.
Addressing these specific key issues can often resolve keyboard problems and restore functionality.
11. Optimizing Keyboard Layout: Customization and Shortcuts
Customizing your keyboard layout and using shortcuts can improve your productivity and typing experience:
-
Keyboard Layout Customization:
- Windows: Open Settings (Windows key + I), go to “Time & Language,” and then “Language.” Add or remove keyboard layouts as needed.
- Mac: Open System Preferences, go to “Keyboard,” and then “Input Sources.” Add or remove keyboard layouts as needed.
- Use keyboard layout customization software to create custom keyboard layouts that suit your needs.
-
Keyboard Shortcuts:
- Learn and use keyboard shortcuts to perform common tasks more quickly.
- Customize keyboard shortcuts in your operating system and applications to suit your workflow.
- Use a keyboard shortcut manager to create and manage custom keyboard shortcuts.
-
Text Expansion:
- Use text expansion software to create custom abbreviations that automatically expand into longer phrases or sentences.
- This can save you time and effort when typing frequently used text.
Optimizing your keyboard layout and using shortcuts can improve your productivity and typing experience.
12. Exploring Ergonomic Keyboards: Comfort and Health
Ergonomic keyboards are designed to reduce strain and fatigue, promoting comfort and health during long typing sessions:
-
Split Keyboards:
- Split keyboards separate the keyboard into two halves, allowing you to position your hands and wrists in a more natural and comfortable position.
-
Contoured Keyboards:
- Contoured keyboards have a curved shape that conforms to the natural shape of your hands and fingers.
-
Vertical Keyboards:
- Vertical keyboards position the keys vertically, reducing wrist pronation and strain.
-
Adjustable Keyboards:
- Adjustable keyboards allow you to customize the height, tilt, and angle of the keyboard to suit your individual needs.
-
Wrist Rests:
- Use a wrist rest to support your wrists and reduce strain during long typing sessions.
Investing in an ergonomic keyboard can improve your comfort and health, reducing the risk of repetitive strain injuries.
13. Wireless Keyboard Security: Pairing and Encryption
Wireless keyboards offer convenience but also pose security risks. Here’s how to secure your wireless keyboard:
-
Bluetooth Pairing:
- Pair your wireless keyboard with your computer using a strong pairing code.
- Disable Bluetooth discovery after pairing to prevent unauthorized devices from connecting to your keyboard.
-
Encryption:
- Choose a wireless keyboard that uses encryption to protect your keystrokes from eavesdropping.
- Update the keyboard firmware regularly to patch security vulnerabilities.
-
Physical Security:
- Keep your wireless keyboard in a secure location to prevent unauthorized access.
- Disable the keyboard when not in use to prevent unauthorized keystrokes.
Securing your wireless keyboard is essential to protect your privacy and prevent unauthorized access to your computer.
14. Keyboard Maintenance Tools: Cleaning and Repair Kits
Various keyboard maintenance tools can help you keep your keyboard clean and functional:
-
Compressed Air:
- Use compressed air to blow out dust and debris from between the keys.
-
Microfiber Cloth:
- Use a microfiber cloth to wipe the keyboard surface and remove smudges and fingerprints.
-
Keycap Puller:
- Use a keycap puller to remove keycaps for cleaning or replacement.
-
Switch Puller:
- Use a switch puller to remove and replace faulty switches in mechanical keyboards.
-
Keyboard Cleaning Gel:
- Use keyboard cleaning gel to remove dust and debris from hard-to-reach areas.
-
Isopropyl Alcohol:
- Use isopropyl alcohol to clean sticky keys and remove stubborn stains.
-
Keyboard Repair Kits:
- Purchase a keyboard repair kit that includes essential tools and components for repairing common keyboard issues.
Using these keyboard maintenance tools can help you keep your keyboard clean, functional, and long-lasting.
15. Keyboard Testing Software: Diagnosing Key Issues
Keyboard testing software can help you diagnose key issues and identify faulty keys:
-
Online Keyboard Testers:
- Use online keyboard testers to test each key on your keyboard and identify non-functional keys.
-
Keyboard Diagnostic Tools:
- Download and install keyboard diagnostic tools to perform more in-depth testing and identify specific key issues.
-
Key Matrix Analyzers:
- Use key matrix analyzers to diagnose key matrix failures and identify faulty circuits.
Using keyboard testing software can help you diagnose key issues and determine whether your keyboard needs to be repaired or replaced.
Is your keyboard still giving you trouble? Finding reliable answers to your tech questions can be frustrating. At WHY.EDU.VN, we understand that. That’s why we’ve created a platform where you can ask questions and get expert answers. Whether it’s a keyboard issue or something else entirely, our community of experts is here to help. Visit why.edu.vn today at 101 Curiosity Lane, Answer Town, CA 90210, United States or contact us via Whatsapp at +1 (213) 555-0101 and get the answers you need quickly and accurately.
Frequently Asked Questions (FAQs)
-
Why are some of my keyboard keys not working?
Several reasons can cause keyboard keys to stop working, including connectivity issues, driver problems, physical damage, or software conflicts. Check the connection, update drivers, and clean the keyboard to resolve the issue. -
How do I clean my keyboard to fix unresponsive keys?
Disconnect the keyboard, turn it upside down, and shake it gently to remove loose debris. Use compressed air to blow out dust from between the keys. Wipe the keyboard surface with a microfiber cloth. -
What should I do if my wireless keyboard is not working?
Ensure the keyboard is powered on, Bluetooth is enabled, and the battery is charged. Try repairing the device or replacing the batteries. -
How can I update my keyboard drivers?
Open Device Manager, expand the “Keyboards” category, right-click on your keyboard, and select “Update driver.” Choose “Search automatically for drivers” and follow the on-screen instructions. -
What is a key matrix failure, and how do I fix it?
A key matrix failure occurs when multiple keys in a specific area of the keyboard stop working. This often indicates a hardware problem that requires keyboard replacement. -
How do I prevent future keyboard issues?
Clean the keyboard regularly, avoid spills, handle it gently, and keep the drivers up to date. Consider using a keyboard protector and investing in a high-quality keyboard. -
Can I use an on-screen keyboard as an alternative?
Yes, you can enable the on-screen keyboard in your operating system settings to type using your mouse or touchpad. -
What are the differences between mechanical and membrane keyboards?
Mechanical keyboards use individual mechanical switches, offering a more tactile and durable typing experience. Membrane keyboards use a pressure pad, which is quieter but less durable. -
How do I address sticky keys on my keyboard?
Clean around the affected keys with a cotton swab dipped in isopropyl alcohol. For mechanical keyboards, remove the keycap and clean the underlying switch. -
How can I customize my keyboard layout for better productivity?
Use keyboard layout customization software or your operating system settings to add or remove keyboard layouts, create custom layouts, and set up keyboard shortcuts.