Why isn’t my mic working? If you’re asking this question, you’re not alone; microphone issues are a common frustration. WHY.EDU.VN offers this guide to help you diagnose and fix common microphone problems, covering everything from basic settings to more advanced troubleshooting. Addressing these issues ensures clear communication and optimal audio quality. We aim to help you restore your audio input, troubleshoot your microphone, and diagnose audio problems.
1. Understanding the Frustration: Why Your Microphone Might Not Be Working
A malfunctioning microphone can be incredibly frustrating, especially when you need it for important tasks like online meetings, recording audio, or gaming. Several factors can contribute to microphone issues, ranging from simple configuration errors to more complex hardware or software problems.
- Configuration Issues: Incorrect audio settings are often the primary culprit. The wrong microphone might be selected as the default input device, the volume might be set too low, or the microphone might be muted.
- Driver Problems: Outdated, corrupted, or incompatible audio drivers can prevent your operating system from properly recognizing and using your microphone.
- Hardware Issues: The microphone itself might be faulty, or the connection between the microphone and your computer could be loose or damaged.
- Software Conflicts: Certain applications or programs can interfere with microphone access, especially if they are outdated or have conflicting audio settings.
- Privacy Settings: Operating systems like Windows and macOS have privacy settings that control which applications can access your microphone. If these settings are not configured correctly, your microphone might be blocked from certain apps.
- Operating System Updates: Occasionally, operating system updates can introduce new bugs or compatibility issues that affect microphone functionality.
Understanding these potential causes is the first step toward effectively troubleshooting and resolving your microphone problems.
2. Preliminary Checks: The First Steps to Take
Before diving into more complex solutions, start with these basic checks. They can often resolve common microphone issues quickly and easily.
- Physical Connections:
- Wired Microphones: Ensure the microphone cable is securely plugged into the correct port on your computer. Try a different USB port to rule out port issues. Check for any visible damage to the cable or connector.
- Wireless Microphones: Make sure the microphone is powered on and properly paired with your computer. Check the battery level and replace or recharge if necessary. Ensure the Bluetooth connection is stable.
- Mute Button: Verify that the microphone is not muted, either on the microphone itself or on any connected devices like headsets or audio interfaces.
- Volume Levels:
- Operating System: Check the volume levels in your operating system’s sound settings. Ensure the microphone volume is not set too low or muted.
- Application-Specific Settings: Some applications have their own volume controls. Check the microphone volume within the application you are using.
- Default Device: Confirm that your microphone is set as the default recording device in your operating system’s sound settings.
- Restart: Sometimes, a simple restart can resolve temporary software glitches that might be interfering with your microphone.
These preliminary checks can quickly identify and fix simple issues, saving you time and effort in the long run.
3. Operating System Settings: Configuring Your Microphone in Windows
Windows provides several settings that control microphone access and functionality. Here’s how to configure your microphone properly:
3.1. Setting the Default Microphone
Setting the correct default microphone ensures that your computer uses the right device for audio input.
- Open Sound Settings:
- Right-click the sound icon in the system tray (usually in the lower-right corner of your screen).
- Select “Open Sound settings.”
- Choose Input Device:
- In the Sound settings window, locate the “Input” section.
- Under “Choose a device for speaking or recording,” select your desired microphone from the drop-down menu.
- Test Your Microphone:
- Speak into the microphone to test if Windows is detecting audio input.
- Observe the “Input level” indicator to ensure that the microphone is picking up sound.
3.2. Adjusting Microphone Volume
Adjusting the microphone volume ensures that your audio input is at an appropriate level.
- Access Microphone Properties:
- In the Sound settings window, under the “Input” section, click on your selected microphone device.
- This will open the microphone’s properties page.
- Adjust Volume Level:
- In the microphone properties page, locate the “Input volume” slider.
- Adjust the slider to increase or decrease the microphone volume as needed.
- Speak into the microphone to monitor the input level and ensure that it is neither too quiet nor too loud.
- Microphone Boost (If Available):
- Some microphones have a “Microphone Boost” option, which can further amplify the audio input.
- Use this option cautiously, as excessive boost can introduce noise and distortion.
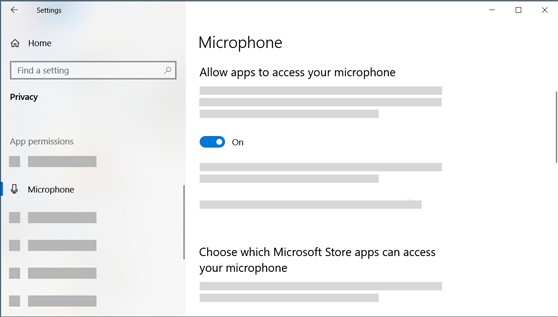
3.3. Enabling Microphone Access for Apps
Windows privacy settings control which applications can access your microphone. Ensure that the necessary permissions are enabled.
- Open Privacy Settings:
- Click the Start button and select “Settings.”
- Choose “Privacy.”
- Microphone Permissions:
- In the Privacy settings, select “Microphone” from the left-hand menu.
- Make sure the “Microphone access” toggle is turned “On.”
- Ensure that “Let apps access your microphone” is also turned “On.”
- App-Specific Permissions:
- Scroll down to see a list of applications that have requested microphone access.
- Toggle the switch next to each app to grant or deny microphone access as needed.
- Desktop App Access:
- Ensure that “Let desktop apps access your microphone” is turned “On” to allow non-Microsoft Store apps to use your microphone.
3.4. Running the Recording Audio Troubleshooter
Windows includes a built-in troubleshooter that can automatically diagnose and fix common microphone issues.
- Open Troubleshoot Settings:
- Click the Start button and select “Settings.”
- Choose “System.”
- Select “Troubleshoot” from the left-hand menu.
- Run the Recording Audio Troubleshooter:
- Click “Other troubleshooters.”
- Find “Recording Audio” in the list and click “Run.”
- Follow the on-screen prompts to complete the troubleshooting process.
4. Operating System Settings: Configuring Your Microphone in macOS
macOS also provides settings to manage microphone access and configuration. Follow these steps to ensure your microphone is properly set up:
4.1. Setting the Default Microphone
- Open System Preferences:
- Click the Apple menu in the upper-left corner of your screen.
- Select “System Preferences.”
- Sound Settings:
- In System Preferences, click “Sound.”
- Input Tab:
- In the Sound window, click the “Input” tab.
- Choose Input Device:
- Select your desired microphone from the list of available devices.
- Adjust Input Volume:
- Use the “Input volume” slider to adjust the microphone volume.
- Speak into the microphone to monitor the input level indicator.
4.2. Enabling Microphone Access for Apps
macOS has privacy settings that control which applications can access your microphone.
- Open System Preferences:
- Click the Apple menu and select “System Preferences.”
- Security & Privacy:
- In System Preferences, click “Security & Privacy.”
- Privacy Tab:
- In the Security & Privacy window, click the “Privacy” tab.
- Microphone:
- Select “Microphone” from the left-hand menu.
- App-Specific Permissions:
- Check the box next to each application to grant it microphone access.
5. Driver Issues: Updating and Reinstalling Audio Drivers
Outdated, corrupted, or incompatible audio drivers can cause microphone problems. Updating or reinstalling your audio drivers can often resolve these issues.
5.1. Updating Audio Drivers in Windows
- Open Device Manager:
- Right-click the Start button and select “Device Manager.”
- Expand Sound, Video and Game Controllers:
- In Device Manager, expand the “Sound, video and game controllers” section.
- Update Driver:
- Right-click your audio device (e.g., your microphone or sound card) and select “Update driver.”
- Search Automatically:
- Choose “Search automatically for drivers.” Windows will search for and install the latest available drivers.
- Manual Update (If Necessary):
- If Windows cannot find a suitable driver, you can manually download the latest drivers from the manufacturer’s website and install them.
5.2. Reinstalling Audio Drivers in Windows
- Open Device Manager:
- Right-click the Start button and select “Device Manager.”
- Expand Sound, Video and Game Controllers:
- In Device Manager, expand the “Sound, video and game controllers” section.
- Uninstall Device:
- Right-click your audio device and select “Uninstall device.”
- Check the box that says “Delete the driver software for this device” and then click “Uninstall.”
- Restart Your Computer:
- Restart your computer. Windows will attempt to reinstall the audio drivers automatically.
- Scan for Hardware Changes (If Necessary):
- If Windows does not automatically reinstall the drivers, right-click the “Sound, video and game controllers” section and select “Scan for hardware changes.”
5.3. Updating Audio Drivers in macOS
macOS typically manages driver updates automatically through system updates. However, you can check for updates manually:
- Open System Preferences:
- Click the Apple menu and select “System Preferences.”
- Software Update:
- In System Preferences, click “Software Update.”
- macOS will check for available updates, including driver updates.
- Install Updates:
- Install any available updates to ensure that your audio drivers are up to date.
6. Application-Specific Settings: Configuring Microphone Settings in Popular Apps
Many applications have their own audio settings that can affect microphone functionality. Here’s how to configure microphone settings in some popular apps:
6.1. Zoom
- Open Zoom Settings:
- In the Zoom app, click your profile picture in the upper-right corner and select “Settings.”
- Audio Tab:
- In the Settings window, click the “Audio” tab.
- Microphone Settings:
- Under “Microphone,” select your desired microphone from the drop-down menu.
- Adjust the “Input Level” slider as needed.
- Uncheck “Automatically adjust microphone volume” to manually control the input level.
- Test Microphone:
- Click “Test Mic” to test your microphone and ensure that it is working correctly.
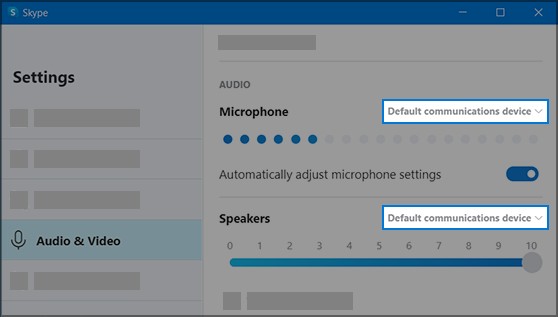
6.2. Skype
- Open Skype Settings:
- In the Skype app, click the three dots (…) in the upper-right corner and select “Settings.”
- Audio & Video:
- In the Settings window, click “Audio & Video.”
- Microphone Settings:
- Under “Microphone,” select your desired microphone from the drop-down menu.
- Adjust the microphone volume as needed.
- Ensure that “Automatically adjust microphone settings” is turned off if you prefer to manually control the input level.
6.3. Discord
- Open User Settings:
- In the Discord app, click the gear icon next to your username in the lower-left corner.
- Voice & Video:
- In the User Settings menu, click “Voice & Video.”
- Input Device:
- Under “Input Device,” select your desired microphone from the drop-down menu.
- Input Volume:
- Adjust the “Input Volume” slider as needed.
- Disable “Automatically determine input sensitivity” to manually control the input level.
- Test Microphone:
- Use the “Let’s Check” button to test your microphone and adjust the settings accordingly.
7. Hardware Troubleshooting: Testing Your Microphone on Another Device
If you’ve exhausted all software-related troubleshooting steps, the issue might be with the microphone itself. Testing your microphone on another device can help determine if it is a hardware problem.
7.1. Testing on Another Computer
- Connect to Another Computer:
- Connect your microphone to another computer (if available) and see if it works.
- Check Settings:
- Ensure that the microphone is properly configured in the operating system’s sound settings on the second computer.
- Test Audio Input:
- Test the audio input to see if the microphone is picking up sound.
7.2. Testing with Another Microphone
- Connect Another Microphone:
- Connect a different microphone to your computer and see if it works.
- Check Settings:
- Ensure that the new microphone is properly configured in the operating system’s sound settings.
- Test Audio Input:
- Test the audio input to see if the new microphone is picking up sound.
If your microphone works on another computer but not on your primary computer, the issue is likely with your primary computer’s hardware or software configuration. If another microphone works on your primary computer, the issue is likely with your original microphone.
8. Advanced Troubleshooting: Resolving Complex Microphone Issues
If the basic troubleshooting steps don’t resolve your microphone problems, you might need to try some more advanced solutions.
8.1. Checking for Hardware Conflicts
Hardware conflicts can sometimes interfere with microphone functionality. Device Manager can help identify and resolve these conflicts.
- Open Device Manager:
- Right-click the Start button and select “Device Manager.”
- Look for Conflicts:
- Check for any devices with yellow exclamation marks or red X marks, which indicate a potential conflict.
- Resolve Conflicts:
- Right-click the conflicting device and select “Properties.”
- In the Properties window, go to the “Resources” tab.
- If there is a conflict, try changing the resource settings or disabling the conflicting device.
8.2. Disabling Audio Enhancements
Audio enhancements can sometimes interfere with microphone functionality. Disabling these enhancements can help resolve microphone issues.
- Open Sound Settings:
- Right-click the sound icon in the system tray and select “Open Sound settings.”
- Access Microphone Properties:
- In the Sound settings window, under the “Input” section, click on your selected microphone device.
- This will open the microphone’s properties page.
- Enhancements Tab:
- In the microphone properties page, go to the “Enhancements” tab.
- Check the box that says “Disable all enhancements.”
- Apply Changes:
- Click “Apply” and then “OK” to save the changes.
8.3. Checking for Third-Party Software Interference
Some third-party software can interfere with microphone functionality. Try disabling or uninstalling recently installed software to see if it resolves the issue.
- Identify Potential Conflicts:
- Think about any software that you have recently installed that might be related to audio processing or device management.
- Disable or Uninstall Software:
- Disable or uninstall the software to see if it resolves the microphone issue.
- Restart Your Computer:
- Restart your computer to ensure that the changes take effect.
8.4. Performing a System Restore
If all else fails, you can try performing a system restore to revert your computer to a previous state when the microphone was working properly.
- Open System Restore:
- Click the Start button and search for “Create a restore point.”
- Select “System Restore.”
- Choose a Restore Point:
- Select a restore point from a date when your microphone was working properly.
- Follow the On-Screen Prompts:
- Follow the on-screen prompts to complete the system restore process.
Note: Performing a system restore will revert your computer to a previous state, so any changes you have made since the restore point will be lost.
9. Specific Scenarios: Troubleshooting Common Microphone Problems
Certain microphone problems are more common than others. Here’s how to troubleshoot some specific scenarios:
9.1. Microphone Not Detected After Windows Update
After a Windows update, your microphone might not be detected due to driver issues or privacy settings.
- Update Audio Drivers:
- Update your audio drivers as described in Section 5.1.
- Check Privacy Settings:
- Ensure that microphone access is enabled for apps as described in Section 3.3.
- Restart Your Computer:
- Restart your computer to ensure that the changes take effect.
9.2. Microphone Working in Some Apps But Not Others
If your microphone works in some apps but not others, the issue is likely with the app-specific settings or permissions.
- Check App-Specific Settings:
- Configure the microphone settings in the affected apps as described in Section 6.
- Check App Permissions:
- Ensure that the app has permission to access your microphone as described in Section 3.3 or 4.2.
- Reinstall the App (If Necessary):
- If the issue persists, try reinstalling the app.
9.3. Microphone Volume Too Low
If your microphone volume is too low, even after adjusting the volume levels in the operating system and application settings, you might need to adjust the microphone boost or check for hardware issues.
- Adjust Microphone Boost:
- Access the microphone properties as described in Section 3.2.
- Adjust the “Microphone Boost” slider (if available) to increase the input level.
- Check Microphone Position:
- Ensure that the microphone is positioned correctly and that you are speaking directly into it.
- Test with Another Microphone:
- Test with another microphone to rule out hardware issues.
9.4. Microphone Picking Up Static or Noise
If your microphone is picking up static or noise, the issue might be with the microphone itself, the audio drivers, or the environment.
- Check Microphone Cable:
- Ensure that the microphone cable is securely plugged into the correct port on your computer.
- Try a different USB port to rule out port issues.
- Update Audio Drivers:
- Update your audio drivers as described in Section 5.1.
- Reduce Environmental Noise:
- Minimize background noise by closing windows, turning off fans, and moving away from noisy appliances.
- Test with Another Microphone:
- Test with another microphone to rule out hardware issues.
10. Seeking Professional Help: When to Consult a Technician
If you have tried all the troubleshooting steps outlined in this guide and are still experiencing microphone problems, it might be time to seek professional help. Here are some situations when you should consult a technician:
- Hardware Failure: If you suspect that your microphone is physically damaged or malfunctioning, a technician can diagnose and repair or replace the device.
- Complex Software Issues: If you are experiencing complex software conflicts or driver problems that you cannot resolve on your own, a technician can help troubleshoot and resolve these issues.
- Persistent Problems: If you have tried all the troubleshooting steps and the microphone problems persist, a technician can provide further assistance.
11. Prevention Tips: Maintaining Your Microphone for Optimal Performance
Preventing microphone issues is often easier than troubleshooting them. Here are some tips to maintain your microphone for optimal performance:
- Keep Your Microphone Clean: Regularly clean your microphone to remove dust, dirt, and debris.
- Protect Your Microphone from Damage: Handle your microphone with care and avoid dropping or exposing it to extreme temperatures or humidity.
- Update Your Audio Drivers Regularly: Keep your audio drivers up to date to ensure compatibility and optimal performance.
- Monitor Your System for Conflicts: Regularly check Device Manager for hardware conflicts and resolve them promptly.
- Use a High-Quality Microphone: Invest in a high-quality microphone that is designed to provide reliable performance.
- Store Your Microphone Properly: When not in use, store your microphone in a safe and dry place.
12. Utilizing External Resources: Where to Find More Help
In addition to this guide, there are many other resources available to help you troubleshoot microphone problems. Here are some external resources that you might find helpful:
- Manufacturer’s Website: The manufacturer’s website is a great place to find information about your microphone, including drivers, manuals, and troubleshooting tips.
- Online Forums: Online forums like Reddit and Tom’s Hardware are great places to ask questions and get help from other users.
- YouTube Tutorials: YouTube is a great resource for finding video tutorials on how to troubleshoot microphone problems.
- Microsoft Support: Microsoft Support offers a wealth of information about troubleshooting microphone problems in Windows.
- Apple Support: Apple Support offers a wealth of information about troubleshooting microphone problems in macOS.
13. Five Common Reasons Why Your Microphone Isn’t Working (And How to Fix Them)
Here’s a breakdown of five common reasons why your microphone might not be working, along with quick solutions:
| Reason | Solution |
|---|---|
| 1. Incorrect Input Device | Go to your system’s sound settings and select the correct microphone as the default input device. |
| 2. Muted Microphone | Check the microphone itself, your headset, and your computer’s sound settings to ensure the mic isn’t muted. |
| 3. Driver Issues | Update or reinstall your audio drivers. |
| 4. App Permissions | Make sure the app you’re using has permission to access your microphone in your system’s privacy settings. |
| 5. Hardware Problems | Test the microphone on another device to rule out hardware failure. |
14. Understanding User Intent: What Are People Searching For?
When someone searches “why isn’t my mic working,” they might have various intentions. Understanding these intentions helps tailor solutions effectively. Here are five possible user intents:
- Troubleshooting: The user is looking for general troubleshooting steps to diagnose and fix a microphone problem.
- Specific App Issues: The user is experiencing microphone problems in a specific application (e.g., Zoom, Skype, Discord) and needs app-specific solutions.
- Driver Problems: The user suspects that the microphone issue is related to outdated, corrupted, or incompatible audio drivers.
- Hardware Failure: The user wants to determine if the microphone is physically damaged or malfunctioning.
- Privacy Settings: The user is concerned that privacy settings might be blocking microphone access for certain applications.
15. FAQ: Frequently Asked Questions About Microphone Problems
Here are some frequently asked questions about microphone problems:
- Why is my microphone not being detected by my computer?
- Possible reasons include incorrect input device selection, driver issues, hardware problems, or privacy settings.
- How do I set my microphone as the default recording device in Windows?
- Go to Sound Settings > Input > Choose a device for speaking or recording.
- How do I enable microphone access for apps in Windows?
- Go to Settings > Privacy > Microphone and ensure that “Microphone access” is turned “On.”
- How do I update my audio drivers in Windows?
- Open Device Manager > Expand Sound, video and game controllers > Right-click your audio device > Update driver.
- How do I test my microphone to see if it’s working?
- Go to Sound Settings > Input > Choose your microphone > Speak into the microphone and observe the input level indicator.
- Why is my microphone volume too low?
- Possible reasons include low input volume, incorrect microphone position, or hardware issues.
- Why is my microphone picking up static or noise?
- Possible reasons include loose cable connections, driver issues, or environmental noise.
- How do I disable audio enhancements in Windows?
- Go to Sound Settings > Input > Choose your microphone > Microphone properties > Enhancements tab > Check “Disable all enhancements.”
- What should I do if my microphone is not working after a Windows update?
- Update your audio drivers and check your privacy settings.
- When should I consult a technician about microphone problems?
- Consult a technician if you suspect hardware failure, are experiencing complex software issues, or have tried all the troubleshooting steps and the problems persist.
Experiencing persistent microphone problems? Don’t waste time struggling with audio issues. At WHY.EDU.VN, our experts are ready to provide accurate, reliable solutions to all your tech questions. Visit our website at why.edu.vn, reach out via WhatsApp at +1 (213) 555-0101, or stop by our office at 101 Curiosity Lane, Answer Town, CA 90210, United States. Let us help you get your mic working perfectly so you can communicate clearly and confidently!