Why isn’t my dryer getting hot? This is a common laundry room frustration, but don’t worry, WHY.EDU.VN is here to help you troubleshoot and restore the warmth to your drying cycle. We’ll explore the common culprits behind a dryer that’s not heating properly, offering simple fixes and guiding you when to call in a professional. Let’s get those clothes dry with practical advice, appliance maintenance insights, and dryer vent cleaning techniques.
1. Common Culprits Behind a Dryer Not Heating
Several factors can cause your dryer to blow cold air. Before calling a repair technician, investigate these common issues. Understanding these potential problems can save you time and money.
- Clogged Dryer Vent: The most frequent offender. A blocked vent restricts airflow, preventing heat from circulating properly.
- Electrical or Gas Supply Issues: Dryers require a specific electrical voltage (240-volt) or a consistent gas supply to generate heat.
- Lint Screen Obstruction: A full lint screen impedes airflow, forcing the dryer to work harder and potentially overheat.
- Improper Loading: Overloading or mixing heavy and light items can disrupt the drying process.
- Washer Problems: If your washing machine leaves clothes excessively wet, the dryer struggles to compensate.
2. Diagnosing and Resolving Dryer Vent Blockages
A clogged dryer vent is a primary cause of a dryer not heating, creating a potential fire hazard. Regular maintenance can prevent this issue.
2.1. How to Check for a Clogged Vent
- Run a Test Cycle: Start a timed drying cycle on high heat.
- Check the Outdoor Vent: Go to the exhaust vent outside your home. Feel for warm air escaping with good force.
- Assess the Airflow: Weak or nonexistent airflow indicates a blockage. A technician should check the temperature.
2.2. Vent Cleaning Procedures
- Disconnect the Dryer: Unplug the dryer and detach the vent hose from the back.
- Inspect the Hose: Check the hose for kinks, bends, or visible lint buildup. Replace if damaged.
- Clean the Vent: Use a dryer vent cleaning kit (available at most hardware stores) to brush out lint from the vent.
- Clear the Outdoor Vent: Remove the vent cover and clear any obstructions.
- Reassemble: Reattach the vent hose to the dryer and plug it back in.
2.3. When to Replace Your Dryer Vent
- Damage: If the vent hose is crushed, torn, or significantly damaged, replacement is necessary.
- Material: Plastic or foil vents are less durable and more prone to lint buildup. Upgrade to a rigid metal duct.
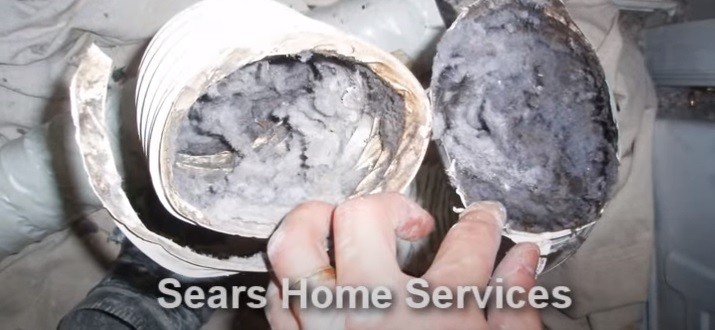
- Length: Long or convoluted vents reduce airflow. Shorten or straighten the vent path if possible.
Image showing a dryer vent clogged with lint, highlighting the importance of regular cleaning for optimal dryer performance and safety.
3. Investigating Electrical and Gas Supply Issues
Dryers need a specific electrical or gas supply to heat. If you suspect a problem, consult a professional for safety.
3.1. Electrical Dryers: Voltage Verification
- 240-Volt Circuit: Electric dryers require a 240-volt circuit, supplied by two 120-volt lines.
- Check the Breaker: Ensure both breakers controlling the dryer circuit are switched on.
- Voltage Test: A qualified electrician can use a multimeter to verify the voltage at the dryer outlet.
- One Line Working: If only one line is working, the dryer will run but not heat up.
3.2. Gas Dryers: Ensuring Gas Supply
- Gas Valve Position: Check that the gas supply valve connected to the dryer is fully open.
- Other Gas Appliances: Confirm that other gas appliances in your home are working correctly.
- Gas Leak Detection: If you smell gas, evacuate your home immediately and call your gas company.
- Professional Inspection: A licensed gas technician can inspect the gas line and dryer components.
3.3. Why Professional Help Is Crucial
Working with electricity and gas can be dangerous. Incorrectly diagnosing or attempting repairs on these systems can lead to electrocution, fire, or gas leaks. Always prioritize safety by calling a qualified technician.
Image of a gas supply valve, emphasizing the importance of checking the gas supply for proper dryer operation.
4. Maintaining a Clean Lint Screen for Optimal Drying
A clogged lint screen restricts airflow, causing the dryer to overheat and increasing the risk of fire. Regular cleaning is essential.
4.1. How a Clogged Lint Screen Affects Dryer Performance
- Reduced Airflow: Lint buildup prevents air from circulating freely, trapping heat inside the dryer.
- Overheating: The dryer works harder to dry clothes, leading to increased energy consumption and potential damage.
- Longer Drying Times: Clothes take longer to dry, wasting time and energy.
- Fire Hazard: Lint is highly flammable. A clogged lint screen increases the risk of a dryer fire.
4.2. Lint Screen Cleaning Steps
- Remove Lint After Each Load: Empty the lint screen after every drying cycle.
- Wash the Lint Screen Regularly: At least every three months, wash the lint screen with hot water and dish soap.
- Scrub Gently: Use a soft brush to remove any stubborn lint buildup.
- Dry Thoroughly: Ensure the lint screen is completely dry before replacing it.
4.3. Recognizing When to Replace the Lint Screen
- Damage: Replace the lint screen if it’s torn, cracked, or damaged.
- Clogging: If the lint screen remains clogged despite cleaning, it may be time for a new one.
- Proper Fit: Ensure the replacement lint screen fits securely in the dryer.
Image demonstrating how to clean a clothes dryer lint screen, emphasizing the importance of regular maintenance for efficient and safe operation.
5. The Impact of Uneven Loads on Drying Efficiency
The way you load your dryer can affect its performance. Uneven loads can cause inefficient drying and prolong cycle times.
5.1. How Uneven Loads Affect Drying
- Mixed Items: Drying heavy items (towels, sheets) with light items (shirts, socks) can lead to uneven drying.
- Auto-Dry Cycle Issues: The auto-dry sensor may detect that the light items are dry and shut off the cycle before the heavy items are fully dry.
- Reduced Airflow: Overloading the dryer restricts airflow, causing clothes to take longer to dry.
5.2. Best Practices for Loading Your Dryer
- Separate Loads: Wash and dry similar items together.
- Don’t Overload: Avoid stuffing the dryer with too many clothes. Leave enough room for air to circulate freely.
- Shake Out Clothes: Before placing clothes in the dryer, shake them out to remove excess water and prevent clumping.
5.3. Utilizing Dryer Settings for Different Load Types
- Delicate Cycle: Use the delicate cycle for lingerie, and items that could shrink.
- Permanent Press: Use the permanent press setting for wrinkle-free clothes.
- Heavy Duty: Use the heavy-duty cycle for towels, jeans and other bulky items.
6. Washer Issues Affecting Dryer Performance
If your washing machine doesn’t remove enough water from clothes, the dryer will have to work harder, making it seem like the dryer isn’t heating properly.
6.1. How a Malfunctioning Washer Impacts Drying
- Excessive Moisture: If the washer doesn’t drain completely or spin out enough water, clothes will be excessively wet when transferred to the dryer.
- Longer Drying Times: The dryer has to work harder to remove the extra moisture, resulting in longer drying times and increased energy consumption.
- Dryer Overload: The dryer may overheat due to the excessive moisture, potentially leading to damage.
6.2. Diagnosing Washer-Related Drying Problems
- Check Washer Drainage: Ensure the washing machine drains completely after each cycle.
- Inspect Spin Cycle: Verify that the spin cycle is working correctly. Clothes should not be soaking wet after the spin cycle.
- Washer Settings: Use the appropriate wash settings for different types of loads.
- Washer Maintenance: Clean the washer regularly to prevent clogs and ensure proper drainage.
6.3. Addressing Common Washer Issues
- Clogged Drain Hose: Check the drain hose for kinks or clogs.
- Faulty Drain Pump: If the washer isn’t draining, the drain pump may be faulty and need replacement.
- Lid Switch Problems: A faulty lid switch can prevent the washer from spinning.
7. Recognizing Signs That You Need a Dryer Repair Expert
While some dryer problems are easy to fix, others require professional assistance. Knowing when to call an expert can save you time, money, and potential safety hazards.
7.1. When DIY Isn’t Enough
- Complex Repairs: Advanced repairs involving electrical components, gas lines, or internal mechanisms are best left to professionals.
- Safety Concerns: Working with electricity and gas can be dangerous. Always prioritize safety by calling a qualified technician.
- Warranty Issues: Attempting DIY repairs on a dryer under warranty may void the warranty.
7.2. Common Dryer Problems Requiring Professional Help
- Faulty Thermal Fuse: A blown thermal fuse often indicates a more significant underlying problem, such as a clogged vent or faulty thermostat.
- Broken Heating Element: Replacing a heating element requires specialized knowledge and tools.
- Defective Thermostat: A malfunctioning thermostat can cause the dryer to overheat or not heat at all.
- Timer Issues: Problems with the timer motor can prevent the dryer from cycling properly.
7.3. Benefits of Hiring a Dryer Repair Expert
- Accurate Diagnosis: Professionals have the expertise to accurately diagnose the problem and identify the root cause.
- Proper Repairs: They have the tools and knowledge to perform repairs correctly and safely.
- Warranty Protection: Hiring a qualified technician ensures that repairs are done according to warranty requirements.
- Peace of Mind: You can have peace of mind knowing that your dryer is in good hands.
Image of a thermal fuse in a clothes dryer, highlighting the importance of professional diagnosis and repair when this component fails.
8. Diagnosing and Fixing a Faulty Thermal Fuse
The thermal fuse is a safety device that prevents the dryer from overheating. A blown fuse usually indicates a more significant problem.
8.1. What Is a Thermal Fuse?
- Purpose: The thermal fuse is a safety component that shuts off the dryer if it overheats.
- Location: It’s typically located near the heating element or exhaust vent.
- One-Time Use: Once blown, the thermal fuse must be replaced.
8.2. Causes of a Blown Thermal Fuse
- Clogged Vent: Restricted airflow causes the dryer to overheat, blowing the thermal fuse.
- Faulty Thermostat: A malfunctioning thermostat can cause the dryer to overheat.
- Heating Element Issues: A shorted or damaged heating element can cause excessive heat.
8.3. How to Test and Replace a Thermal Fuse
- Safety First: Unplug the dryer and disconnect the gas supply (if applicable).
- Locate the Fuse: Refer to your dryer’s service manual to locate the thermal fuse.
- Test with a Multimeter: Use a multimeter to check for continuity. A blown fuse will have no continuity.
- Replace the Fuse: Install a new thermal fuse of the same type and rating.
- Address the Root Cause: Identify and fix the underlying cause of the blown fuse (e.g., clogged vent).
Image of a heating element in a clothes dryer, emphasizing the need for professional inspection and repair when this component fails.
9. Addressing a Broken Heating Element in Your Dryer
The heating element is responsible for generating heat in electric dryers. A broken element will prevent the dryer from heating.
9.1. Signs of a Faulty Heating Element
- No Heat: The dryer runs but doesn’t produce any heat.
- Burning Smell: A burning smell may indicate a damaged heating element.
- Visible Damage: Inspect the heating element for cracks, breaks, or signs of burning.
9.2. Testing the Heating Element
- Safety First: Unplug the dryer and disconnect the gas supply (if applicable).
- Locate the Element: Refer to your dryer’s service manual to locate the heating element.
- Visual Inspection: Check for any visible damage.
- Continuity Test: Use a multimeter to check for continuity. A broken element will have no continuity.
9.3. Replacement Procedures and Safety Measures
Replacing a heating element can be dangerous due to the risk of electric shock. It’s best to have a qualified technician perform this repair.
- Disconnect Power: Always disconnect the power supply before working on electrical components.
- Proper Tools: Use insulated tools to prevent electric shock.
- Follow Instructions: Follow the manufacturer’s instructions for replacing the heating element.
- Professional Help: If you’re not comfortable working with electricity, call a qualified technician.
10. Thermostat Malfunctions and Dryer Temperature Control
Thermostats regulate the temperature inside the dryer. A broken thermostat can cause overheating or no heat at all.
10.1. How Thermostats Regulate Dryer Temperature
- Temperature Control: Thermostats monitor the temperature inside the dryer and cycle the heating element on and off to maintain the desired temperature.
- Overheat Protection: Thermostats also act as a safety device to prevent the dryer from overheating.
10.2. Symptoms of a Defective Thermostat
- Overheating: The dryer gets excessively hot, potentially damaging clothes.
- No Heat: The dryer doesn’t produce any heat.
- Inconsistent Temperature: The dryer temperature fluctuates erratically.
10.3. Testing and Replacing Thermostats
- Safety First: Unplug the dryer and disconnect the gas supply (if applicable).
- Locate Thermostats: Refer to your dryer’s service manual to locate the thermostats.
- Continuity Test: Use a multimeter to check for continuity. A faulty thermostat may have no continuity or inconsistent readings.
- Replace the Thermostat: Install a new thermostat of the same type and rating.
Image of a high-temperature safety thermostat, emphasizing its role in preventing overheating and ensuring safe dryer operation.
11. Addressing a Defective Timer Motor in Your Dryer
The timer motor advances the control dial through the drying cycle. A defective motor can cause the dryer to run continuously or not advance.
11.1. How the Timer Motor Works
- Cycle Progression: The timer motor moves the control dial through the different stages of the drying cycle.
- Automatic Shutoff: The timer motor is responsible for shutting off the dryer at the end of the cycle.
11.2. Signs of a Defective Timer Motor
- Dial Doesn’t Move: The control dial doesn’t advance through the cycle.
- Dryer Runs Continuously: The dryer keeps running without stopping.
- Cycle Doesn’t End: The dryer doesn’t shut off at the end of the cycle.
11.3. Diagnosing and Replacing the Timer Motor
- Safety First: Unplug the dryer and disconnect the gas supply (if applicable).
- Locate the Timer Motor: Refer to your dryer’s service manual to locate the timer motor.
- Visual Inspection: Check for any visible damage.
- Test the Motor: Use a multimeter to check for continuity. A faulty motor may have no continuity or inconsistent readings.
- Replace the Motor: Install a new timer motor of the same type and rating.
Image of a dryer timer, emphasizing the importance of professional diagnosis and repair when the timer motor malfunctions.
12. Troubleshooting Complex Electrical or Gas Issues
Some electrical and gas issues are too complex for DIY repairs. These require the expertise of a qualified technician.
12.1. Identifying Complex Issues
- Unfamiliar Problems: If you’re unable to determine the cause of the dryer malfunction, it may be a complex issue.
- Electrical Problems: Diagnosing and repairing electrical problems can be dangerous.
- Gas Problems: Repairing gas lines and components requires specialized knowledge and tools.
12.2. Why Professional Diagnosis Is Essential
- Safety: Working with electricity and gas can be dangerous.
- Accuracy: Professionals have the expertise to accurately diagnose the problem.
- Proper Repairs: They have the tools and knowledge to perform repairs correctly and safely.
12.3. When to Call a Sears Technician
- Unexplained Malfunctions: If you’re unable to determine why your dryer won’t run or heat.
- Electrical Problems: If you suspect an electrical issue.
- Gas Problems: If you smell gas or suspect a gas leak.
13. DIY Troubleshooting Tips and Safety Precautions
If you choose to troubleshoot your dryer yourself, follow these safety precautions.
13.1. Essential Safety Guidelines
- Disconnect Power: Always unplug the dryer and disconnect the gas supply (if applicable) before attempting any repairs.
- Use Proper Tools: Use insulated tools to prevent electric shock.
- Follow Instructions: Follow the manufacturer’s instructions for troubleshooting and repairs.
- Don’t Take Risks: If you’re not comfortable performing a repair, call a qualified technician.
13.2. Basic Troubleshooting Steps
- Check the Power Supply: Ensure the dryer is plugged in and the circuit breaker is on.
- Clean the Lint Screen: Remove any lint buildup from the lint screen.
- Check the Vent: Ensure the vent is not clogged.
- Reset the Dryer: Some dryers have a reset button. Refer to your dryer’s service manual for instructions.
13.3. Online Resources and Repair Videos
- Manufacturer’s Website: Check the manufacturer’s website for troubleshooting tips and repair videos.
- Online Forums: Consult online forums for advice from other dryer owners.
- Repair Videos: Watch repair videos on YouTube to learn how to perform basic repairs.
14. Trusting Sears Home Services for Dryer Repair
Sears Home Services offers expert dryer repair services with trained technicians who can diagnose and fix any problem.
14.1. Expertise and Experience
- Trained Technicians: Sears technicians are highly trained and skilled in repairing all types of dryers.
- Brand Knowledge: They are familiar with all the top dryer brands, including Whirlpool, Frigidaire, Samsung, GE, LG, and Kenmore.
- Millions of Repairs: Sears technicians have repaired millions of laundry appliances, so they have the experience needed to get the job done right.
14.2. Comprehensive Repair Services
- Accurate Diagnosis: Sears technicians can accurately diagnose the problem and identify the root cause.
- Proper Repairs: They have the tools and knowledge to perform repairs correctly and safely.
- Warranty Protection: Sears repairs are backed by a warranty.
14.3. Preventative Maintenance
- Annual Maintenance: Sears offers annual dryer maintenance services to prevent problems and ensure optimal performance.
- Lint Removal: Technicians will vacuum excess lint from the dryer and vent.
- Component Check: They will check the electrical components, drum rollers, motor, and heating element (or gas burner assembly).
15. Preventative Maintenance: Keeping Your Dryer in Top Shape
Regular maintenance can prevent many dryer problems and extend the life of your appliance.
15.1. Why Maintenance Is Important
- Prevents Problems: Regular maintenance can prevent minor issues from turning into major repairs.
- Extends Lifespan: Proper care can extend the life of your dryer.
- Improves Efficiency: A well-maintained dryer operates more efficiently, saving energy and money.
- Reduces Fire Risk: Cleaning the lint screen and vent reduces the risk of a dryer fire.
15.2. Essential Maintenance Tasks
- Clean Lint Screen: Remove lint after each load.
- Wash Lint Screen: Wash the lint screen with hot water and soap every three months.
- Clean Dryer Vent: Clean the dryer vent annually to remove lint buildup.
- Inspect Hoses: Check the vent hose for kinks, bends, or damage.
- Professional Maintenance: Schedule annual maintenance with a qualified technician.
15.3. Benefits of Professional Dryer Maintenance
- Thorough Cleaning: Technicians can thoroughly clean the dryer and vent, removing all lint buildup.
- Component Inspection: They can inspect the electrical components, drum rollers, motor, and heating element (or gas burner assembly).
- Early Detection: Technicians can identify potential problems early, before they cause major damage.
16. Dryer Safety: Preventing Fires and Other Hazards
Dryers are a leading cause of house fires. Taking the necessary safety precautions can prevent fires and other hazards.
16.1. Common Dryer Hazards
- Lint Buildup: Lint is highly flammable.
- Clogged Vents: Restricted airflow can cause the dryer to overheat.
- Electrical Problems: Faulty wiring or components can cause a fire.
- Gas Leaks: Gas leaks can cause an explosion.
16.2. Essential Safety Precautions
- Clean Lint Screen: Remove lint after each load.
- Clean Dryer Vent: Clean the dryer vent annually.
- Don’t Overload: Avoid overloading the dryer.
- Use Proper Venting: Use a rigid metal vent instead of plastic or foil.
- Install Smoke Detectors: Install smoke detectors near the laundry room.
- Never Leave Unattended: Never leave the dryer running unattended.
16.3. What to Do in Case of a Dryer Fire
- Call 911: Call 911 immediately.
- Evacuate: Evacuate your home.
- Don’t Open the Door: Don’t open the dryer door, as this can provide more oxygen to the fire.
- Shut Off Power: If it’s safe to do so, shut off the power to the dryer.
17. Statistics and Facts About Dryer Fires
Understanding the statistics about dryer fires can highlight the importance of proper maintenance and safety precautions.
17.1. Key Statistics
- Leading Cause: Dryers are a leading cause of house fires in the United States.
- Annual Incidents: According to the U.S. Fire Administration, dryers cause thousands of fires each year.
- Property Damage: These fires result in millions of dollars in property damage.
- Injuries and Deaths: Dryer fires can also cause injuries and deaths.
17.2. Common Causes of Dryer Fires
- Lint Buildup: Failure to clean the lint screen is the leading cause of dryer fires.
- Clogged Vents: Clogged vents restrict airflow and cause the dryer to overheat.
- Improper Venting: Using improper venting materials (e.g., plastic or foil) can increase the risk of fire.
17.3. How to Reduce the Risk of Dryer Fires
- Clean Lint Screen: Clean the lint screen after each load.
- Clean Dryer Vent: Clean the dryer vent annually.
- Use Proper Venting: Use a rigid metal vent.
- Professional Maintenance: Schedule annual maintenance with a qualified technician.
18. Understanding Dryer Settings and Their Impact on Heating
Using the correct dryer settings can optimize drying performance and prevent damage to your clothes.
18.1. Common Dryer Settings
- High Heat: For towels, jeans, and other heavy items.
- Medium Heat: For most fabrics.
- Low Heat: For delicates and items that could shrink.
- Air Dry: For items that don’t require heat.
- Permanent Press: For wrinkle-free clothes.
18.2. How Settings Affect Heating
- Temperature Control: Different settings use different temperature levels.
- Cycle Time: The cycle time varies depending on the setting.
- Energy Consumption: Higher heat settings consume more energy.
18.3. Choosing the Right Settings
- Read Garment Labels: Check the garment label for recommended drying instructions.
- Separate Loads: Dry similar items together.
- Don’t Overload: Avoid overloading the dryer.
- Use Auto-Dry: Use the auto-dry setting for optimal drying performance.
19. Exploring Common Dryer Brands and Their Specific Issues
Different dryer brands may have specific issues that affect their heating performance.
19.1. Whirlpool Dryers
- Common Issues: Heating element failures, thermostat problems, and clogged vents.
- Troubleshooting Tips: Check the heating element, thermostat, and vent.
19.2. Frigidaire Dryers
- Common Issues: Thermal fuse failures, heating element problems, and timer issues.
- Troubleshooting Tips: Check the thermal fuse, heating element, and timer.
19.3. Samsung Dryers
- Common Issues: Thermostat problems, heating element failures, and vent clogs.
- Troubleshooting Tips: Check the thermostat, heating element, and vent.
19.4. GE Dryers
- Common Issues: Heating element failures, thermostat problems, and timer issues.
- Troubleshooting Tips: Check the heating element, thermostat, and timer.
19.5. LG Dryers
- Common Issues: Thermostat problems, heating element failures, and vent clogs.
- Troubleshooting Tips: Check the thermostat, heating element, and vent.
20. The Role of Airflow in Dryer Performance and Heating
Proper airflow is essential for efficient drying and preventing overheating.
20.1. How Airflow Affects Drying
- Heat Circulation: Airflow circulates hot air throughout the dryer, drying clothes evenly.
- Moisture Removal: Airflow removes moisture from the dryer, preventing clothes from remaining damp.
- Overheat Prevention: Proper airflow prevents the dryer from overheating.
20.2. Factors Affecting Airflow
- Lint Buildup: Lint buildup in the lint screen and vent restricts airflow.
- Clogged Vents: Clogged vents prevent air from escaping the dryer.
- Kinked Hoses: Kinked vent hoses restrict airflow.
- Long Vents: Long vent runs reduce airflow.
20.3. How to Improve Airflow
- Clean Lint Screen: Remove lint after each load.
- Clean Dryer Vent: Clean the dryer vent annually.
- Use Proper Venting: Use a rigid metal vent.
- Shorten Vent Runs: Shorten the vent run if possible.
- Remove Obstructions: Remove any obstructions from the vent.
Don’t let a cold dryer leave you with damp clothes. Whether it’s a clogged vent, a faulty component, or something else, understanding the potential causes can help you troubleshoot effectively. Remember, safety should always be your top priority.
For reliable solutions and expert assistance, visit WHY.EDU.VN. Our platform offers comprehensive answers to your questions, connecting you with seasoned professionals ready to address your dryer dilemmas and beyond. Don’t hesitate to reach out for guidance or explore our extensive knowledge base.
Have more questions or need personalized assistance? Contact us at:
- Address: 101 Curiosity Lane, Answer Town, CA 90210, United States
- WhatsApp: +1 (213) 555-0101
- Website: why.edu.vn
FAQ: Addressing Common Questions About Dryers Not Heating
Here are some frequently asked questions about dryers not getting hot, along with detailed answers:
1. Why is my dryer running but not heating up?
The most common causes are a clogged dryer vent, a faulty heating element, or a blown thermal fuse. Check the vent for obstructions, test the heating element with a multimeter, and inspect the thermal fuse.
2. How do I know if my dryer vent is clogged?
Run the dryer on high heat for a few minutes and check the outside vent. If there’s little to no airflow, the vent is likely clogged. You can also visually inspect the vent for lint buildup.
3. Can a dirty lint screen cause my dryer to not heat?
Yes, a clogged lint screen restricts airflow, causing the dryer to overheat and potentially preventing it from heating properly. Clean the lint screen after each load.
4. What is a thermal fuse, and why does it blow?
A thermal fuse is a safety device that shuts off the dryer if it overheats. It blows when there’s a clog, faulty thermostat, or heating element issue.
5. How can I test if my dryer’s heating element is working?
Use a multimeter to test the heating element for continuity. If there’s no continuity, the heating element is likely broken and needs replacement.
6. What should I do if I smell gas coming from my gas dryer?
Evacuate your home immediately and call your gas company or a qualified gas technician. Do not attempt to repair the dryer yourself.
7. Is it safe to repair a dryer myself?
Basic maintenance like cleaning the lint screen and vent is safe. However, complex repairs involving electrical or gas components should be left to professionals.
8. How often should I clean my dryer vent?
It’s recommended to clean your dryer vent at least once a year to prevent lint buildup and reduce the risk of fire.
9. What are the signs that I need to call a dryer repair technician?
Signs include no heat, burning smells, unusual noises, and the dryer not shutting off automatically.
10. Can overloading my dryer affect its heating performance?
Yes, overloading the dryer restricts airflow, which can cause the dryer to take longer to dry clothes and potentially overheat.