Why Is The Time On My Iphone Orange? Understanding the orange time indicator on your iPhone is crucial for your privacy and device management. WHY.EDU.VN dives deep into this topic, offering clear explanations, troubleshooting steps, and proactive solutions to address this common concern, ensuring you maintain control over your device and safeguard your personal information, especially concerning microphone usage, data privacy, and background app activity. Let’s explore background processes, privacy settings, and iOS functionality.
1. Understanding the Orange Time Indicator on Your iPhone
The orange time indicator on your iPhone is a crucial visual cue implemented by Apple to enhance user privacy and transparency regarding microphone usage. This indicator is part of Apple’s broader commitment to keeping users informed about when their device’s hardware components, specifically the microphone and camera, are being accessed by apps.
1.1. What Does the Orange Dot Mean?
The orange dot, which appears as either a dot or a square (depending on your iPhone model and iOS version), signifies that an app is currently using your iPhone’s microphone. This feature was introduced with iOS 14 to provide a clear, real-time indication of microphone access, thereby increasing user awareness and control over their privacy. The orange dot is designed to be non-intrusive yet easily noticeable, appearing in the status bar at the top of your screen.
1.2. Where Does It Appear?
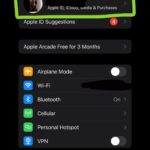
The orange indicator typically appears in the upper-right corner of your iPhone screen, next to the battery indicator or within the Dynamic Island on newer models. When an app is actively using the microphone, this orange dot remains visible, regardless of whether the app is in the foreground or running in the background. This consistent visibility ensures that you are always aware of when your microphone is in use.
1.3. Why Did Apple Introduce This Feature?
Apple introduced the orange microphone indicator as a core component of its privacy enhancements in iOS 14. This feature addresses growing concerns about apps accessing the microphone without explicit user consent or knowledge. By providing a clear visual signal, Apple empowers users to monitor and manage app permissions more effectively, fostering greater trust and transparency in the app ecosystem. This is aligned with Apple’s broader philosophy of prioritizing user privacy and data security.
2. Common Scenarios When the Time Turns Orange
The orange time indicator can appear in various scenarios, each indicating active microphone usage by an app on your iPhone. Recognizing these situations helps you understand which apps are accessing your microphone and why.
2.1. During Phone Calls
One of the most common scenarios is during phone calls. When you are on a call, the Phone app naturally requires microphone access to transmit your voice. The orange indicator will be visible throughout the duration of the call, signaling that the microphone is in active use. This is a standard and expected occurrence.
2.2. Using Voice Assistants Like Siri
When you activate Siri, either by voice command (“Hey Siri”) or by pressing the side button, the orange indicator will appear. Siri needs microphone access to process your requests and commands. The indicator will remain active as long as Siri is listening and processing your input.
2.3. Recording Voice Memos
Whenever you use the Voice Memos app to record audio, the orange indicator will be displayed. This is a straightforward indication that the app is actively using the microphone to capture your voice. The indicator will disappear once you stop the recording.
2.4. Voice Typing or Dictation
When using voice typing or dictation features, the microphone is actively transcribing your speech into text. The orange indicator will appear whenever the dictation mode is active, whether you are composing a text message, writing an email, or using any other app that supports voice input.
2.5. Using Apps That Require Microphone Access
Many apps require microphone access for various functionalities. Social media apps like WhatsApp, Facebook, and Instagram use the microphone for voice messages, video recordings, and live streams. Similarly, apps like Zoom, Skype, and Microsoft Teams need microphone access for video conferencing and online meetings. The orange indicator will appear whenever these apps are actively using the microphone.
2.6. Background App Activity
In some cases, the orange indicator may appear even when you are not actively using an app. This can occur if an app is running in the background and still has microphone access. For instance, a voice recording app might be inadvertently left running in the background, or an app might be actively listening for specific voice commands. Identifying and managing such background activity is essential for maintaining your privacy.
3. Troubleshooting the Orange Time Indicator
If you notice the orange time indicator and are unsure why it’s appearing, troubleshooting steps can help you identify the cause and take appropriate action.
3.1. Check Control Center for Recent App Usage
The Control Center provides a quick way to see which apps have recently used your microphone. To access the Control Center, swipe down from the upper-right corner of your screen (on iPhones with Face ID) or swipe up from the bottom of the screen (on iPhones with a Home button). The Control Center will display the apps that have recently accessed the microphone, allowing you to identify any unexpected or unauthorized usage.
3.2. Review Microphone Permissions in Settings
You can review and manage microphone permissions for each app installed on your iPhone through the Settings app.
- Open the Settings app.
- Scroll down and tap on Privacy & Security.
- Tap on Microphone.
This section displays a list of all apps that have requested microphone access. You can toggle the switch next to each app to grant or revoke permission. Review this list carefully and disable microphone access for any apps that do not genuinely require it.
3.3. Close Suspicious Apps
If you identify an app that is unexpectedly using the microphone, close it to stop the microphone access.
- Swipe up from the bottom of the screen (or double-press the Home button on older models) to open the App Switcher.
- Swipe left or right to find the app you want to close.
- Swipe up on the app’s preview to close it.
Closing the app ensures that it cannot continue using the microphone in the background.
3.4. Restart Your iPhone
Restarting your iPhone can resolve many temporary glitches and software issues that might be causing the orange indicator to appear incorrectly.
- Press and hold either volume button and the side button until the power-off slider appears (or press and hold the side button on older models).
- Drag the slider to turn your device completely off.
- After a few seconds, press and hold the side button again until you see the Apple logo.
3.5. Update to the Latest iOS Version
Keeping your iPhone updated with the latest iOS version ensures that you have the latest security patches and bug fixes. Software updates often address issues related to privacy indicators and app permissions.
- Open the Settings app.
- Tap on General.
- Tap on Software Update.
- If an update is available, tap Download and Install.
3.6. Reset All Settings
If the issue persists, resetting all settings on your iPhone can help resolve any configuration problems that might be causing the orange indicator to malfunction.
- Open the Settings app.
- Tap on General.
- Scroll down and tap on Transfer or Reset iPhone.
- Tap on Reset.
- Tap on Reset All Settings.
Note that this will reset your preferences for Wi-Fi networks, वॉल्यूम, and other settings, but it will not delete your data.
3.7. Contact Apple Support
If none of the above steps resolve the issue, there might be a more complex problem with your device. Contact Apple Support for further assistance. You can reach Apple Support through their website, by phone, or by visiting an Apple Store.
4. Potential Causes of the Orange Time Indicator When No Apps Are Open
Sometimes, the orange time indicator may appear even when you have no apps open, which can be concerning. Here are some potential causes and solutions for this issue.
4.1. Background App Refresh
Even when you are not actively using an app, it might still be running in the background and accessing the microphone due to the Background App Refresh feature.
- Open the Settings app.
- Tap on General.
- Tap on Background App Refresh.
- You can either turn off Background App Refresh entirely or disable it for specific apps that you suspect are causing the issue.
4.2. Siri Listening in the Background
Siri might be actively listening for voice commands even when you are not actively using it.
- Open the Settings app.
- Tap on Siri & Search.
- Turn off Listen for “Hey Siri” or Press Side Button for Siri.
4.3. System Services
Certain system services might require microphone access for specific functionalities.
- Open the Settings app.
- Tap on Privacy & Security.
- Tap on Microphone.
- Review the list of apps and system services that have microphone access and disable any that seem unnecessary or suspicious.
4.4. Malware or Unauthorized Access
Although rare, the orange indicator could be a sign of malware or unauthorized access to your device.
- Run a security scan using a reputable antivirus app.
- Review your installed apps for any unfamiliar or suspicious applications.
- Change your Apple ID password and enable two-factor authentication for added security.
4.5. Glitches and Bugs
Sometimes, the orange indicator might appear due to software glitches or bugs in the iOS system.
- Restart your iPhone.
- Update to the latest iOS version.
- Reset all settings on your iPhone.
4.6. Accessibility Features
Some accessibility features might utilize the microphone for voice control or other functions.
- Open the Settings app.
- Tap on Accessibility.
- Review the settings related to voice control and other microphone-dependent features.
- Disable any features that you are not actively using.
5. Understanding App Permissions and Privacy
Managing app permissions is crucial for maintaining your privacy on your iPhone. Understanding how apps request and use permissions can help you make informed decisions about what to allow.
5.1. How Apps Request Permissions
When you install a new app, it will often request access to various hardware components and data on your iPhone, including the microphone, camera, location, contacts, and more. These requests are presented in the form of permission prompts, which appear when the app first needs to use a particular feature.
5.2. Types of Permissions
There are several types of permissions that apps can request:
- Microphone: Allows the app to access your iPhone’s microphone for recording audio, voice calls, and other voice-related functions.
- Camera: Grants the app access to your iPhone’s camera for taking photos, recording videos, and video conferencing.
- Location: Enables the app to access your location data, which can be used for mapping, navigation, and location-based services.
- Contacts: Allows the app to access your contact list, which can be used for communication, social networking, and data enrichment.
- Photos: Grants the app access to your photo library, which can be used for sharing images, editing photos, and backing up data.
- Notifications: Allows the app to send you push notifications, which can be used for alerts, reminders, and updates.
- Background App Refresh: Enables the app to refresh its content in the background, even when you are not actively using it.
5.3. Managing Permissions
You can manage app permissions in the Settings app:
- Open the Settings app.
- Scroll down and tap on Privacy & Security.
- Select the specific permission you want to manage (e.g., Microphone, Camera, Location).
- Review the list of apps that have requested the permission and toggle the switch next to each app to grant or revoke access.
5.4. Best Practices for App Permissions
- Grant permissions only when necessary: Only grant permissions to apps that genuinely need them for their core functionality.
- Review permissions regularly: Periodically review the permissions you have granted to apps and revoke any that are no longer necessary.
- Be cautious with location permissions: Location data is highly sensitive, so be selective about which apps you allow to access your location.
- Read the app’s privacy policy: Before granting permissions, review the app’s privacy policy to understand how your data will be used.
- Use “Ask Not to Track”: Enable the “Ask App Not to Track” feature in the Privacy & Security settings to limit the amount of data that apps can collect about you.
6. How to Enhance Your iPhone Privacy
In addition to managing app permissions, there are several other steps you can take to enhance your iPhone privacy.
6.1. Enable Two-Factor Authentication
Two-factor authentication adds an extra layer of security to your Apple ID, making it more difficult for unauthorized users to access your account.
- Open the Settings app.
- Tap on your Apple ID at the top of the screen.
- Tap on Sign-In & Security.
- Tap on Turn On Two-Factor Authentication and follow the prompts.
6.2. Use a Strong Passcode
Using a strong and unique passcode can prevent unauthorized access to your iPhone.
- Open the Settings app.
- Tap on Face ID & Passcode (or Touch ID & Passcode on older models).
- Tap on Change Passcode.
- Choose a strong alphanumeric passcode that is difficult to guess.
6.3. Enable Face ID or Touch ID
Face ID and Touch ID provide a convenient and secure way to unlock your iPhone and authenticate purchases.
- Open the Settings app.
- Tap on Face ID & Passcode (or Touch ID & Passcode on older models).
- Follow the prompts to set up Face ID or Touch ID.
6.4. Limit Ad Tracking
You can limit the amount of data that advertisers can collect about you for targeted advertising.
- Open the Settings app.
- Tap on Privacy & Security.
- Tap on Tracking.
- Toggle off Allow Apps to Request to Track.
6.5. Use a VPN
A Virtual Private Network (VPN) encrypts your internet traffic and masks your IP address, providing an extra layer of privacy and security when browsing the web.
- Download and install a reputable VPN app from the App Store.
- Follow the instructions to set up and connect to the VPN.
6.6. Review Location Services
Location services can be a significant privacy risk, so it’s important to review and manage your location settings carefully.
- Open the Settings app.
- Tap on Privacy & Security.
- Tap on Location Services.
- Review the list of apps that have access to your location and choose the appropriate permission level for each app (e.g., Never, While Using the App, Always).
6.7. Clear Browsing History and Cookies
Clearing your browsing history and cookies can help prevent websites from tracking your online activity.
- Open the Settings app.
- Scroll down and tap on Safari.
- Tap on Clear History and Website Data.
7. Privacy Indicators in iOS: Orange vs. Green
iOS uses two primary privacy indicators: orange and green. Understanding the difference between these indicators is essential for monitoring your device’s privacy.
7.1. Orange Indicator: Microphone in Use
As previously discussed, the orange indicator signifies that an app is currently using your iPhone’s microphone. This indicator appears in the status bar whenever an app is actively accessing the microphone, whether it’s for phone calls, voice recordings, voice typing, or any other voice-related function.
7.2. Green Indicator: Camera in Use
The green indicator, on the other hand, signifies that an app is currently using your iPhone’s camera, or both the camera and the microphone. This indicator also appears in the status bar whenever an app is actively accessing the camera, whether it’s for taking photos, recording videos, video conferencing, or any other camera-related function.
7.3. Similarities and Differences
Both the orange and green indicators share the same goal: to provide users with clear, real-time information about when their device’s hardware components are being accessed by apps. They both appear in the status bar, are designed to be non-intrusive yet easily noticeable, and are part of Apple’s broader commitment to privacy and transparency.
The key difference is the hardware component they represent: orange for the microphone and green for the camera. When you see either indicator, it’s important to be aware of which app is accessing the hardware and why.
7.4. Examples of When Each Indicator Appears
- Orange Indicator:
- During phone calls
- When using voice assistants like Siri
- Recording voice memos
- Using voice typing or dictation
- Using apps that require microphone access (e.g., WhatsApp, Zoom)
- Green Indicator:
- Taking photos or recording videos with the Camera app
- Video conferencing with apps like FaceTime, Zoom, or Skype
- Using apps that require camera access (e.g., Instagram, Snapchat)
7.5. Troubleshooting Both Indicators
If you see either the orange or green indicator and are unsure why it’s appearing, the troubleshooting steps are similar:
- Check Control Center for recent app usage.
- Review microphone or camera permissions in Settings.
- Close suspicious apps.
- Restart your iPhone.
- Update to the latest iOS version.
- Reset all settings if necessary.
- Contact Apple Support if the issue persists.
8. Debunking Myths About iPhone Privacy
There are many myths and misconceptions about iPhone privacy. Here are some common myths debunked.
8.1. Myth: iPhones Are Completely Immune to Hacking
Reality: While iPhones are generally considered more secure than many other devices, they are not completely immune to hacking. Hackers can exploit software vulnerabilities, use phishing attacks, or install malware to gain access to your iPhone.
8.2. Myth: Closing Apps Prevents Them from Tracking You
Reality: Closing apps can prevent them from actively using your microphone or camera in the background, but it does not necessarily prevent them from tracking your data. Many apps continue to collect data even when they are not actively running, using methods like background app refresh and location services.
8.3. Myth: Apple Never Collects Your Data
Reality: Apple does collect some data about your usage of its products and services, but it generally anonymizes and aggregates this data to improve its offerings. Apple also provides transparency about what data it collects and gives you control over how it’s used.
8.4. Myth: Turning Off Location Services Prevents All Location Tracking
Reality: Turning off location services can prevent apps from accessing your precise location data, but it does not necessarily prevent all location tracking. Your iPhone can still be tracked using other methods, such as Wi-Fi triangulation and IP address tracking.
8.5. Myth: Using a VPN Makes You Completely Anonymous Online
Reality: A VPN can encrypt your internet traffic and mask your IP address, providing an extra layer of privacy and security. However, it does not make you completely anonymous online. Websites and apps can still track you using other methods, such as cookies and device fingerprinting.
8.6. Myth: iPhones Don’t Get Viruses
Reality: While it’s true that traditional computer viruses are rare on iPhones, iPhones can still be infected with malware and other types of malicious software. These threats can compromise your privacy, steal your data, or damage your device.
9. The Role of iOS Updates in Privacy Protection
iOS updates play a critical role in protecting your privacy on your iPhone.
9.1. Security Patches
Each iOS update includes security patches that address known vulnerabilities and protect your device from potential threats. These patches are essential for keeping your iPhone secure and preventing hackers from exploiting security flaws.
9.2. Privacy Enhancements
iOS updates often introduce new privacy features and enhancements that give you more control over your data. These features can include improved app permission management, enhanced location services controls, and new tracking prevention measures.
9.3. Bug Fixes
iOS updates also include bug fixes that address software glitches and issues that could compromise your privacy. These fixes can resolve problems with privacy indicators, app permissions, and other privacy-related features.
9.4. Performance Improvements
In addition to security and privacy enhancements, iOS updates often include performance improvements that can make your iPhone run faster and more efficiently. These improvements can also help improve battery life and overall device performance.
9.5. How to Update Your iPhone
- Open the Settings app.
- Tap on General.
- Tap on Software Update.
- If an update is available, tap Download and Install.
- Follow the prompts to complete the update.
9.6. Best Practices for iOS Updates
- Install updates promptly: Install iOS updates as soon as they are available to ensure that you have the latest security patches and privacy enhancements.
- Back up your iPhone before updating: Before installing an update, back up your iPhone to iCloud or your computer to protect your data in case something goes wrong.
- Read the release notes: Before installing an update, read the release notes to learn about the new features, security patches, and bug fixes included in the update.
- Ensure sufficient battery life: Make sure your iPhone has sufficient battery life (at least 50%) before starting the update process.
- Connect to a stable Wi-Fi network: Connect your iPhone to a stable Wi-Fi network to ensure that the update can be downloaded and installed without interruption.
10. Proactive Steps to Secure Your iPhone
Taking proactive steps can significantly enhance your iPhone’s security and protect your personal information.
10.1. Regularly Review App Permissions
Make it a habit to regularly review the permissions you have granted to apps on your iPhone. Revoke any permissions that are no longer necessary or that seem suspicious.
10.2. Use Strong, Unique Passwords
Use strong and unique passwords for all of your online accounts, including your Apple ID, email accounts, and social media accounts. Avoid using the same password for multiple accounts.
10.3. Enable Two-Factor Authentication
Enable two-factor authentication for all of your online accounts that support it, including your Apple ID, Google account, and social media accounts.
10.4. Be Cautious of Phishing Attacks
Be cautious of phishing attacks, which are attempts to trick you into providing your personal information. Avoid clicking on links or opening attachments in suspicious emails or text messages.
10.5. Install a Reputable Antivirus App
Install a reputable antivirus app on your iPhone to protect your device from malware and other threats.
10.6. Keep Your Software Up to Date
Keep your iPhone’s software up to date by installing iOS updates as soon as they are available.
10.7. Use a VPN When on Public Wi-Fi
Use a VPN when connecting to public Wi-Fi networks to encrypt your internet traffic and protect your data from eavesdropping.
10.8. Be Mindful of What You Share Online
Be mindful of what you share online, including on social media, email, and messaging apps. Avoid sharing sensitive information that could be used to compromise your privacy or security.
10.9. Regularly Back Up Your iPhone
Regularly back up your iPhone to iCloud or your computer to protect your data in case of loss, theft, or damage.
10.10. Educate Yourself About Privacy and Security
Educate yourself about privacy and security best practices to stay informed about the latest threats and how to protect yourself.
11. How WHY.EDU.VN Can Help You
At WHY.EDU.VN, we understand the challenges users face in finding accurate and trustworthy answers to their questions. The internet is flooded with information, but it can be difficult to distinguish reliable sources from misinformation. Many users struggle to understand complex explanations and seek expert insights to guide them.
11.1. Providing Detailed, Easy-to-Understand Answers
WHY.EDU.VN is committed to providing detailed and easy-to-understand answers to complex questions. Our content is carefully crafted to ensure that it is accessible to a wide audience, regardless of their technical expertise. We break down complex topics into simple, digestible pieces, using clear language and real-world examples.
11.2. Expert Insights and Diverse Perspectives
We aggregate and compare diverse perspectives on various topics, ensuring that our users have access to a well-rounded understanding of the subject matter. Our content is based on expert insights and authoritative sources, ensuring accuracy and reliability.
11.3. Ensuring Accuracy and Reliability
Accuracy and reliability are our top priorities. We meticulously research and verify all information before publishing it, ensuring that our users can trust the answers they find on our platform. We cite reputable sources and consult with experts to ensure the highest level of accuracy.
11.4. Connecting Users with Experts
WHY.EDU.VN aims to connect users with experts in various fields, providing them with opportunities to ask questions and receive direct answers from knowledgeable professionals. Our platform fosters a community of learners and experts, creating a collaborative environment for knowledge sharing.
11.5. A Community for Questions and Answers
Our platform is designed to be a valuable resource for anyone seeking reliable answers and expert insights. We strive to create a user-friendly and engaging environment where users can easily find the information they need and connect with others who share their interests.
12. FAQ About the Orange Time Indicator on iPhones
Here are some frequently asked questions about the orange time indicator on iPhones.
12.1. Can the orange dot be a different color?
No, the orange dot is specifically designed to be orange to indicate microphone usage. However, on newer iPhone models with the Dynamic Island, the indicator might appear as a small orange square.
12.2. Does the orange dot mean someone is listening to me?
The orange dot indicates that an app has access to your microphone and is actively using it. It doesn’t necessarily mean someone is listening to you, but it’s essential to be aware of which app is using the microphone and why.
12.3. How can I be sure no apps are using the microphone without my knowledge?
Regularly review the microphone permissions in your Settings app and disable microphone access for any apps that don’t genuinely need it. Also, check the Control Center to see which apps have recently used the microphone.
12.4. Is the orange dot a new feature?
Yes, the orange dot was introduced with iOS 14 as part of Apple’s privacy enhancements.
12.5. What if the orange dot appears even when I’ve closed all apps?
Check for background app activity, Siri listening in the background, system services using the microphone, or potential malware. Restarting your iPhone or resetting all settings can also help.
12.6. Can I disable the orange dot?
No, the orange dot is a system-level feature and cannot be disabled. It is designed to enhance user privacy by providing a clear indication of microphone usage.
12.7. What should I do if I suspect an app is using the microphone maliciously?
Uninstall the app immediately, change your Apple ID password, and enable two-factor authentication. You can also report the app to Apple.
12.8. Does the orange dot appear on other Apple devices, like iPads?
Yes, the orange dot appears on iPads and other Apple devices running iOS 14 or later.
12.9. What’s the difference between the orange dot and the green dot?
The orange dot indicates microphone usage, while the green dot indicates camera usage. Both are privacy indicators designed to alert you when an app is accessing your device’s hardware.
12.10. How does the orange dot help protect my privacy?
The orange dot helps protect your privacy by providing a clear, real-time indication of microphone access, allowing you to monitor and manage app permissions more effectively.
If you’re still struggling to find reliable answers to your tech questions, visit WHY.EDU.VN today. Our team of experts is dedicated to providing accurate, easy-to-understand explanations and connecting you with the knowledge you need.
Address: 101 Curiosity Lane, Answer Town, CA 90210, United States
WhatsApp: +1 (213) 555-0101
Website: WHY.EDU.VN
Don’t let unanswered questions hold you back—discover the answers you’ve been searching for at why.edu.vn!