Why Is My Keyboard Split On My Ipad? This is a common question, and at WHY.EDU.VN, we are experts at providing clear, helpful answers. If you find your iPad keyboard divided into two halves, it’s likely due to the split keyboard feature being enabled, understanding this and more can be solved through dedicated problem solving. Learn about accessibility features and keyboard settings on your iPad with us.
1. Understanding Why Your iPad Keyboard Might Be Split
The split keyboard feature on iPads is designed to enhance usability, particularly for users who prefer typing with their thumbs while holding the device. However, it can sometimes be activated accidentally, leading to confusion. Let’s explore the reasons behind this and how to identify if the split keyboard is the cause.
1.1. Accidental Activation of Split Keyboard
The split keyboard can be easily activated with a simple gesture. Accidentally performing this gesture is a common reason why users find their keyboard split.
1.2. Split Keyboard as a Feature
Apple introduced the split keyboard as a feature to improve the typing experience, especially when holding the iPad in landscape mode. This design allows users to comfortably reach all keys with their thumbs.
1.3. Identifying the Split Keyboard
The split keyboard is characterized by a clear division in the middle, separating the keys into two distinct sections. Each half of the keyboard can be moved independently, further confirming that the split keyboard is active.
2. Quick Fixes to Merge the Split Keyboard
Restoring your iPad keyboard to its default, merged state is usually a straightforward process. Here are several quick fixes to merge the split keyboard:
2.1. Using the Keyboard Button
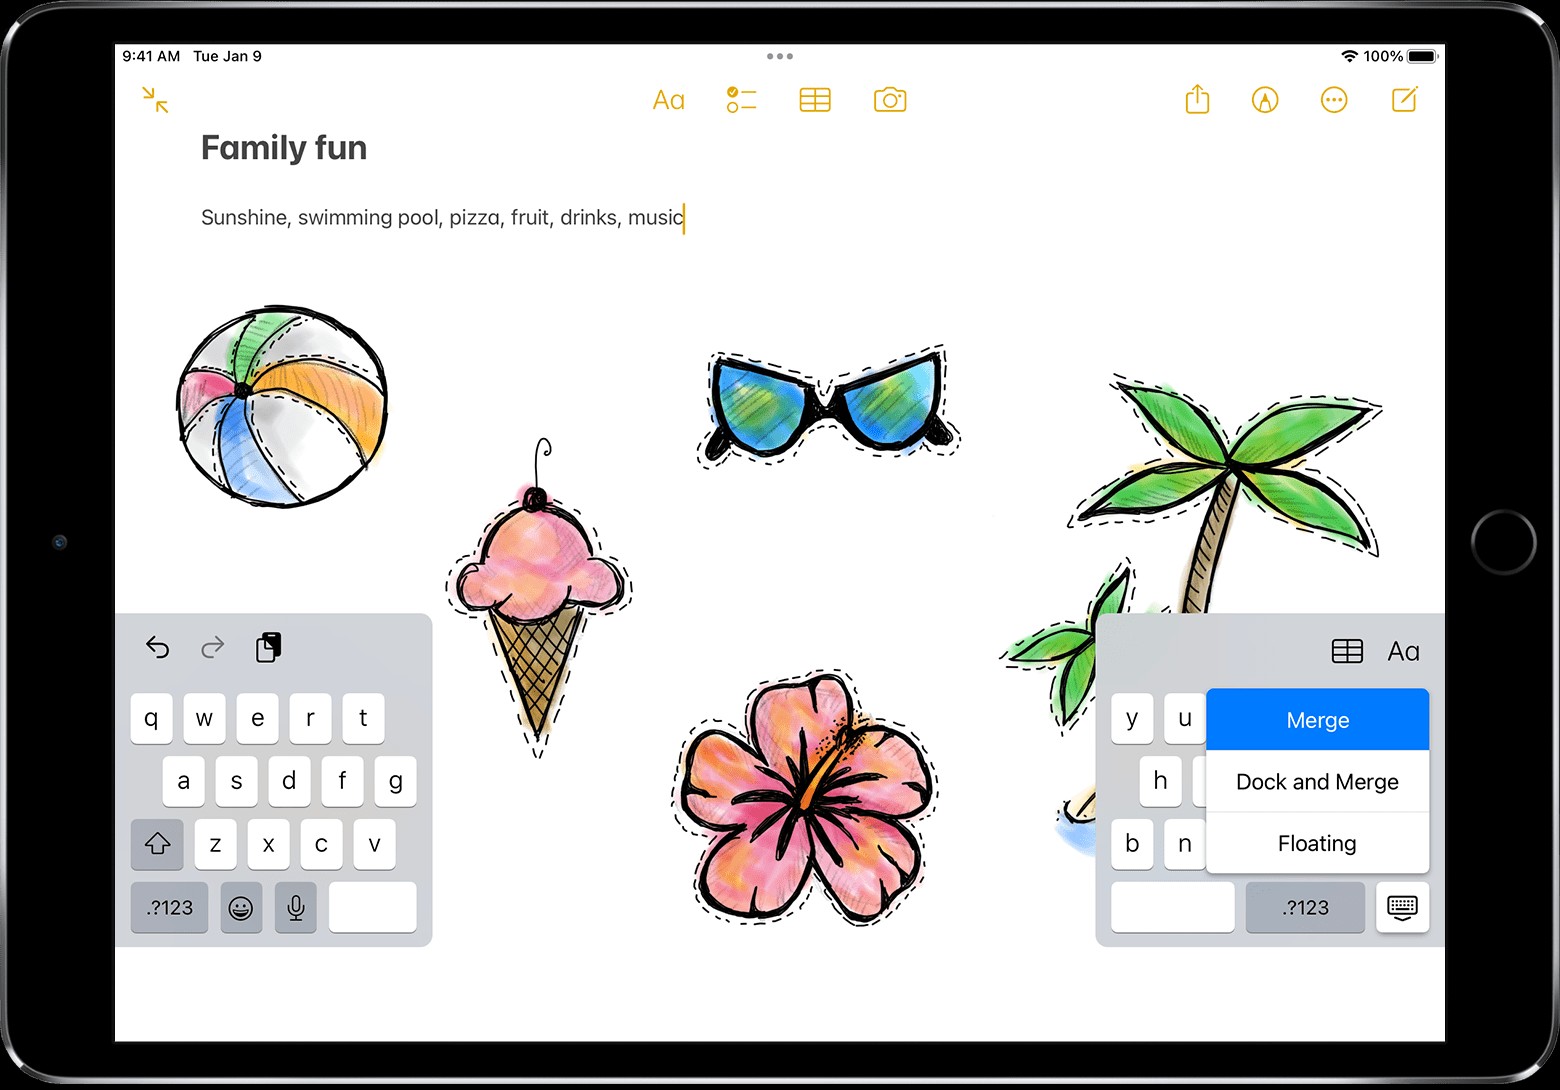
The most direct method to merge the keyboard is by using the keyboard button located in the lower-right corner of the screen.
- Tap a text field to bring up the keyboard.
- Touch and hold the keyboard button.
- Slide your finger up to either Merge or Dock and Merge.
- Release your finger, and the keyboard will return to its normal, merged state.
This method is effective and quick, restoring the keyboard to its default position.
2.2. Pinching the Keyboard
Another intuitive method involves using a pinching gesture directly on the keyboard.
- Place two fingers on the split keyboard.
- Pinch your fingers together towards the center of the screen.
- The keyboard should merge back into a single, standard keyboard.
This gesture is similar to zooming in and out on photos and provides a natural way to merge the keyboard.
2.3. Checking Keyboard Settings
Sometimes, the split keyboard setting might be toggled on in your iPad’s settings. Here’s how to check and disable it:
- Go to Settings on your iPad.
- Tap on General.
- Scroll down and select Keyboard.
- Look for the Split Keyboard option and toggle it off.
Disabling this setting ensures that the keyboard does not accidentally split again.
3. Step-by-Step Guide to Merging the Split Keyboard
For those who prefer a detailed, step-by-step guide, here’s how to merge the split keyboard using the keyboard button:
3.1. Open an App with Keyboard Functionality
First, open any app that requires keyboard input, such as Notes, Messages, or Safari.
3.2. Bring Up the Split Keyboard
Tap on a text field within the app to activate the split keyboard.
3.3. Access the Keyboard Options
Locate the keyboard button in the lower-right corner of the keyboard. This button usually displays a keyboard icon or a globe icon.
3.4. Merge the Keyboard
Touch and hold the keyboard button. A menu will appear with options like Dock and Merge, Undock, and Split.
3.5. Select “Merge” or “Dock and Merge”
Slide your finger up to the Merge or Dock and Merge option, then release. The keyboard will now merge back into its default, single-keyboard configuration. The “Dock and Merge” option will also ensure the keyboard is docked at the bottom of the screen.
4. Understanding the Floating Keyboard
Another common issue users face is the floating keyboard. This feature, while useful in certain situations, can sometimes be enabled unintentionally, causing the keyboard to appear smaller and movable.
4.1. What is the Floating Keyboard?
The floating keyboard is a smaller, single keyboard that can be moved anywhere on the iPad screen. This feature is designed to allow users to type with one hand, making it convenient for multitasking or using the iPad in constrained spaces.
4.2. How the Floating Keyboard Gets Activated
The floating keyboard is typically activated through a pinching gesture on the full-sized keyboard or by long-pressing the keyboard button and selecting the floating keyboard option.
4.3. Recognizing the Floating Keyboard
The floating keyboard is easily recognizable due to its smaller size and the fact that it hovers above the screen rather than being docked at the bottom.
5. Restoring the Floating Keyboard to Default
If your iPad keyboard is floating, restoring it to the default keyboard is a simple process.
5.1. Using the Pinch-Out Gesture
The most direct way to return the floating keyboard to its default size is by using a pinch-out gesture.
- Place two fingers on the floating keyboard.
- Spread your fingers apart, as if you are zooming in on a photo.
- The keyboard will enlarge back to its full size and dock at the bottom of the screen.
5.2. Using the Keyboard Button
Alternatively, you can use the keyboard button to restore the default keyboard.
- Touch and hold the keyboard button in the lower-right corner of the floating keyboard.
- Slide your finger up to the Dock and Merge option.
- Release your finger, and the keyboard will return to its default size and position.
5.3. Checking Keyboard Settings
Similar to the split keyboard, you can also check the keyboard settings to ensure the floating keyboard is not enabled.
- Go to Settings on your iPad.
- Tap on General.
- Select Keyboard.
- Look for any settings related to the floating keyboard and ensure they are disabled.
6. Troubleshooting Common Issues
Sometimes, merging or restoring the keyboard might not work as expected. Here are some common issues and their solutions.
6.1. Keyboard Button Not Responding
If the keyboard button is not responding, try the following:
- Restart your iPad. A simple restart can often resolve minor software glitches.
- Ensure your iPad is running the latest version of iPadOS.
- Check if the keyboard button is physically damaged.
6.2. Keyboard Keeps Splitting
If the keyboard keeps splitting even after merging it, try these steps:
- Disable the split keyboard option in Settings > General > Keyboard.
- Reset your keyboard dictionary in Settings > General > Reset > Reset Keyboard Dictionary.
- Ensure there are no accessibility settings interfering with the keyboard.
6.3. Keyboard is Frozen or Lagging
If the keyboard is frozen or lagging, try these solutions:
- Close any unnecessary apps running in the background.
- Clear the cache and data of the app you are using.
- Ensure your iPad has enough storage space.
7. Exploring Keyboard Customization Options
The iPad offers a range of keyboard customization options to enhance your typing experience.
7.1. Enabling One-Handed Keyboard
The one-handed keyboard is similar to the floating keyboard but is designed to stick to either the left or right side of the screen.
- Touch and hold the keyboard button.
- Select either the left or right one-handed keyboard icon.
7.2. Using Keyboard Shortcuts
Keyboard shortcuts can significantly speed up your typing.
- Go to Settings > General > Keyboard > Text Replacement.
- Add custom shortcuts for frequently used phrases or words.
7.3. Dictation and Voice Input
The iPad supports dictation, allowing you to type using your voice.
- Enable dictation in Settings > General > Keyboard > Enable Dictation.
- Tap the microphone icon on the keyboard to start dictating.
8. The Benefits of Using an External Keyboard
For users who do a lot of typing on their iPads, an external keyboard can be a valuable accessory.
8.1. Increased Typing Speed and Accuracy
External keyboards typically offer a more comfortable and efficient typing experience compared to the on-screen keyboard.
8.2. Improved Ergonomics
Using an external keyboard can improve your posture and reduce strain on your hands and wrists.
8.3. Enhanced Productivity
With an external keyboard, you can type faster and more accurately, boosting your overall productivity.
8.4. Types of External Keyboards
There are various types of external keyboards available for the iPad, including:
- Bluetooth keyboards
- Smart Keyboards (designed specifically for the iPad Pro and iPad Air)
- Wired keyboards (using the Lightning or USB-C port)
9. Common iPad Keyboard Gestures
Mastering iPad keyboard gestures can improve your typing efficiency and overall user experience.
9.1. QuickPath Typing (Slide to Type)
QuickPath allows you to type by sliding your finger from one letter to the next without lifting it from the screen.
- Ensure QuickPath is enabled in Settings > General > Keyboard > Enable Slide to Type.
- Start typing by sliding your finger across the letters of the word.
9.2. Undo and Redo Gestures
You can quickly undo or redo your typing using simple gestures.
- Undo: Swipe left with three fingers on the screen.
- Redo: Swipe right with three fingers on the screen.
9.3. Copy and Paste Gestures
Copying and pasting text can be done using intuitive gestures.
- Copy: Pinch closed with three fingers.
- Cut: Pinch closed with three fingers twice.
- Paste: Spread three fingers apart.
10. Maintaining Your iPad for Optimal Performance
Ensuring your iPad is well-maintained can prevent keyboard issues and other performance problems.
10.1. Regularly Update iPadOS
Keep your iPad updated to the latest version of iPadOS to ensure you have the latest bug fixes and performance improvements.
10.2. Manage Storage Space
Ensure your iPad has enough free storage space. A full storage can cause performance issues, including keyboard lag.
10.3. Clear Cache and Data
Periodically clear the cache and data of apps you frequently use to free up storage space and improve performance.
10.4. Restart Your iPad Regularly
Restarting your iPad regularly can help clear temporary files and resolve minor software glitches.
11. AssistiveTouch and Accessibility Features
iPadOS includes several accessibility features that can assist users with disabilities, including those who have difficulty using the standard keyboard.
11.1. Enabling AssistiveTouch
AssistiveTouch allows you to perform gestures and actions using on-screen buttons.
- Go to Settings > Accessibility > Touch > AssistiveTouch.
- Toggle AssistiveTouch on.
- Customize the AssistiveTouch menu to include keyboard-related actions.
11.2. Using On-Screen Keyboard Options
iPadOS offers several on-screen keyboard options to assist users with different needs.
- Sticky Keys: Allows you to press modifier keys (such as Shift, Ctrl, or Option) one at a time instead of holding them down.
- Slow Keys: Requires you to press and hold a key for a certain period before it is recognized, preventing accidental key presses.
11.3. Voice Control
Voice Control allows you to control your iPad entirely with your voice.
- Go to Settings > Accessibility > Voice Control.
- Enable Voice Control.
- Use voice commands to navigate your iPad and type text.
12. Keyboard Layout Options on iPad
The iPad offers various keyboard layout options to suit different language needs and user preferences.
12.1. Adding Multiple Keyboards
You can add multiple keyboards for different languages to your iPad.
- Go to Settings > General > Keyboard > Keyboards.
- Tap Add New Keyboard and select the languages you want to add.
- Switch between keyboards by tapping the globe icon on the keyboard.
12.2. Changing Keyboard Layout
You can change the keyboard layout for different languages to match your typing style.
- Go to Settings > General > Keyboard > Keyboards.
- Select a language and choose the keyboard layout you prefer (e.g., QWERTY, AZERTY, Dvorak).
12.3. Using Third-Party Keyboards
You can also use third-party keyboards from the App Store to customize your typing experience further.
- Download and install a third-party keyboard from the App Store.
- Go to Settings > General > Keyboard > Keyboards.
- Add the third-party keyboard to your list of keyboards and enable Allow Full Access if required.
13. Preventing Accidental Keyboard Splits
To avoid accidentally splitting your keyboard in the future, consider these tips:
13.1. Be Mindful of Gestures
Pay attention to your gestures while typing, especially when holding the iPad in landscape mode. Avoid unintentional pinching or spreading gestures on the keyboard.
13.2. Disable Split Keyboard Setting
If you rarely use the split keyboard feature, you can disable it altogether in Settings > General > Keyboard.
13.3. Use a Case with Keyboard Protection
Consider using a case that covers the edges of your iPad, providing a barrier against accidental gestures on the screen.
14. Exploring Advanced Keyboard Features
The iPad offers several advanced keyboard features that can enhance your typing experience.
14.1. Predictive Text
Predictive text suggests words as you type, helping you type faster and more accurately.
- Ensure predictive text is enabled in Settings > General > Keyboard > Predictive.
- Start typing, and the iPad will suggest words above the keyboard.
14.2. Auto-Correction
Auto-correction automatically corrects misspelled words as you type.
- Ensure auto-correction is enabled in Settings > General > Keyboard > Auto-Correction.
- Type as usual, and the iPad will correct any misspelled words.
14.3. Smart Punctuation
Smart Punctuation automatically inserts punctuation marks, such as commas and periods, as you type.
- Ensure Smart Punctuation is enabled in Settings > General > Keyboard > Smart Punctuation.
- Type as usual, and the iPad will insert punctuation marks where appropriate.
15. The Future of iPad Keyboards
As technology evolves, so too will the features and capabilities of iPad keyboards.
15.1. Enhanced AI Integration
Future iPad keyboards may incorporate more advanced AI features, such as improved predictive text, contextual suggestions, and personalized typing experiences.
15.2. Gesture-Based Typing
Gesture-based typing, such as QuickPath, may become even more sophisticated, allowing for faster and more intuitive typing.
15.3. Augmented Reality (AR) Keyboards
In the future, we may see the introduction of AR keyboards that project a virtual keyboard onto any surface, providing a flexible and customizable typing solution.
16. Addressing User Concerns About Keyboard Size
Many users find the default iPad keyboard size either too small or too large. Here’s how to adjust the keyboard size to suit your preferences.
16.1. Using the Floating Keyboard for Smaller Size
If you find the default keyboard too large, using the floating keyboard can be a good solution. The floating keyboard is smaller and can be moved anywhere on the screen.
- Touch and hold the keyboard button.
- Select the floating keyboard option.
- Adjust the position of the floating keyboard as needed.
16.2. Zoom Feature for Larger Size
If you need a larger keyboard, you can use the zoom feature in iPadOS.
- Go to Settings > Accessibility > Zoom.
- Enable Zoom.
- Use the zoom gestures to magnify the screen, including the keyboard.
16.3. External Keyboard for Custom Size
Using an external keyboard allows you to choose a keyboard size that suits your preferences. External keyboards come in various sizes and layouts.
17. How to Customize Keyboard Appearance
Customizing the appearance of your iPad keyboard can make typing more enjoyable and visually appealing.
17.1. Dark Mode
Enabling Dark Mode changes the keyboard to a dark theme, which can be easier on the eyes, especially in low-light conditions.
- Go to Settings > Display & Brightness.
- Select Dark.
- The keyboard will automatically switch to a dark theme.
17.2. Keyboard Themes
Some third-party keyboards offer a variety of themes that allow you to customize the appearance of your keyboard.
- Download and install a third-party keyboard from the App Store.
- Open the keyboard settings and choose a theme that you like.
17.3. Custom Keyboard Colors
Some third-party keyboards also allow you to customize the colors of individual keys and the background.
- Open the keyboard settings and look for options to customize the keyboard colors.
- Choose the colors you prefer and save your settings.
18. Keyboard Shortcuts for Text Editing
Using keyboard shortcuts can significantly speed up your text editing tasks on the iPad.
18.1. Basic Text Editing Shortcuts
- Command + C: Copy
- Command + X: Cut
- Command + V: Paste
- Command + Z: Undo
- Command + Shift + Z: Redo
- Command + A: Select All
- Command + F: Find
18.2. Formatting Shortcuts
- Command + B: Bold
- Command + I: Italic
- Command + U: Underline
18.3. Navigation Shortcuts
- Command + Left Arrow: Go to the beginning of the line
- Command + Right Arrow: Go to the end of the line
- Option + Left Arrow: Go to the beginning of the word
- Option + Right Arrow: Go to the end of the word
19. Optimizing Keyboard Performance for Gaming
For gamers, optimizing keyboard performance is crucial for a smooth and responsive gaming experience.
19.1. Using a Gaming Keyboard
Consider using a dedicated gaming keyboard designed for fast response times and customizable keys.
19.2. Disabling Autocorrection and Predictive Text
Autocorrection and predictive text can sometimes interfere with gaming, so it’s best to disable them.
- Go to Settings > General > Keyboard.
- Toggle off Auto-Correction and Predictive.
19.3. Custom Key Mapping
Some games allow you to customize key mappings, so you can assign specific actions to different keys on the keyboard.
20. Keyboard Maintenance and Cleaning
Proper keyboard maintenance and cleaning can help prolong the life of your keyboard and ensure it functions optimally.
20.1. Regular Cleaning
Clean your keyboard regularly to remove dust, dirt, and debris.
- Turn off your iPad and disconnect the keyboard.
- Use a soft, lint-free cloth to wipe the keyboard.
- For hard-to-reach areas, use a can of compressed air.
20.2. Deep Cleaning
For a more thorough cleaning, you can use a keyboard cleaning solution.
- Turn off your iPad and disconnect the keyboard.
- Dampen a soft cloth with keyboard cleaning solution.
- Wipe the keyboard, being careful not to get any liquid inside.
- Allow the keyboard to dry completely before reconnecting it.
20.3. Preventing Damage
Avoid eating or drinking near your keyboard to prevent spills and crumbs from getting inside. Store your keyboard in a safe place when not in use to protect it from damage.
21. Resolving Bluetooth Keyboard Connection Issues
If you’re using a Bluetooth keyboard with your iPad and experiencing connection issues, here are some troubleshooting steps.
21.1. Ensure Bluetooth is Enabled
Make sure Bluetooth is enabled on your iPad.
- Go to Settings > Bluetooth.
- Toggle Bluetooth on.
21.2. Pair the Keyboard
Pair the keyboard with your iPad.
- Put the keyboard in pairing mode.
- In the Bluetooth settings on your iPad, select the keyboard from the list of available devices.
- Follow the on-screen instructions to complete the pairing process.
21.3. Check Battery Level
Ensure the keyboard has enough battery power. A low battery can cause connection issues.
21.4. Forget and Re-Pair the Keyboard
If you’re still experiencing issues, try forgetting the keyboard and re-pairing it.
- In the Bluetooth settings on your iPad, tap the “i” icon next to the keyboard.
- Select Forget This Device.
- Re-pair the keyboard following the steps above.
21.5. Reset Network Settings
If none of the above steps work, try resetting your iPad’s network settings.
- Go to Settings > General > Reset > Reset Network Settings.
- Follow the on-screen instructions to complete the reset. Note that this will also reset your Wi-Fi passwords.
22. Exploring iPad Keyboard Alternatives
If you’re not satisfied with the default iPad keyboard, there are several alternatives you can explore.
22.1. Third-Party Keyboard Apps
There are many third-party keyboard apps available on the App Store, offering a variety of features and customization options. Some popular options include:
- Gboard
- SwiftKey
- Fleksy
22.2. Hardware Keyboards
Hardware keyboards offer a physical typing experience, which some users prefer. Options include:
- Apple Magic Keyboard
- Logitech Folio Touch
- Brydge Keyboards
22.3. Split Keyboard Apps
If you prefer a split keyboard layout, there are several apps that offer this feature.
- Texpand
- Minuum
23. Maximizing Productivity with Keyboard Features
Leveraging keyboard features can significantly enhance your productivity on the iPad.
23.1. Text Expansion
Text expansion allows you to create shortcuts for frequently used phrases or words.
- Go to Settings > General > Keyboard > Text Replacement.
- Tap the “+” button to add a new shortcut.
- Enter the phrase you want to expand and the shortcut you want to use.
23.2. Smart Punctuation
Smart Punctuation automatically inserts punctuation marks, such as commas and periods, as you type, saving you time and effort.
23.3. Autocorrection
Autocorrection automatically corrects misspelled words as you type, helping you avoid errors.
23.4. Predictive Text
Predictive text suggests words as you type, helping you type faster and more accurately.
24. Ergonomic Tips for iPad Keyboard Use
Following ergonomic tips can help prevent strain and injury while using your iPad keyboard.
24.1. Proper Posture
Maintain proper posture while typing. Sit up straight with your shoulders relaxed and your wrists straight.
24.2. Keyboard Placement
Place the keyboard in a comfortable position, close to your body.
24.3. Take Breaks
Take frequent breaks to stretch your hands and wrists.
24.4. Use a Wrist Rest
Use a wrist rest to support your wrists while typing.
25. Accessibility Options for Keyboard Use
iPadOS offers several accessibility options for users with disabilities, including options to customize keyboard behavior.
25.1. Sticky Keys
Sticky Keys allows you to press modifier keys (such as Shift, Ctrl, or Option) one at a time instead of holding them down.
25.2. Slow Keys
Slow Keys requires you to press and hold a key for a certain period before it is recognized, preventing accidental key presses.
25.3. Full Keyboard Access
Full Keyboard Access allows you to navigate and control your iPad entirely using the keyboard.
26. Understanding Keyboard Security Settings
Understanding keyboard security settings is essential to protect your privacy and data.
26.1. Keyboard Tracking
Be aware of keyboard tracking, which can be used to monitor your keystrokes. Avoid installing keyboard apps from untrusted sources.
26.2. Passwords
Use strong, unique passwords for your accounts to protect yourself from unauthorized access.
26.3. Two-Factor Authentication
Enable two-factor authentication for your accounts to add an extra layer of security.
27. Keyboard Language Settings
The iPad supports multiple keyboard languages, allowing you to type in your preferred language.
27.1. Adding a Language
Add a language to your keyboard settings.
- Go to Settings > General > Keyboard > Keyboards.
- Tap Add New Keyboard and select the language you want to add.
27.2. Switching Languages
Switch between languages while typing by tapping the globe icon on the keyboard.
27.3. Customizing Language Settings
Customize language settings, such as autocorrection and predictive text, for each language.
28. Optimizing Keyboard for Multilingual Users
For multilingual users, optimizing keyboard settings is crucial for a seamless typing experience.
28.1. Adding Multiple Languages
Add multiple languages to your keyboard settings.
28.2. Customizing Settings for Each Language
Customize settings, such as autocorrection and predictive text, for each language.
28.3. Using Keyboard Shortcuts
Use keyboard shortcuts to quickly switch between languages.
29. Common Mistakes to Avoid While Using iPad Keyboard
Avoiding common mistakes can help improve your typing accuracy and efficiency.
29.1. Accidental Key Presses
Avoid accidental key presses by typing deliberately and using the correct finger placement.
29.2. Misspelled Words
Pay attention to your spelling and use autocorrection to correct misspelled words.
29.3. Incorrect Punctuation
Use correct punctuation to ensure your writing is clear and easy to understand.
30. iPad Keyboard FAQs
Here are some frequently asked questions about the iPad keyboard:
30.1. How do I split the keyboard on my iPad?
To split the keyboard, touch and hold the keyboard button in the lower-right corner of the keyboard, then slide your finger up to the Split option.
30.2. How do I merge the keyboard on my iPad?
To merge the keyboard, touch and hold the keyboard button in the lower-right corner of the keyboard, then slide your finger up to the Merge or Dock and Merge option.
30.3. How do I move the keyboard on my iPad?
To move the floating keyboard, touch and hold the keyboard button, then drag the keyboard to the desired location on the screen.
30.4. How do I resize the keyboard on my iPad?
To resize the floating keyboard, place two fingers on the keyboard and pinch to zoom in or out.
30.5. How do I change the keyboard language on my iPad?
To change the keyboard language, go to Settings > General > Keyboard > Keyboards, then add or remove languages as needed.
30.6. How do I enable autocorrection on my iPad?
To enable autocorrection, go to Settings > General > Keyboard, then toggle the Auto-Correction option on.
30.7. How do I enable predictive text on my iPad?
To enable predictive text, go to Settings > General > Keyboard, then toggle the Predictive option on.
30.8. How do I use dictation on my iPad?
To use dictation, tap the microphone icon on the keyboard and start speaking.
30.9. How do I use keyboard shortcuts on my iPad?
To use keyboard shortcuts, press and hold the Command key, then press the corresponding letter or number.
30.10. How do I clean my iPad keyboard?
To clean your iPad keyboard, turn off your iPad and use a soft, lint-free cloth to wipe the keyboard.
Experiencing a split keyboard on your iPad can be perplexing, but it’s usually an easy fix. Whether it’s an accidental gesture or an unfamiliar feature, restoring your keyboard to its default state is straightforward. If you’re still facing issues or have more questions, WHY.EDU.VN is here to help. Visit our website at WHY.EDU.VN, where our experts provide detailed answers and solutions to all your tech queries. For immediate assistance, contact us at 101 Curiosity Lane, Answer Town, CA 90210, United States, or reach out via WhatsApp at +1 (213) 555-0101. Let why.edu.vn be your go-to resource for reliable and expert guidance on all things tech! We are dedicated to providing comprehensive solutions and support, ensuring you always have the answers you need. Explore our resources today!