Experiencing issues with your external hard drive not showing up on your Mac can be incredibly frustrating, especially when you need to access important files. You’re not alone; this is a common problem Mac users encounter. Fortunately, in many cases, the issue is easily resolved. This guide will walk you through the troubleshooting steps to get your external hard drive recognized again, ensuring you can access your valuable data.
First, let’s cover some quick checks that might immediately solve the problem.
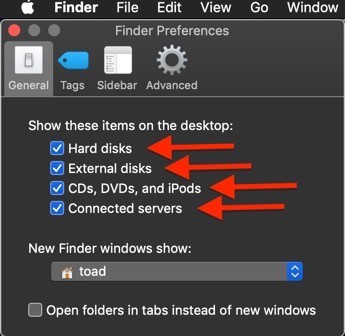
One of the simplest yet often overlooked solutions is to ensure your Finder preferences are correctly configured to display external drives on your desktop. To check this:
- Open Finder.
- In the menu bar, click on Finder and select Preferences.
- Go to the General tab.
- Make sure the checkbox next to External disks is selected. This setting controls whether external hard drives appear on your desktop.
- Next, navigate to the Sidebar tab.
- Under Locations, ensure that External disks is also checked. This ensures external drives appear in the Finder sidebar, providing another way to access them even if they don’t show on the desktop.
If your Finder preferences are correctly set, the next step is to investigate potential connection problems. A faulty cable or port can often be the culprit:
- Check the cable: Ensure the cable connecting your external hard drive to your Mac is securely plugged in at both ends. Try using a different USB cable to rule out a cable issue.
- Try a different port: Connect your external hard drive to a different USB port on your Mac. Sometimes, a specific port may be malfunctioning.
- Restart your Mac: A simple restart can resolve temporary software glitches that might be preventing your Mac from recognizing the external drive.
If these quick checks don’t work, Disk Utility is your next best tool for diagnosing and potentially fixing the issue. Disk Utility is a built-in macOS tool that can repair disk errors and manage drives.
Here’s how to use Disk Utility to address an external hard drive that is not showing up:
- Open Disk Utility. You can find it by going to Applications > Utilities > Disk Utility, or by using Spotlight search (Command + Space, then type “Disk Utility”).
- In the Disk Utility sidebar, look for your external hard drive. Even if it’s not showing up on your desktop or in Finder, it should appear in Disk Utility. It might be listed in gray if it’s not mounted.
- Select the external hard drive that is not mounting.
- Click the First Aid button at the top of the Disk Utility window.
- Click Run to start the First Aid process. Disk Utility will check for and attempt to repair any errors on the disk.
- Once First Aid is complete, check if your external hard drive now mounts and appears in Finder.
If First Aid reports “operation failed” or the drive still doesn’t mount, you can try to manually mount the drive in Disk Utility:
- In Disk Utility, select the unmounted external hard drive.
- Click the Mount button at the top.
If manual mounting fails, and Disk Utility shows the drive but it’s still inaccessible, the issue might be related to the drive’s format or deeper system settings.
Sometimes, resetting your Mac’s System Management Controller (SMC) and NVRAM (Non-Volatile RAM) can resolve hardware-related issues that might be preventing external drives from being recognized. These resets can help with various hardware functions, including USB port operations.
Reset SMC:
The process for resetting SMC varies slightly depending on your Mac model (desktop or laptop). For desktops:
- Shut down your Mac and unplug the power cord.
- Wait for 15 seconds.
- Plug the power cord back in.
- Wait 5 seconds, then turn on your Mac.
Reset NVRAM:
- Shut down your Mac.
- Turn it on and immediately press and hold Option + Command + P + R keys together.
- Release the keys after about 20 seconds, during which your Mac might appear to restart.
After resetting SMC and NVRAM, try reconnecting your external hard drive to see if it is now recognized.
Another potential reason for your external hard drive not showing up is format incompatibility. macOS primarily works best with APFS (Apple File System) or Mac OS Extended (HFS+) formats. However, external drives can also be formatted with FAT32 or exFAT, which are more compatible with Windows.
To check the format of your drive (if it’s visible in Disk Utility):
- Open Disk Utility and select your external hard drive.
- Look for the Format information, usually displayed under the drive name and capacity.
If your drive is formatted in a Windows-centric format like NTFS, macOS has limited built-in support and might not mount it without third-party software. While macOS can read NTFS drives, writing to them usually requires additional drivers. If format incompatibility is suspected, consider reformatting the drive to APFS or exFAT using Disk Utility, but be aware that reformatting will erase all data on the drive, so data recovery might be necessary if important files are on the drive.
In conclusion, if your external hard drive is not showing up on your Mac, systematically go through these troubleshooting steps: check Finder preferences, inspect connections, use Disk Utility for First Aid and mounting, reset SMC/NVRAM, and verify the drive format. If after trying these steps, your drive remains unrecognized, it might indicate a more serious hardware issue with the drive itself, and professional data recovery services might be needed if the data is critical. Regularly backing up your data is always recommended to prevent data loss from such unforeseen issues.