Is your electric dryer not getting hot, leaving you with damp clothes and frustration? At WHY.EDU.VN, we understand the inconvenience of a malfunctioning dryer and aim to provide you with practical solutions. This article will explore common reasons for this issue and guide you through troubleshooting steps, ensuring your laundry routine returns to normal with appliance troubleshooting, dryer maintenance, and heating problems addressed.
1. Understanding Why Your Electric Dryer Isn’t Heating Up
A dryer that doesn’t heat can be a major inconvenience. Several factors can contribute to this issue, ranging from simple fixes to more complex repairs. Understanding these potential causes is the first step in resolving the problem. Let’s dive into the common reasons behind a dryer’s heating malfunction.
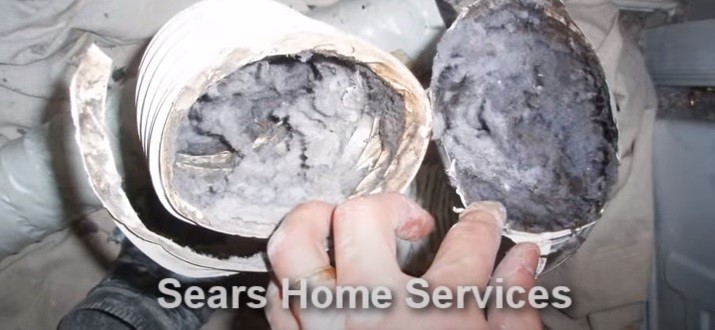
1.1. Clogged Dryer Vent: The Primary Suspect
A clogged dryer vent is the most frequent culprit behind a dryer not heating properly. The dryer relies on proper airflow to exhaust hot, moist air. When the vent is obstructed, heat builds up, triggering safety mechanisms that prevent the dryer from heating.
- How to Check: Start the dryer on a high-heat setting and check the exhaust vent outside. There should be a strong, warm airflow. If the airflow is weak or nonexistent, the vent is likely clogged.
- Solution: Disconnect the dryer vent from the dryer and the outside vent. Use a dryer vent cleaning kit to remove lint buildup. Ensure the vent is free of kinks or obstructions. According to the U.S. Fire Administration, failure to clean dryer vents is a leading cause of home fires.
1.2. Electrical Issues: Powering the Heat
Electric dryers require a 240-volt circuit to operate correctly. This circuit is supplied by two 120-volt lines. If one line fails, the dryer may run but won’t produce heat.
- How to Check: This requires a multimeter and some electrical knowledge. Test the voltage at the dryer outlet to ensure it’s receiving the correct voltage. Safety Note: If you’re not comfortable working with electricity, it’s best to call a qualified electrician.
- Solution: Check the circuit breaker for the dryer. If it’s tripped, reset it. If the breaker trips repeatedly, there may be an underlying electrical issue that requires professional attention. According to the Electrical Safety Foundation International (ESFI), faulty wiring is a significant cause of electrical fires.
1.3. Lint Screen Obstruction: A Simple Yet Critical Check
The lint screen traps lint and debris from clothes, preventing them from entering the exhaust vent. A clogged lint screen restricts airflow, leading to overheating and reduced drying efficiency.
- How to Check: Inspect the lint screen before each load. If it’s covered in lint, it needs cleaning.
- Solution: Remove the lint screen and clean it thoroughly. Soak it in warm water with dish soap and scrub with a soft brush if necessary. Ensure the screen is completely dry before replacing it. The Consumer Product Safety Commission (CPSC) recommends cleaning the lint screen after every load.
1.4. Loading Issues: Balancing the Load
The type and size of your laundry load can affect drying performance. Overloading the dryer or mixing heavy and light items can prevent even drying and cause the dryer to shut off prematurely.
- How to Check: Evaluate the load size and the types of items being dried.
- Solution: Dry similar items together and avoid overloading the dryer. For auto-dry cycles, ensure the load is balanced to prevent the dryer from misjudging dryness levels.
1.5. Faulty Heating Element: The Core of the Heat
The heating element is responsible for generating heat in the dryer. If it fails, the dryer won’t get hot.
- How to Check: Visually inspect the heating element for any signs of damage, such as breaks or burns. Use a multimeter to test the element for continuity. Safety Note: Unplug the dryer before inspecting the heating element.
- Solution: If the heating element is faulty, it needs to be replaced. This is a repair best left to a qualified technician, as it involves working with electrical components.
1.6. Thermostat Malfunctions: Regulating Temperature
Thermostats regulate the dryer’s temperature, preventing overheating. If a thermostat fails, it can cause the dryer to either overheat or not heat at all.
- How to Check: A visual inspection may not reveal a faulty thermostat. Use a multimeter to test the thermostat for continuity.
- Solution: If a thermostat is faulty, it needs to be replaced. Due to the complexity of the dryer’s thermostat system, it’s recommended to have a technician handle this repair.
1.7. Thermal Fuse Issues: A Safety Mechanism
The thermal fuse is a safety device that prevents the dryer from overheating. If the dryer overheats, the thermal fuse blows, cutting off power to the heating element.
- How to Check: The thermal fuse is typically located on the blower housing. Use a multimeter to test the fuse for continuity.
- Solution: If the thermal fuse is blown, it needs to be replaced. However, it’s crucial to identify the cause of the overheating before replacing the fuse, as a clogged vent or faulty thermostat can cause it to blow again.
2. Step-by-Step Troubleshooting Guide
To effectively diagnose why your electric dryer isn’t heating, follow these steps.
2.1. Preliminary Checks
- Check the Power Supply: Ensure the dryer is properly plugged into a functioning outlet. Check the circuit breaker to ensure it hasn’t tripped.
- Inspect the Lint Screen: Clean the lint screen thoroughly before proceeding with further troubleshooting.
- Examine the Dryer Vent: Check the dryer vent for clogs or obstructions. Disconnect the vent and inspect it visually.
2.2. Testing the Venting System
- Run a Timed Dry Cycle: Start the dryer on a high-heat setting and go to the exhaust vent outside.
- Assess Airflow: Use your hand to check the airflow. If it’s weak or nonexistent, the venting system is likely clogged.
- Clean the Vent: Disconnect the vent from the dryer and the outside vent. Use a dryer vent cleaning kit to remove lint buildup.
2.3. Electrical System Checks
- Voltage Test: Use a multimeter to test the voltage at the dryer outlet. Ensure it’s receiving the correct voltage (240 volts).
- Circuit Breaker: Check the circuit breaker for the dryer. If it’s tripped, reset it.
- Safety First: If you’re not comfortable working with electricity, consult a qualified electrician.
2.4. Component Testing
- Heating Element: Unplug the dryer and access the heating element. Visually inspect it for any signs of damage. Use a multimeter to test the element for continuity.
- Thermostat: Locate the thermostats inside the dryer. Use a multimeter to test them for continuity.
- Thermal Fuse: The thermal fuse is typically located on the blower housing. Use a multimeter to test the fuse for continuity.
2.5. Addressing Loading Issues
- Load Size: Avoid overloading the dryer. Dry similar items together for more even drying.
- Auto-Dry Cycles: For auto-dry cycles, ensure the load is balanced to prevent the dryer from misjudging dryness levels.
3. When to Call a Professional
While many dryer issues can be resolved with DIY troubleshooting, certain problems require the expertise of a professional appliance repair technician.
3.1. Complex Electrical Issues
If you’re uncomfortable working with electricity or if you suspect a more complex electrical problem, it’s best to call a professional. Electrical repairs can be dangerous and should be handled by someone with the necessary skills and experience.
3.2. Gas Dryer Issues
Gas dryers involve working with gas lines, which can be hazardous if not handled properly. If you suspect a gas-related issue, such as a gas leak or a faulty gas valve, contact a qualified technician immediately.
3.3. Internal Component Failures
If you’ve identified a faulty heating element, thermostat, or thermal fuse, replacing these components can be complex and may require specialized tools. A professional technician can diagnose the problem accurately and perform the necessary repairs safely.
3.4. Recurring Problems
If you’ve attempted to fix the dryer yourself but the problem persists or recurs, it’s a sign that there may be an underlying issue that requires professional attention.
4. Maintaining Your Dryer for Optimal Performance
Regular maintenance can prevent many common dryer problems and extend the lifespan of your appliance.
4.1. Regular Lint Screen Cleaning
Clean the lint screen after every load to ensure proper airflow. This simple task can significantly improve drying efficiency and prevent overheating.
4.2. Vent Cleaning
Clean the dryer vent at least once a year, or more frequently if you notice reduced airflow or longer drying times. Use a dryer vent cleaning kit to remove lint buildup and ensure the vent is free of obstructions.
4.3. Inspecting and Maintaining the Exterior Vent
Check the exterior vent regularly to ensure it’s not blocked by snow, debris, or vegetation. Clear any obstructions to maintain proper airflow.
4.4. Professional Dryer Maintenance
Consider scheduling professional dryer maintenance annually. A technician can inspect the dryer’s internal components, clean the venting system, and identify potential problems before they cause major issues.
4.5. Proper Loading Practices
Avoid overloading the dryer and dry similar items together for more even drying. This will help prevent the dryer from overheating and improve drying efficiency.
5. Understanding Dryer Components
Familiarizing yourself with the key components of your dryer can help you better understand how it works and troubleshoot problems more effectively.
5.1. Heating Element
The heating element is responsible for generating heat in the dryer. It’s typically located in the lower part of the dryer and consists of a coil of wire that heats up when electricity passes through it.
5.2. Thermostats
Thermostats regulate the dryer’s temperature, preventing overheating. Dryers typically have multiple thermostats, including a cycling thermostat and a high-limit thermostat.
5.3. Thermal Fuse
The thermal fuse is a safety device that prevents the dryer from overheating. It’s typically located on the blower housing and cuts off power to the heating element if the dryer gets too hot.
5.4. Lint Screen
The lint screen traps lint and debris from clothes, preventing them from entering the exhaust vent. It’s typically located inside the dryer door or on top of the dryer.
5.5. Dryer Vent
The dryer vent is a duct that carries hot, moist air from the dryer to the outside. It’s typically made of flexible metal or plastic and should be inspected and cleaned regularly to prevent clogs.
6. Common Dryer Problems and Their Solutions
In addition to the dryer not heating, there are several other common dryer problems that you may encounter.
6.1. Dryer Not Tumbling
If the dryer is not tumbling, the problem could be a broken belt, a faulty motor, or a worn-out drum support roller.
- Solution: Replace the broken belt, faulty motor, or worn-out drum support roller. This repair may require the expertise of a professional technician.
6.2. Dryer Too Hot
If the dryer is getting too hot, the problem could be a faulty thermostat or a clogged vent.
- Solution: Replace the faulty thermostat or clean the clogged vent. Ensure proper airflow to prevent overheating.
6.3. Dryer Not Turning On
If the dryer is not turning on, the problem could be a tripped circuit breaker, a faulty door switch, or a broken timer.
- Solution: Reset the tripped circuit breaker, replace the faulty door switch, or replace the broken timer. Check the power supply to ensure the dryer is receiving electricity.
6.4. Dryer Making Noise
If the dryer is making noise, the problem could be a worn-out drum support roller, a loose blower wheel, or a foreign object in the drum.
- Solution: Replace the worn-out drum support roller, tighten the loose blower wheel, or remove the foreign object from the drum. Inspect the dryer for any signs of damage or wear.
7. The Science Behind Dryer Heat
Understanding the science behind how a dryer generates heat can help you better troubleshoot problems and maintain your appliance.
7.1. Electrical Resistance Heating
Electric dryers use electrical resistance heating to generate heat. When electricity passes through the heating element, the element resists the flow of electricity, generating heat.
7.2. Heat Transfer
The heat generated by the heating element is transferred to the air inside the dryer. The hot air is then circulated through the drum, drying the clothes.
7.3. Evaporation
As the hot air passes over the clothes, it causes the water in the clothes to evaporate. The moist air is then exhausted through the dryer vent.
7.4. Temperature Regulation
Thermostats regulate the temperature inside the dryer, preventing overheating. The thermostats cycle the heating element on and off to maintain the desired temperature.
8. Safety Precautions When Working with Dryers
Working with dryers can be dangerous if proper safety precautions are not followed.
8.1. Unplug the Dryer
Always unplug the dryer before performing any maintenance or repairs. This will prevent electric shock.
8.2. Turn Off the Gas Supply
If you have a gas dryer, turn off the gas supply before performing any maintenance or repairs. This will prevent gas leaks.
8.3. Wear Protective Gear
Wear protective gear, such as gloves and safety glasses, when working with dryers. This will protect you from injury.
8.4. Follow Manufacturer’s Instructions
Follow the manufacturer’s instructions when performing any maintenance or repairs. This will ensure that you are doing things correctly and safely.
8.5. Seek Professional Help
If you are not comfortable working with dryers, seek professional help. A qualified technician can diagnose and repair the problem safely and effectively.
9. Dryer Brands and Their Specific Issues
Different dryer brands may have specific issues that are more common than others.
9.1. Whirlpool
Whirlpool dryers are known for their durability and reliability. Common issues include a faulty heating element, a broken belt, and a clogged vent.
9.2. Frigidaire
Frigidaire dryers are known for their affordability and ease of use. Common issues include a faulty thermostat, a broken timer, and a worn-out drum support roller.
9.3. Samsung
Samsung dryers are known for their innovative features and stylish designs. Common issues include a faulty heating element, a clogged vent, and a broken control panel.
9.4. GE
GE dryers are known for their performance and energy efficiency. Common issues include a faulty thermostat, a broken timer, and a worn-out drum support roller.
9.5. LG
LG dryers are known for their advanced technology and smart features. Common issues include a faulty heating element, a clogged vent, and a broken control panel.
10. Environmental Impact of Dryer Usage
Dryer usage can have a significant environmental impact, particularly in terms of energy consumption.
10.1. Energy Consumption
Dryers are one of the most energy-intensive appliances in the home. Reducing dryer usage can significantly lower your energy consumption and carbon footprint.
10.2. Alternative Drying Methods
Consider alternative drying methods, such as air-drying clothes on a clothesline or using a drying rack. These methods are more energy-efficient and environmentally friendly.
10.3. Energy-Efficient Dryers
If you need to replace your dryer, consider purchasing an energy-efficient model. Energy-efficient dryers use less energy and can save you money on your utility bills.
10.4. Proper Dryer Maintenance
Proper dryer maintenance can improve energy efficiency and reduce environmental impact. Clean the lint screen regularly and clean the dryer vent at least once a year.
10.5. Reducing Dryer Usage
Reduce dryer usage by washing smaller loads, using the correct dryer settings, and avoiding over-drying clothes. These simple steps can help save energy and reduce your environmental impact.
11. Advanced Troubleshooting Techniques
For those with more technical expertise, advanced troubleshooting techniques can help diagnose more complex dryer problems.
11.1. Using a Multimeter
A multimeter is an essential tool for troubleshooting electrical problems. It can be used to test voltage, continuity, and resistance.
11.2. Reading Wiring Diagrams
Understanding wiring diagrams can help you trace electrical circuits and identify faulty components.
11.3. Using a Manometer
A manometer can be used to test gas pressure in gas dryers. This can help diagnose gas-related problems.
11.4. Inspecting the Control Board
The control board is the brain of the dryer. Inspecting the control board for any signs of damage can help diagnose complex problems.
11.5. Using Diagnostic Codes
Many modern dryers have diagnostic codes that can help identify problems. Refer to the manufacturer’s manual for a list of diagnostic codes and their meanings.
12. The Future of Dryer Technology
Dryer technology is constantly evolving, with new features and innovations being introduced regularly.
12.1. Smart Dryers
Smart dryers can be connected to the internet and controlled remotely. They can also provide diagnostic information and alert you to potential problems.
12.2. Sensor Technology
Advanced sensor technology can automatically adjust drying time and temperature based on the moisture level of the clothes.
12.3. Heat Pump Dryers
Heat pump dryers are more energy-efficient than traditional dryers. They use a heat pump to recycle heat, reducing energy consumption.
12.4. Steam Dryers
Steam dryers use steam to refresh clothes and remove wrinkles. They can also be used to sanitize clothes.
12.5. Ventless Dryers
Ventless dryers do not require an external vent. They use a condensation system to remove moisture from the clothes.
13. Dryer Repair Cost Analysis
Understanding the cost of dryer repairs can help you make informed decisions about whether to repair or replace your appliance.
13.1. DIY Repairs
DIY repairs can be cost-effective if you have the necessary skills and tools. However, DIY repairs can also be risky and may void the warranty.
13.2. Professional Repairs
Professional repairs can be more expensive than DIY repairs, but they are also more reliable and safer.
13.3. Repair vs. Replacement
Consider the age and condition of your dryer when deciding whether to repair or replace it. If the dryer is old and has had multiple problems, it may be more cost-effective to replace it.
13.4. Warranty Coverage
Check the warranty to see if the repair is covered. Many dryers come with a limited warranty that covers certain repairs.
13.5. Getting Estimates
Get estimates from multiple technicians before hiring someone to repair your dryer. This will help you find the best price and ensure that you are getting a fair deal.
14. Dryer Fire Prevention
Dryer fires are a serious hazard that can be prevented with proper maintenance and care. According to the National Fire Protection Association (NFPA), dryers cause an estimated 15,970 home fires each year.
14.1. Clean the Lint Screen Regularly
Clean the lint screen after every load to prevent lint buildup, which can cause fires.
14.2. Clean the Dryer Vent Regularly
Clean the dryer vent at least once a year to remove lint buildup and ensure proper airflow.
14.3. Avoid Overloading the Dryer
Avoid overloading the dryer, which can cause overheating and increase the risk of fire.
14.4. Use Metal Venting
Use metal venting instead of plastic or foil venting, which is more fire-resistant.
14.5. Install a Dryer Vent Alarm
Install a dryer vent alarm to alert you to clogs or obstructions in the vent.
15. Common Misconceptions About Dryers
There are several common misconceptions about dryers that can lead to improper usage and maintenance.
15.1. More Heat Dries Clothes Faster
Using a higher heat setting does not necessarily dry clothes faster. In fact, it can damage clothes and increase energy consumption.
15.2. Dryer Sheets Clean the Lint Screen
Dryer sheets do not clean the lint screen. In fact, they can leave a residue that reduces airflow.
15.3. All Dryers are the Same
Not all dryers are the same. Different dryers have different features, energy efficiencies, and maintenance requirements.
15.4. Dryers Don’t Need Maintenance
Dryers need regular maintenance to operate efficiently and safely. Neglecting maintenance can lead to problems and increase the risk of fire.
15.5. You Can Use Any Extension Cord
You should only use heavy-duty extension cords that are rated for the dryer’s amperage. Using the wrong extension cord can be dangerous and cause a fire.
16. Troubleshooting Flowchart
To help you quickly diagnose and resolve common dryer problems, here is a troubleshooting flowchart:
- Dryer Not Heating?
- Check the lint screen. Is it clean?
- Yes: Go to step 2.
- No: Clean the lint screen and try again.
- Check the dryer vent. Is it clear?
- Yes: Go to step 3.
- No: Clean the dryer vent and try again.
- Check the circuit breaker. Is it tripped?
- Yes: Reset the circuit breaker and try again. If it trips again, call a professional.
- No: Go to step 4.
- Check the heating element. Is it working?
- Yes: Go to step 5.
- No: Replace the heating element (call a professional if needed).
- Check the thermostat. Is it working?
- Yes: Call a professional.
- No: Replace the thermostat (call a professional if needed).
- Check the lint screen. Is it clean?
17. Advanced Dryer Features Explained
Many modern dryers come with advanced features designed to improve performance and convenience.
17.1. Steam Cycles
Steam cycles use steam to refresh clothes, remove wrinkles, and sanitize items.
17.2. Sensor Drying
Sensor drying uses sensors to detect the moisture level of the clothes and automatically adjust the drying time.
17.3. Wrinkle Shield
Wrinkle Shield periodically tumbles the clothes after the drying cycle to prevent wrinkles from setting in.
17.4. Sanitize Cycle
Sanitize cycles use high heat to kill bacteria and germs on clothes.
17.5. Eco Mode
Eco Mode reduces energy consumption by using lower heat settings and longer drying times.
18. Dryer Venting Options
Proper dryer venting is essential for safe and efficient dryer operation.
18.1. Rigid Metal Duct
Rigid metal duct is the preferred venting material because it is fire-resistant and provides excellent airflow.
18.2. Flexible Metal Duct
Flexible metal duct is easier to install than rigid metal duct, but it is more prone to kinks and clogs.
18.3. Plastic or Foil Duct
Plastic or foil duct is not recommended because it is a fire hazard and restricts airflow.
18.4. Vent Length
The maximum vent length should not exceed 25 feet, with deductions for elbows and bends.
18.5. Vent Termination
The vent should terminate outside the home, away from windows, doors, and other openings.
19. The Importance of Proper Dryer Installation
Proper dryer installation is crucial for safe and efficient operation.
19.1. Electrical Connections
Ensure that the dryer is properly connected to a dedicated 240-volt circuit.
19.2. Gas Connections
If you have a gas dryer, ensure that the gas connection is properly installed and leak-tested.
19.3. Venting Connections
Ensure that the venting is properly connected and sealed to prevent leaks.
19.4. Leveling
Ensure that the dryer is level to prevent vibration and noise.
19.5. Clearances
Ensure that there are adequate clearances around the dryer for proper ventilation and access.
20. Expert Tips for Dryer Longevity
Follow these expert tips to extend the lifespan of your dryer.
20.1. Regular Maintenance
Perform regular maintenance, including cleaning the lint screen and dryer vent.
20.2. Proper Loading
Avoid overloading the dryer and dry similar items together.
20.3. Use the Correct Settings
Use the correct dryer settings for the type of clothes you are drying.
20.4. Inspect Regularly
Inspect the dryer regularly for any signs of damage or wear.
20.5. Seek Professional Help
Seek professional help when needed to diagnose and repair problems.
21. Dryer FAQs
Here are some frequently asked questions about dryers.
21.1. Why is my dryer taking so long to dry clothes?
A clogged lint screen or dryer vent is often the culprit.
21.2. Can I use a dryer without a vent?
Yes, ventless dryers are available, but they may be less efficient than vented dryers.
21.3. How often should I clean my dryer vent?
At least once a year, or more frequently if you notice reduced airflow.
21.4. Is it safe to leave a dryer running unattended?
No, it is not safe to leave a dryer running unattended due to the risk of fire.
21.5. Can I dry shoes in the dryer?
It’s generally not recommended, as it can damage both the shoes and the dryer.
21.6. What does the “air fluff” setting do?
It tumbles clothes without heat, which is useful for fluffing items or removing odors.
21.7. Why does my dryer smell like burning?
This could indicate a serious problem, such as a clogged vent or a faulty heating element. Stop using the dryer and call a professional.
21.8. What is the difference between a gas dryer and an electric dryer?
Gas dryers use gas to generate heat, while electric dryers use electricity.
21.9. How do I know if my dryer is energy-efficient?
Look for the Energy Star label, which indicates that the dryer meets certain energy-efficiency standards.
21.10. What should I do if my dryer is making a loud noise?
Stop using the dryer and inspect it for any loose or broken parts. If you cannot identify the problem, call a professional.
22. Final Thoughts
A dryer that doesn’t heat can be frustrating, but with the right knowledge and troubleshooting steps, you can often resolve the problem yourself. Remember to prioritize safety and seek professional help when needed. Regular maintenance and proper usage can extend the lifespan of your dryer and ensure optimal performance. At WHY.EDU.VN, we’re committed to providing you with the information and resources you need to keep your appliances running smoothly.
Is your dryer still giving you trouble? Don’t hesitate to reach out to our experts at WHY.EDU.VN. Visit us at 101 Curiosity Lane, Answer Town, CA 90210, United States, or contact us via WhatsApp at +1 (213) 555-0101. You can also explore our website, why.edu.vn, to ask questions and find answers from our community of experts. Let us help you get your dryer back in working order today!