Is your ceiling fan creating an unwelcome symphony of whirs, clicks, or buzzes? This comprehensive guide from WHY.EDU.VN tackles the annoying issue of a noisy ceiling fan, providing you with practical solutions to restore peace and quiet to your home. Learn how to identify the source of the noise and implement effective fixes, ensuring optimal performance of your ceiling fan. We’ll delve into fan maintenance, noise reduction techniques, and common fan problems.
1. Understanding the Common Culprits Behind Ceiling Fan Noise
Ceiling fan noise can stem from a variety of issues, ranging from simple fixes to more complex problems. Identifying the source is the first step towards a solution. Here are some of the most common reasons why your ceiling fan might be making noise:
1.1. Loose Screws and Fixtures: The Rattle and Hum Culprit
One of the most frequent causes of ceiling fan noise is simply loose components. The constant vibration of the fan in operation can gradually loosen screws, bolts, and other fasteners. This creates opportunities for rattling, clicking, or even a more pronounced clanking sound.
-
Blade Brackets: The screws that hold the blades to the motor assembly are prime suspects.
-
Motor Assembly: Check for loose screws or bolts on the motor housing and mounting brackets.
-
Downrod: A loose downrod, connecting the fan to the ceiling, can cause wobbling and noise.
-
Canopy: The decorative cover concealing wiring can rattle if its screws are loose.
-
Light Fixture (If Applicable): Loose screws or connections on the light fixture can cause vibration and noise.
To remedy this, systematically inspect each of these areas and tighten any loose fasteners. Consider using a threadlocker like Loctite® Threadlocker Blue 242 to help prevent screws from loosening again in the future. Regular checks are crucial, particularly for the fan blade fixing screws, as these are often the first to loosen.
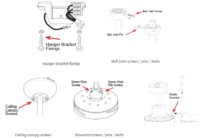 Checking for Loose Screws on a Ceiling Fan
1.2. Unbalanced Blades: The Wobble and Whoosh Effect
Unbalanced blades can also be a significant contributor to noise. When blades aren’t properly balanced, they generate vibrations that lead to noise. An imbalanced fan can also wobble, potentially damaging the motor or mounting components over time.
-
Uneven Weight Distribution: Manufacturing imperfections, warping, or blade damage can cause uneven weight.
-
Misaligned Blade Brackets: Bent or misaligned brackets can cause blades to sit at incorrect angles.
-
Dirt and Debris Accumulation: Dust buildup can add weight and disrupt the balance.
To address this:
1.  **Inspect Blades:** Check for damage, warping, and dirt. Clean thoroughly and replace any damaged blades.

2.  **Check Blade Alignment:** Gently push each blade upward to ensure they are level. Adjust brackets as needed.

3.  **Use a Blade Balancing Kit:** These kits usually include a clip and weights. Attach the clip to the blade's trailing edge and observe changes in wobble or noise. Apply weights to the top side of the blade near the clip until smooth operation is achieved.
1.3. Motor Problems: The Hum, Buzz, and Whir
Motor issues can manifest as humming, buzzing, or whirring sounds. Identifying and addressing these issues can prolong the life of your fan.
-
Worn or Damaged Motor Windings: Constant use can wear down windings, causing humming or buzzing.
-
Loose or Misaligned Motor Components: Loose stators, rotors, or mounting brackets can cause vibrations.
-
Capacitor Issues: A malfunctioning capacitor can cause the motor to struggle, resulting in noise.
To diagnose motor problems:
1.  **Listen Closely:** Listen for consistent humming or buzzing that increases with speed.

2.  **Inspect the Motor Assembly:** Check for loose or misaligned components.

3.  **Test the Capacitor:** Consult a professional electrician to test and replace if necessary.

4.  **Seek Professional Assistance:** If unsure, consult an electrician or ceiling fan technician.
1.4. Dirty or Damaged Bearings: The Squeak and Grind
Dirty or damaged bearings can also cause noise. Dirty bearings generate friction, leading to squeaking or grinding sounds. Damaged bearings exacerbate this, creating louder, more persistent noise.
-
Dust and Debris Accumulation: Dust can accumulate on bearings, increasing friction.
-
Lack of Lubrication: Bearings need proper lubrication to reduce friction and wear.
-
Normal Wear and Tear: Constant motion wears down bearings over time.
To address bearing issues:
1.  **Clean the Bearings:** Remove the fan, disassemble the motor, and clean the bearings with a soft cloth or brush.

2.  **Lubricate the Bearings:** Apply a small amount of lubricant designed for ceiling fan bearings.

3.  **Inspect for Damage:** Look for pitting, scoring, or excessive wear.

4.  **Replace Damaged Bearings:** Consult a professional electrician or ceiling fan technician.
1.5. Poor Installation: The Foundation of Future Problems
Incorrect installation can lead to various noise problems like rattling, humming, or vibrating sounds. Proper installation is crucial for quiet operation, longevity, and optimal performance.
-
Insecure Mounting: If not securely mounted, the fan can wobble, vibrate, or rattle.
-
Improper Electrical Connections: Loose connections can cause humming or buzzing.
-
Incorrect Blade Height: Inconsistent blade heights can unbalance the fan.
-
Using the Wrong Mounting System: An incompatible system can lead to noise and potential damage.
-
Fan Installed Too Low: Low installation can create excessive vibration.
To correct poor installation:
1.  **Check the Mounting:** Ensure the mounting bracket is securely fastened.

2.  **Inspect Electrical Connections:** Verify secure and proper electrical connections (turn off power first).

3.  **Ensure Consistent Blade Height:** Confirm blades are installed at the same height.

4.  **Verify the Mounting System:** Ensure the system is compatible with your ceiling.
2. Step-by-Step Guide to Stopping Ceiling Fan Noise
Here’s a practical guide on how to troubleshoot and fix those annoying noises.
2.1. Step 1: Tighten All Screws and Parts
This is the most basic and often most effective first step. Using a screwdriver, systematically tighten all screws you can find on the fan:
- Screws holding the blades to the blade brackets.
- Screws securing the blade brackets to the motor housing.
- Screws connecting the downrod to the motor assembly and ceiling mounting bracket.
- Screws holding the canopy to the ceiling.
- Screws on any light fixture attached to the fan.
Make sure not to overtighten the screws, as this could strip the threads or damage the components.
2.2. Step 2: Balance the Blades
If tightening screws doesn’t solve the noise issue, unbalanced blades are a likely culprit. Here’s how to balance them:
-
Visually Inspect: Check each blade for any signs of damage, warping, or excessive dirt buildup. Clean the blades thoroughly with a damp cloth.
-
Measure Blade Height: Use a measuring tape to check the distance from each blade tip to the ceiling. All blades should be the same distance from the ceiling. If one or more blades are significantly different, you may need to adjust the blade brackets.
-
Use a Balancing Kit: Purchase a ceiling fan balancing kit from a hardware store. These kits typically include a small plastic clip and several adhesive weights.
- Attach the clip to the trailing edge of one of the blades, about halfway between the blade bracket and the blade tip.
- Turn the fan on to a medium speed and observe whether the wobble or noise has decreased.
- If the wobble has improved, move the clip to another location on the same blade to see if you can further reduce the wobble.
- If the wobble has worsened, move the clip to another blade and repeat the process.
- Once you’ve found the blade and location where the clip provides the most improvement, attach one or more of the adhesive weights to the top side of the blade, near the clip.
- Remove the clip and turn on the fan to see if the wobble has been eliminated. If not, add more weights until the fan runs smoothly.
2.3. Step 3: Lubricate the Motor Bearings
If the noise seems to be coming from the motor housing, the bearings may need lubrication.
-
Turn Off the Power: Before working on the fan, turn off the power at the circuit breaker to avoid electric shock.
-
Disassemble the Fan: Carefully remove the fan blades and the motor housing.
-
Locate the Bearings: The bearings are typically located at the top and bottom of the motor shaft.
-
Lubricate the Bearings: Apply a few drops of lightweight machine oil or a specialized bearing lubricant to each bearing.
-
Reassemble the Fan: Carefully reassemble the motor housing and fan blades.
2.4. Step 4: Check the Motor Mount
The motor mount is the part of the fan that connects the motor housing to the downrod. If the motor mount is loose or damaged, it can cause the fan to wobble and make noise.
-
Inspect the Motor Mount: Check the motor mount for any signs of cracks, bends, or loose screws.
-
Tighten Loose Screws: Tighten any loose screws on the motor mount.
-
Replace Damaged Parts: If the motor mount is damaged, replace it with a new one.
2.5. Step 5: Ensure Proper Wiring Connections
Loose or incorrect wiring connections can cause humming or buzzing noises.
-
Turn Off the Power: Before working on the wiring, turn off the power at the circuit breaker.
-
Inspect the Wiring: Check all wiring connections in the fan’s switch housing and at the ceiling electrical box. Make sure all connections are secure and that there are no exposed wires.
-
Use Wire Connectors: Use wire connectors to ensure that all connections are properly insulated.
2.6. Step 6: Inspect the Ceiling Fan Capacitor
The capacitor helps to start and run the motor. A faulty capacitor can cause humming or buzzing noises. If the capacitor looks swollen or damaged, it needs to be replaced.
If you’re not comfortable working with electricity, call a qualified electrician.
3. Advanced Troubleshooting: When to Call a Professional
While many ceiling fan noise issues can be resolved with the above steps, some problems require the expertise of a qualified professional. Consider calling an electrician or ceiling fan technician if:
- You are uncomfortable working with electricity.
- You suspect a problem with the motor windings or capacitor.
- You are unable to identify the source of the noise.
- The noise persists after trying the above solutions.
- The fan is wobbling excessively or appears to be unstable.
4. How to Prevent Ceiling Fan Noise in the Future
Prevention is always better than cure. Here are some key maintenance tips to keep your ceiling fan running quietly and efficiently:
4.1. Regular Cleaning
Dust and debris accumulation can contribute to unbalanced blades and motor noise. Regularly clean the fan blades and motor housing with a damp cloth to remove dust and grime.
4.2. Check and Tighten Screws Regularly
Make it a habit to check all screws and fasteners on the fan every few months. Tighten any loose screws to prevent rattling and wobbling.
4.3. Lubricate the Motor Annually
Apply a few drops of lightweight machine oil to the motor bearings annually to ensure smooth operation and minimize friction.
4.4. Inspect for Wear and Tear
Regularly inspect the fan blades, motor, and other components for signs of damage or wear. Address any issues promptly to prevent further damage and noise problems.
4.5. Balance Blades Periodically
Check the balance of the fan blades periodically and adjust them as needed to maintain optimal performance and minimize vibration.
5. Deciphering Specific Sounds: What is Your Fan Telling You?
Different sounds can indicate different problems. Here’s a breakdown of what various noises might mean:
| Noise | Possible Cause(s) | Solution(s) |
|---|---|---|
| Rattling | Loose screws, loose light fixture components, canopy rubbing against the ceiling | Tighten all screws, secure light fixture components, ensure canopy is properly installed and not rubbing |
| Clicking | Small debris hitting the blades, loose chain hitting the motor housing | Clean the blades, shorten or secure the chain |
| Humming or Buzzing | Loose wiring connections, faulty capacitor, motor issues | Check and secure wiring connections (after turning off power), replace capacitor (if necessary), consult a professional for motor issues |
| Squeaking or Grinding | Dry or damaged motor bearings | Lubricate the motor bearings, replace the bearings (if damaged) |
| Wobbling | Unbalanced blades, loose motor mount | Balance the blades, tighten the motor mount |
| Knocking | Obstruction in the blade path, loose blade bracket | Remove any obstructions, tighten the blade bracket |
6. Additional Tips for a Quieter Ceiling Fan
Beyond the basic troubleshooting steps, here are some extra tips to help reduce ceiling fan noise:
-
Use a Rubber Washer: When installing or reassembling the fan, place a rubber washer between the fan blades and the blade brackets. This can help dampen vibrations and reduce noise.
-
Install a Fan Silencer: A fan silencer is a small device that attaches to the downrod and helps to absorb vibrations and reduce noise.
-
Upgrade to a Quieter Fan: If your fan is old or particularly noisy, consider upgrading to a newer, quieter model. Look for fans that are specifically designed for quiet operation.
7. The Science of Silence: How Ceiling Fans are Engineered for Quiet
Modern ceiling fans incorporate several design features aimed at minimizing noise:
- Aerodynamic Blade Design: Blades are designed to move air efficiently with minimal turbulence, reducing the whooshing sound.
- High-Quality Motors: Manufacturers use advanced motor designs and materials to reduce vibration and noise.
- Precision Balancing: Fans are often factory-balanced to minimize wobble and vibration.
- Sound-Dampening Materials: Some fans incorporate rubber or other sound-dampening materials in their construction.
8. DIY vs. Professional Help: Making the Right Choice
Deciding whether to tackle ceiling fan noise issues yourself or call a professional depends on your comfort level, experience, and the complexity of the problem.
DIY is a good option if:
- The problem is simple (e.g., loose screws, unbalanced blades).
- You are comfortable working with basic tools.
- You have experience with minor home repairs.
Call a professional if:
- You are uncomfortable working with electricity.
- You suspect a problem with the motor or wiring.
- You are unable to diagnose the source of the noise.
- The problem persists after trying DIY solutions.
9. Case Studies: Real-Life Examples of Noisy Fan Solutions
To illustrate the troubleshooting process, here are a few real-life examples:
Case Study 1: The Rattling Fan
- Problem: A homeowner complained of a constant rattling noise coming from their ceiling fan.
- Solution: Upon inspection, the homeowner found that several screws on the blade brackets were loose. Tightening the screws eliminated the rattling noise.
Case Study 2: The Humming Fan
- Problem: A homeowner reported a humming noise coming from their ceiling fan, which grew louder over time.
- Solution: An electrician diagnosed a faulty capacitor. Replacing the capacitor resolved the humming noise.
Case Study 3: The Wobbling Fan
- Problem: A homeowner experienced excessive wobbling and noise from their ceiling fan.
- Solution: The homeowner used a blade balancing kit to balance the blades, which eliminated the wobbling and reduced the noise.
10. FAQs: Your Burning Questions Answered
Here are some frequently asked questions about ceiling fan noise:
-
Why is my ceiling fan making a clicking noise? A clicking noise often indicates small debris hitting the blades or a loose pull chain.
-
Can a dirty ceiling fan cause noise? Yes, dust and debris buildup can unbalance the blades and cause noise.
-
How often should I lubricate my ceiling fan motor? Annually.
-
Is it safe to use WD-40 on my ceiling fan motor? No, WD-40 is not a suitable lubricant for ceiling fan motors. Use a lightweight machine oil or specialized bearing lubricant.
-
Can I replace the motor on my ceiling fan? Yes, but it may be more cost-effective to replace the entire fan.
-
Why does my ceiling fan make noise only on certain speeds? This may indicate a problem with the fan’s speed control switch or the motor windings.
-
How do I know if my ceiling fan blades are warped? Visually inspect the blades for any bends or distortions.
-
Can a loose light fixture cause ceiling fan noise? Yes, loose components on a light fixture can vibrate and cause rattling.
-
What is a fan silencer, and does it work? A fan silencer is a device that attaches to the downrod and helps to absorb vibrations. They can be effective in reducing noise.
-
Where can I find a qualified ceiling fan technician? You can search online directories or ask for recommendations from friends or family.
Is your quest for silence still unanswered? Don’t let a noisy ceiling fan disrupt your peace any longer! At WHY.EDU.VN, we understand the frustration of dealing with household nuisances. Our team of experts is dedicated to providing comprehensive and reliable answers to all your questions. Visit WHY.EDU.VN today to ask your question and connect with specialists who can offer tailored solutions to your specific needs. Whether it’s a persistent hum, a mysterious rattle, or any other perplexing problem, we’re here to help you find the answers you deserve. Contact us at 101 Curiosity Lane, Answer Town, CA 90210, United States, or reach out via WhatsApp at +1 (213) 555-0101. Let why.edu.vn be your trusted source for knowledge and peace of mind.
This guide has armed you with the knowledge and tools to tackle ceiling fan noise. By systematically troubleshooting and maintaining your fan, you can restore peace and quiet to your home and enjoy the comfort of a well-functioning fan.