Uninstalling games can sometimes be a straightforward process, but when it comes to Valorant, many users find themselves asking, “why can’t I uninstall Valorant?”. This popular first-person shooter, developed by Riot Games, comes with a robust anti-cheat system called Riot Vanguard, which is often the culprit behind uninstall issues. Whether you’re looking to free up disk space, troubleshoot game errors, or simply take a break from the intense gameplay, understanding the correct uninstallation procedure is crucial.
This guide provides a detailed walkthrough for uninstalling Valorant in 2024, ensuring you remove both the game and Riot Vanguard completely from your system. We will address common problems like Valorant not uninstalling, delve into alternative methods, and provide troubleshooting steps to ensure a clean and complete removal. By the end of this article, you’ll have a clear understanding of how to effectively uninstall Valorant and resolve any roadblocks you might encounter.
Understanding Why Uninstalling Valorant Can Be Tricky
There are numerous reasons why you might decide to uninstall Valorant. Players often need to uninstall and reinstall to fix persistent errors, such as VAN9001, VAN 128, VAN -102, and VAN -104, which can stem from issues like Windows TPM 2.0 or Secure Boot incompatibility. A fresh installation is often recommended to resolve these issues effectively.
Beyond technical troubleshooting, personal reasons also play a significant role. The competitive nature of Valorant’s ranked mode and the potential for toxicity within the game can lead to stress. If you find the ranked grind impacting your mental well-being, uninstalling Valorant can be a positive step towards managing your digital wellbeing. Similarly, recognizing signs of gaming addiction related to Valorant can also be a valid reason to remove the game from your system.
The primary challenge in uninstalling Valorant lies in its anti-cheat system, Riot Vanguard. Unlike typical software, Valorant cannot be fully removed simply by deleting the game files or using the standard uninstall procedure. Riot Vanguard, designed to run at a kernel level for enhanced security, requires a specific removal process. This is why many users encounter difficulties and wonder, “why is Valorant not uninstalling?”. Attempting to uninstall Valorant without properly addressing Vanguard will likely result in incomplete removal and potential errors.
Alt text: Valorant account advertisement banner, promoting game accounts for Valorant.
Decoding Common Valorant Error Codes
Encountering error codes while playing or uninstalling Valorant can be frustrating. Understanding these codes can help you diagnose the problem and find the right solution. Here are some common Valorant error codes and their quick fixes:
| Error Code | Message | Solution |
|---|---|---|
| VAN 140 | Valorant has encountered a connection error. Please relaunch to reconnect | This often points to compatibility issues with older operating systems. Upgrading to Windows 10 or 11 is generally recommended. If the problem persists, a clean reinstallation of both Riot Vanguard and Valorant might be necessary. Riot Support is actively investigating permanent solutions. |
| VAN9001 | Secure Boot or TPM (Trusted Platform Module) 2.0 is not enabled | This error indicates that your system’s security features are not configured correctly for Vanguard. Ensure that Secure Boot and TPM 2.0 are enabled in your BIOS settings. Consult your motherboard manual for specific instructions. |
| VAN9002 | This build of Vanguard requires Control Flow Guard (CFG) to be enabled in system exploit protection settings. | Control Flow Guard (CFG) is a security feature in Windows. You may need to adjust your exploit protection settings to enable CFG. If you’re unsure how to do this, or if the error continues, contacting Valorant Support is advisable. |
| VAN9003 | Secure Boot is not enabled | Similar to VAN9001, this error specifically highlights the absence of Secure Boot. Verify and enable Secure Boot within your system’s BIOS settings. |
If you encounter any of these errors during the uninstallation process, it’s crucial to address the underlying issue before proceeding. In many cases, a proper uninstallation and reinstallation, following the steps outlined below, will resolve these problems.
Step-by-Step Guide: How to Uninstall Valorant Properly
To ensure a complete and error-free uninstallation of Valorant from your Windows PC, follow these steps meticulously:
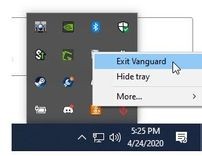
Step 1: Exit Riot Vanguard from the System Tray
Before you begin the uninstallation process, it’s essential to disable Riot Vanguard. This ensures that the anti-cheat system doesn’t interfere with the removal process.
- Locate the Riot Vanguard icon: Look for the red Vanguard icon, which resembles a stylized “V”, in your system tray (usually located in the bottom-right corner of your taskbar). You might need to click the “Show hidden icons” arrow to see it.
- Right-click the Vanguard icon: Right-clicking the icon will open a context menu.
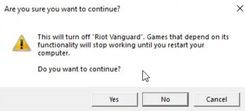
- Select “Exit Vanguard”: From the menu, choose the “Exit Vanguard” option.
- Confirm Exit: A confirmation prompt will appear, asking “Are you sure you want to exit Vanguard?”. Click “Yes” to proceed. This will temporarily disable the Riot Vanguard anti-cheat service on your computer.
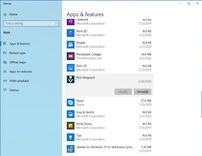
Step 2: Uninstall Riot Vanguard
Once Vanguard is disabled, you can proceed to uninstall it through the Windows settings menu.
- Open the Settings App: Press the Windows key + I simultaneously. This shortcut will directly open the Windows Settings app.
- Navigate to “Apps”: In the Settings app, click on the “Apps” category. This section manages all installed applications on your system.
- Find “Riot Vanguard”: In the “Apps & features” section, scroll through the list of installed apps or use the search bar to find “Riot Vanguard“.
- Select and Uninstall: Click on “Riot Vanguard” to select it. An “Uninstall” button will appear. Click this button.
- Follow the Uninstallation Prompts: Windows will initiate the uninstallation process. Follow any on-screen prompts to complete the removal of Riot Vanguard. You may be asked to confirm your decision or grant administrative permissions.
Step 3: Uninstall Valorant
After successfully uninstalling Riot Vanguard, you can now remove the Valorant game client itself.
- Return to the “Apps & features” list: If you are not already there, open the Settings app (Windows key + I), and go to the “Apps” section.
- Locate “Valorant”: Find “Valorant” in the list of installed applications, similar to how you found Riot Vanguard.
- Uninstall Valorant: Click on “Valorant” and then click the “Uninstall” button.
- Confirm Uninstallation: Follow the on-screen instructions to uninstall Valorant. You may need to confirm your action and wait for the process to complete.
- Restart Your Computer: After uninstalling both Riot Vanguard and Valorant, it’s crucial to restart your computer. This ensures that all components are fully removed and any lingering processes are terminated.
- Check for Leftover Files (Optional but Recommended): After restarting, open File Explorer and navigate to your main drive (usually C:). Check for a folder named “Riot Games“. If it still exists, you can delete it to remove any remaining game files. Be cautious and only delete the “Riot Games” folder if you are certain that Valorant and Riot Vanguard have been uninstalled.
By following these step-by-step instructions, you should be able to uninstall Valorant and Riot Vanguard completely through the standard Windows settings. However, if you still encounter issues or “why can’t I uninstall Valorant?” remains your question, the alternative methods below can provide further solutions.
Alternative Uninstall Methods: Using Command Prompt
If the standard uninstallation process fails, or you suspect corrupted files are preventing removal, using the Command Prompt can offer a more forceful way to uninstall Valorant and Riot Vanguard. This method is particularly helpful when you encounter persistent issues and need a more direct approach.
Uninstalling Vanguard and Valorant via Command Prompt
Before proceeding with these steps, ensure you have exited Riot Vanguard from the system tray as described in Step 1 of the standard uninstallation guide.
- Open Command Prompt as Administrator:
- Press the Windows key or click on the Start Menu.
- Type “CMD” or “Command Prompt“.
- In the search results, you will see “Command Prompt”. Right-click on it and select “Run as administrator“. This is crucial as administrator privileges are required to execute the necessary commands.
- Execute Vanguard Deletion Commands:
- In the Administrator Command Prompt window, type the following commands one by one, pressing Enter after each command:
sc delete vgcsc delete vgk
- These commands instruct the system to delete the Vanguard service (
vgc) and Vanguard kernel driver (vgk).
- In the Administrator Command Prompt window, type the following commands one by one, pressing Enter after each command:
- Restart Your System: Restart your computer immediately after executing these commands. This restart is essential for the changes to take effect and to ensure Vanguard is completely removed from memory.
- Delete the Riot Vanguard Folder:
- After restarting, open File Explorer.
- Navigate to the location:
C:Program Files - Look for a folder named “Riot Vanguard“.
- Delete the “Riot Vanguard” folder. This will remove any remaining Vanguard files from your system.
Alt text: Screenshot of Command Prompt window running as administrator, showing commands “sc delete vgc” and “sc delete vgk” being executed.
After completing these steps, Riot Vanguard should be completely uninstalled from your system. You can then proceed to uninstall Valorant itself through the “Apps & features” settings as described in Step 3 of the standard uninstallation guide, if you haven’t already done so.
Will uninstalling Valorant delete my game progress? No, uninstalling Valorant will not erase your game progress. All your Valorant progress, including ranks, skins, and account level, is saved on your Riot account servers. When you reinstall and log back in with your account, all your progress will be restored.
Can I uninstall Valorant from the Riot Client? No, Valorant cannot be uninstalled directly through the Riot Client. The Riot Client is a launcher for multiple Riot Games, and it does not include an uninstallation feature for individual games. You must use the Windows “Apps & features” settings or the Command Prompt method described above to uninstall Valorant. Following the steps in this guide will remove both Valorant and the Riot Client from your system if no other Riot games are installed. If you have other Riot games installed, only Valorant will be uninstalled.
Troubleshooting Common Uninstall Issues and Residual Files
Even after following the standard or alternative uninstallation methods, you might still encounter issues or find residual files left behind. Here’s how to troubleshoot these common problems:
Dealing with Residual Files After Uninstallation
Sometimes, even after uninstalling Valorant and Riot Vanguard, some leftover files and folders may remain on your system. These residual files are usually harmless but can occupy disk space. To ensure a truly clean uninstallation and remove any traces of the game:
- Open the Run Dialog: Press Windows key + R to open the “Run” dialog box.
- Enter “%appdata%” and Press Enter: Type
%appdata%in the Run dialog and press Enter. This will open the Roaming folder within your AppData directory. - Locate and Delete the “Riot Games” Folder: In the Roaming folder, look for a folder named “Riot Games“. If you find it, delete this folder.
- Repeat for LocalAppData: Open the Run dialog again (Windows key + R). This time, enter
%LocalAppData%and press Enter. This will open the Local folder within AppData. Look for a “Riot Games” folder here as well and delete it if present. - Repeat for ProgramData: Open the Run dialog one more time (Windows key + R). Enter
%ProgramData%and press Enter. This will open the ProgramData folder (which might be hidden by default). Find and delete any “Riot Games” folder in this location.
By deleting these “Riot Games” folders in AppData (Roaming and Local) and ProgramData, you will remove most of the common residual files associated with Valorant and Riot Vanguard.
Registry Cleanup (Advanced – Use with Caution)
For a more thorough cleanup, particularly if you plan to reinstall Valorant or are troubleshooting persistent issues, you can consider cleaning the Windows Registry. However, editing the registry is an advanced step and should be done with caution. Incorrect modifications to the registry can cause system instability. It is highly recommended to back up your registry before making any changes.
Using Registry Editor (Regedit):
- Open Registry Editor: Press Windows key + R, type
regedit, and press Enter. - Export Registry for Backup: Before making any changes, go to “File” > “Export”. Choose a location to save the backup, name the file, and click “Save”. This allows you to restore the registry if anything goes wrong.
- Search for “Riot Games” and “Valorant”: Use the “Find” function (Ctrl+F) in Registry Editor. Search for “Riot Games” and delete any keys or values that are found and are clearly related to Valorant or Riot Vanguard. Repeat the search for “Valorant” and delete relevant entries. Be extremely careful not to delete any entries that are not clearly associated with Valorant or Riot Games.
- Restart Your Computer: After making changes to the registry, restart your computer for the changes to take full effect.
Using Third-Party Registry Cleaner (Optional and with Caution):
There are third-party registry cleaner applications like CCleaner or RegSeeker that can automate the process of finding and removing registry entries. If you choose to use such tools, select reputable software and use them cautiously. Always review the changes suggested by these tools before applying them, and ensure you have a registry backup.
Important Disclaimer: Registry cleaning is an advanced procedure. If you are not comfortable editing the registry manually or using registry cleaner tools, it is best to skip this step. Removing residual files from AppData and ProgramData folders is usually sufficient for most users.
Reinstalling Valorant After Uninstall
If you uninstalled Valorant for troubleshooting or to free up space but now wish to reinstall it, the process is straightforward:
- Visit the Official Valorant Website: Go to https://playvalorant.com/en-us in your web browser.
- Log in or Register: Click “Play Free” and either log in with your existing Riot Account credentials or create a new account if you don’t have one.
- Download the Installer: Once logged in, you should be directed to a download page. Click the “Download” button to download the Valorant installer.
- Run the Installer: Locate the downloaded installer file (usually in your Downloads folder) and double-click to run it.
- Follow Installation Instructions: Follow the on-screen prompts to install Valorant. Choose your installation location if prompted, and wait for the installation process to complete.
- Launch Valorant and Update: Once installed, launch Valorant. The game client will automatically check for and download any necessary updates. Allow sufficient time for updates to download and install completely.
- Log in and Play: After updates are finished, log in to Valorant with your Riot Account. Choose your server region if prompted, and you can start playing Valorant again.
Remember, your game progress is linked to your Riot Account, so you will not lose any ranks, skins, or other items when you reinstall Valorant.
Conclusion: Taking Control of Your Valorant Installation
This comprehensive guide has addressed the common question, “why can’t I uninstall Valorant?” and provided you with the knowledge and step-by-step instructions to effectively remove Valorant and Riot Vanguard from your PC. From understanding the intricacies of Riot Vanguard to mastering both standard and alternative uninstallation methods, you are now equipped to manage your Valorant installation with confidence.
Whether your reasons for uninstalling are technical troubleshooting, managing gaming habits, or simply freeing up disk space, following these guidelines ensures a clean and complete removal. Remember to pay close attention to each step, especially when dealing with Riot Vanguard, and to exercise caution if you choose to perform advanced steps like registry cleaning.
By taking control of your software installations and understanding the processes involved, you not only resolve immediate issues but also enhance your overall system management skills. So, whether you are saying goodbye to Valorant for now or preparing for a fresh reinstallation, this guide empowers you to do so efficiently and effectively.
FAQs About Uninstalling Valorant
Q: What are the key steps to uninstall Valorant in 2024?
A: The essential steps for uninstalling Valorant in 2024 are:
- Exit Vanguard: Close Riot Vanguard from the system tray.
- Uninstall Riot Vanguard: Use “Apps & features” in Windows Settings to uninstall Riot Vanguard.
- Uninstall Valorant: Use “Apps & features” to uninstall the Valorant game client.
- Remove Residual Files: Delete any remaining “Riot Games” folders in AppData (Roaming, Local), ProgramData, and Program Files.
- (Optional) Registry Cleanup: Carefully clean registry entries related to Valorant and Riot Games (advanced users only, backup recommended).
Q: Why is it difficult to uninstall Valorant sometimes? Why can’t I uninstall Valorant easily?
A: The main reason uninstalling Valorant can be tricky is due to Riot Vanguard, its anti-cheat system. Vanguard runs at a kernel level and requires a separate uninstallation process before Valorant can be fully removed. Simply uninstalling Valorant like other software will not remove Vanguard, leading to incomplete uninstallation and potential errors.
Q: Can Riot Vanguard be completely uninstalled?
A: Yes, Riot Vanguard can be completely uninstalled. You can uninstall it through the “Apps & features” menu in Windows Settings after exiting Vanguard from the system tray. Alternatively, you can use Command Prompt for a more forceful removal. Keep in mind that uninstalling Vanguard will prevent you from playing Valorant and potentially other Riot Games that require it until it is reinstalled.