Are your hibiscus leaves turning yellow, and you’re unsure why? You’re not alone. Many plant enthusiasts encounter this issue, but WHY.EDU.VN is here to provide a comprehensive guide to diagnose and resolve the problem. We’ll delve into the common causes of hibiscus leaf discoloration and equip you with effective solutions to restore your plant’s vibrant health. This involves understanding environmental stressors, nutritional imbalances, and pest management.
1. Understanding Hibiscus Plants
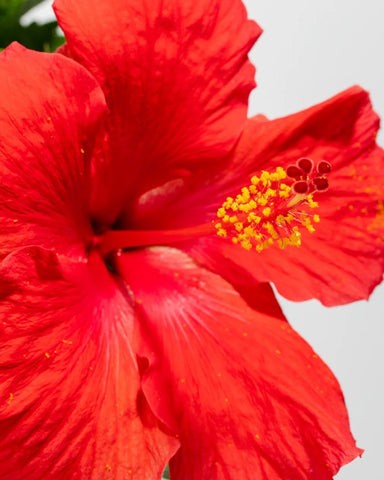
Hibiscus rosa-sinensis, commonly known as hibiscus, is a stunning flowering plant celebrated for its large, colorful, trumpet-shaped flowers. Native to warm temperate, subtropical, and tropical regions, these plants can reach heights of 6-8 feet, making them a striking addition to any indoor or outdoor space. Hibiscus plants thrive in full sunlight, require regular watering, and prefer well-draining soil. Regular fertilization during the growing season is crucial to encourage abundant blooms. While generally pet-friendly, it’s advisable to prevent pets from consuming large quantities of the plant. Understanding these fundamental aspects of hibiscus care is key to preventing issues like yellowing leaves.
1.1 The Beauty and the Beast: Hibiscus Care
Hibiscus plants are prized for their beauty but can be sensitive to changes in their environment. Even a well-lit area in your home may not be enough if you neglect regular care. Yellow leaves, pest infestations, and other foliage issues indicate that something is amiss. Catching these warning signs early is crucial for maintaining your hibiscus’s health.
1.2 Quick Hibiscus Care Guide
| Aspect | Requirement |
|---|---|
| Light | Full sunlight (at least 6 hours per day) |
| Water | Regular watering, allowing the top inch of soil to dry out between waterings |
| Soil | Well-draining soil |
| Fertilizer | Balanced fertilizer (e.g., 20-20-20 or 10-10-10) during the growing season |
| Temperature | Warm temperatures (above 60°F) |
| Pest Control | Regular inspection for pests and prompt treatment with neem oil or insecticidal soap |
2. Why Are My Hibiscus Leaves Turning Yellow? Common Causes
Yellowing leaves, or chlorosis, in hibiscus plants can stem from various factors. Identifying the underlying cause is essential for implementing the correct solution. Let’s examine the most common culprits:
2.1 Light Issues
Hibiscus plants demand ample light. Too little or too much sunlight can both trigger yellowing leaves.
- Insufficient Light: Hibiscus requires at least 6 hours of direct sunlight daily to thrive. Lack of adequate light hinders photosynthesis, leading to leaf discoloration.
- Excessive Sunlight: While hibiscus loves sunlight, intense, direct sunlight, especially during hot afternoons, can scorch the leaves and cause them to turn yellow.
2.2 Watering Problems
Improper watering practices are a frequent cause of yellowing hibiscus leaves.
- Overwatering: Overwatering leads to waterlogged soil, depriving the roots of oxygen and causing root rot. Signs of overwatering include yellowing leaves, wilting, and a mushy soil.
- Underwatering: Insufficient watering leads to drought stress, causing the leaves to dry out and turn yellow.
2.3 Nutrient Deficiencies
Hibiscus plants are heavy feeders and require a balanced supply of nutrients. Deficiencies in essential nutrients can lead to chlorosis.
- Nitrogen Deficiency: Nitrogen is crucial for leaf growth. A lack of nitrogen can cause older leaves to turn yellow.
- Iron Deficiency: Iron is vital for chlorophyll production. Iron deficiency, known as iron chlorosis, causes the leaves to turn yellow while the veins remain green. This is especially common in alkaline soils where iron is less available to the plant. According to a study by the University of California, iron chlorosis is a widespread issue affecting various plants, including hibiscus.
- Magnesium Deficiency: Similar to iron, magnesium is essential for chlorophyll production. Magnesium deficiency can cause yellowing between the veins of older leaves.
2.4 Pest Infestations
Pests can wreak havoc on hibiscus plants by sucking sap from the leaves, leading to yellowing and other damage.
- Aphids: These small, sap-sucking insects can quickly multiply and cause significant damage to hibiscus plants.
- Spider Mites: These tiny pests create fine webs on the leaves and cause them to turn yellow and mottled.
- Mealybugs: These white, cottony insects suck sap from the leaves and stems, causing yellowing and stunted growth.
- Whiteflies: These small, white, winged insects feed on the underside of leaves, causing them to turn yellow and drop.
2.5 Temperature Stress
Hibiscus plants are sensitive to temperature fluctuations.
- Frost: Exposure to frost can damage hibiscus leaves and cause them to turn yellow and drop. Hibiscus plants thrive in temperatures above 60°F (15°C).
- Heat Stress: Excessive heat can cause the leaves to turn yellow, especially if the plant is not adequately watered.
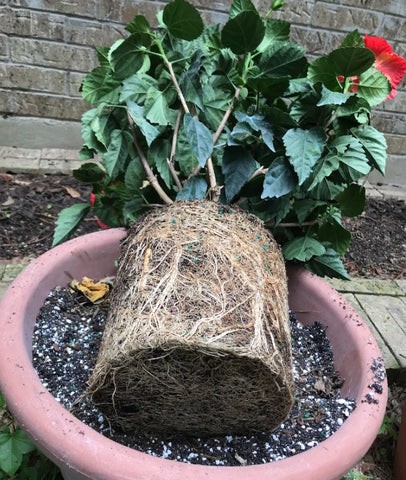
2.6 Root-Bound Condition
When a hibiscus plant becomes root-bound, its roots become tightly packed within the pot, restricting their ability to absorb water and nutrients effectively.
- Restricted Growth: The plant’s growth is stunted because the roots lack space to expand.
- Yellowing Leaves: Reduced nutrient uptake leads to yellowing leaves and overall decline.
2.7 Natural Dormancy
In some cases, yellowing leaves can be a natural part of the hibiscus plant’s dormancy cycle.
- Winter Dormancy: As the days shorten and temperatures drop, hibiscus plants may enter a dormant period, during which they may shed some leaves, including yellowing ones. This is a normal process and not necessarily a cause for concern.
3. Solutions: How to Fix Yellow Leaves on Your Hibiscus
Addressing yellowing leaves on your hibiscus requires identifying the root cause and implementing appropriate solutions. Here’s a step-by-step guide:
3.1 Adjusting Light Exposure
- Insufficient Light: Move your hibiscus plant to a location where it receives at least 6 hours of direct sunlight per day. If natural sunlight is limited, consider using grow lights to supplement the light.
- Excessive Sunlight: If the leaves appear scorched or bleached, move the plant to a location with partial shade, especially during the hottest part of the day. You can also use shade cloth to filter the sunlight.
3.2 Correcting Watering Practices
- Overwatering: Allow the soil to dry out completely before watering again. Ensure that the pot has adequate drainage holes to prevent waterlogging. If root rot is suspected, repot the plant in fresh, well-draining soil.
- Underwatering: Water the plant thoroughly when the top inch of soil feels dry. Ensure that the water reaches the roots by watering slowly and deeply.
3.3 Addressing Nutrient Deficiencies
- Balanced Fertilizer: Feed your hibiscus plant with a balanced fertilizer (e.g., 20-20-20 or 10-10-10) during the growing season. Follow the instructions on the fertilizer label for proper application rates.
- Iron Chelate: If iron chlorosis is suspected, apply iron chelate to the soil or as a foliar spray. Iron chelate is a form of iron that is readily available to the plant.
- Epsom Salts: Magnesium deficiency can be addressed by applying Epsom salts (magnesium sulfate) to the soil.
3.4 Controlling Pests
- Neem Oil: Neem oil is an effective organic insecticide that can control a wide range of pests, including aphids, spider mites, mealybugs, and whiteflies. Apply neem oil to the plant according to the product instructions.
- Insecticidal Soap: Insecticidal soap is another effective option for controlling pests. Spray the plant thoroughly with insecticidal soap, ensuring that you reach all surfaces of the leaves and stems.
- Manual Removal: For small infestations, you can manually remove pests by hand or with a cotton swab dipped in rubbing alcohol.
3.5 Managing Temperature Stress
- Frost Protection: If frost is a concern, move your hibiscus plant indoors or provide adequate protection, such as covering it with a blanket or frost cloth.
- Heat Protection: During periods of extreme heat, provide shade for your hibiscus plant and ensure that it is adequately watered. You can also mist the leaves to increase humidity and cool the plant.
3.6 Repotting Root-Bound Plants
- Choose a Larger Pot: Select a pot that is 1-2 inches larger in diameter than the current pot.
- Use Fresh Soil: Use a well-draining potting mix that is specifically formulated for hibiscus plants.
- Gently Loosen Roots: Before repotting, gently loosen the roots of the plant to encourage new growth.
- Water Thoroughly: After repotting, water the plant thoroughly to help it settle into its new home.
3.7 Managing Dormancy
- Reduce Watering: During the dormant period, reduce watering frequency to prevent overwatering.
- Avoid Fertilizing: Do not fertilize the plant during dormancy.
- Provide Cool Temperatures: Keep the plant in a cool, bright location.
4. Other Common Hibiscus Leaf Problems
Besides yellowing leaves, hibiscus plants can experience other foliage problems. Addressing these issues promptly is crucial for maintaining the plant’s health and appearance.
4.1 Drooping Leaves
Drooping leaves can indicate underwatering, overwatering, or extreme heat.
- Solution: Check the soil moisture level. If the soil is dry, water the plant thoroughly. If the soil is wet, allow it to dry out before watering again. Provide shade during intense heat.
4.2 Brown Spots
Brown spots on hibiscus leaves can be caused by fungal infections or insect damage. According to the University of Hawaii at Manoa, leaf spot disease is a common fungal issue affecting hibiscus plants.
- Solution: Trim affected leaves and avoid wetting the foliage during watering. Apply a fungicide if the problem persists.
4.3 Curling Leaves
Curling leaves can be caused by pests, nutrient deficiencies, or environmental stress.
- Solution: Check for pests and remove them. Ensure the plant is getting enough nutrients by fertilizing it properly. Maintain a stable environment, avoiding frost and drafts.
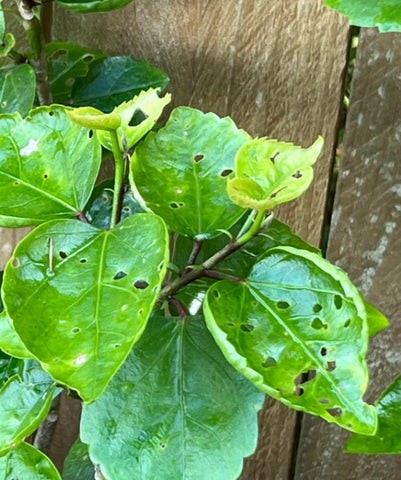
4.4 Holes in Leaves
Holes in leaves indicate that insects like caterpillars or beetles are eating them.
- Solution: Inspect the plant and remove any visible pests. Use insecticidal soap or neem oil to treat and prevent further damage.
5. Hibiscus Leaves Turning Yellow: Detailed Solutions and Prevention
To provide a comprehensive guide, let’s delve deeper into specific solutions and preventative measures for common hibiscus issues. This section aims to equip you with the knowledge to proactively care for your hibiscus.
5.1 Light Management: A Balancing Act
Detailed Solutions:
- Acclimation: When moving a hibiscus from a low-light environment to direct sunlight, do so gradually to prevent shock. Start with a few hours of morning sun and gradually increase the exposure over a week or two.
- Artificial Lighting: If using grow lights, position them 6-12 inches above the plant. LED grow lights are energy-efficient and produce less heat, making them ideal for indoor hibiscus.
- Window Selection: South-facing windows typically provide the most sunlight. East-facing windows offer gentle morning sun, while west-facing windows provide intense afternoon sun. Choose a window that suits your hibiscus’s needs and adjust as needed.
Preventative Measures:
- Regular Observation: Monitor your hibiscus’s leaves for signs of light stress, such as scorching or fading.
- Seasonal Adjustments: Adjust your plant’s position based on the changing seasons and sunlight intensity.
5.2 Watering Techniques: Mastering Moisture
Detailed Solutions:
- Soil Type: Use a well-draining potting mix that retains some moisture but doesn’t become waterlogged. A mix of peat moss, perlite, and vermiculite is a good option.
- Watering Frequency: Water deeply when the top inch of soil feels dry. Check the soil moisture regularly, especially during hot weather.
- Drainage: Ensure that the pot has adequate drainage holes to prevent water from accumulating at the bottom.
- Water Quality: Avoid using hard water, as it can contain high levels of minerals that can damage hibiscus plants. Use filtered or rainwater instead.
Preventative Measures:
- Soil Moisture Meter: Use a soil moisture meter to accurately gauge the moisture level of the soil.
- Proper Potting: Choose a pot that is appropriately sized for the plant to prevent root-bound conditions and ensure proper drainage.
5.3 Nutrient Management: The Right Diet
Detailed Solutions:
- Fertilizer Type: Use a balanced fertilizer specifically formulated for hibiscus plants. These fertilizers typically have a higher potassium content to promote blooming.
- Fertilizer Application: Apply fertilizer according to the instructions on the label. Avoid over-fertilizing, as this can burn the roots and damage the plant.
- Micronutrients: Supplement with micronutrients such as iron, magnesium, and manganese to prevent deficiencies.
Preventative Measures:
- Regular Feeding Schedule: Establish a regular feeding schedule during the growing season (spring and summer).
- Soil Testing: Periodically test the soil pH to ensure that it is within the optimal range for hibiscus plants (6.0-6.5).
5.4 Pest Control: Vigilance is Key
Detailed Solutions:
- Neem Oil Application: Apply neem oil to all surfaces of the plant, including the undersides of leaves, to smother pests and prevent them from feeding.
- Insecticidal Soap Application: Apply insecticidal soap in the early morning or late evening to avoid burning the leaves.
- Beneficial Insects: Introduce beneficial insects such as ladybugs and lacewings to control pest populations naturally.
Preventative Measures:
- Regular Inspection: Regularly inspect your hibiscus plant for signs of pests, such as webbing, honeydew, or damaged leaves.
- Good Air Circulation: Provide good air circulation around the plant to prevent pest infestations.
- Quarantine New Plants: Quarantine new plants before introducing them to your existing collection to prevent the spread of pests.
5.5 Temperature Control: Creating a Comfortable Climate
Detailed Solutions:
- Indoor Hibiscus: Maintain a consistent temperature between 65-75°F (18-24°C) for indoor hibiscus plants.
- Outdoor Hibiscus: Provide shade during the hottest part of the day to prevent heat stress.
- Humidity: Increase humidity around the plant by misting the leaves regularly or placing a humidifier nearby.
Preventative Measures:
- Monitor Weather Conditions: Monitor weather conditions and take appropriate measures to protect your hibiscus plant from extreme temperatures.
- Proper Location: Choose a location for your hibiscus plant that provides optimal temperature and humidity levels.
5.6 Root Health: The Foundation of a Healthy Plant
Detailed Solutions:
- Repotting Frequency: Repot your hibiscus plant every 1-2 years to provide fresh soil and prevent root-bound conditions.
- Root Pruning: When repotting, prune any circling or damaged roots to encourage new growth.
- Soil Amendments: Amend the soil with organic matter such as compost or well-rotted manure to improve drainage and nutrient availability.
Preventative Measures:
- Proper Potting Technique: Use a pot that is appropriately sized for the plant and has adequate drainage holes.
- Avoid Overwatering: Overwatering can lead to root rot, so allow the soil to dry out slightly between waterings.
6. Understanding Hibiscus Diseases
While pests and environmental factors are common culprits, hibiscus plants can also be affected by diseases that manifest as yellowing leaves.
6.1 Fungal Diseases
- Leaf Spot: Characterized by circular or irregular spots on the leaves, which may start as yellow and progress to brown or black.
- Root Rot: Caused by overwatering and poor drainage, leading to yellowing leaves, wilting, and ultimately, plant death.
6.2 Viral Diseases
- Hibiscus Chlorotic Ringspot Virus (HCRSV): This virus causes yellow rings or spots on the leaves, often accompanied by stunted growth.
6.3 Treatment and Prevention
- Fungicides: Apply appropriate fungicides to combat fungal diseases like leaf spot.
- Improved Drainage: Ensure well-draining soil and proper watering practices to prevent root rot.
- Virus Control: Unfortunately, there is no cure for viral diseases. Remove and discard infected plants to prevent the spread of the virus to healthy plants.
7. Hibiscus Leaves Turning Yellow: FAQs
Q: Should I cut off the yellow leaves on Hibiscus?
A: Yes, remove yellow leaves. They won’t turn green again and removing them directs the plant’s energy to new growth.
Q: Do Hibiscus lose their leaves in the winter?
A: Yes, especially when moving them indoors from outdoors. This is normal as they adjust, and new leaves will appear in spring.
Q: What does an overwatered Hibiscus look like?
A: Swollen, yellow leaves, waterlogged soil, and mushy roots. A foul smell from the pot’s base is also indicative.
Q: Why are the leaves on my Hibiscus wilting?
A: Overexposure to sunlight, underwatering, or diseases can cause wilting.
Q: What are the benefits of Hibiscus leaves?
A: Hibiscus leaves and extracts are beneficial. Tea from the leaves and flowers may help lower blood pressure, improve liver health, boost the immune system, and fight inflammation, according to a study published in the Journal of Nutrition.
Q: How do I know if my Hibiscus has spider mites?
A: Look for fine, silky webs and damaged leaves. Spider mites themselves are tiny and hard to see.
Q: What kills fungus on Hibiscus?
A: DIY solutions include water with a drop of dish soap, neem oil solution, or a baking soda and water mix.
Q: How often should I fertilize my hibiscus?
A: During the growing season (spring and summer), fertilize every 2-4 weeks with a balanced fertilizer.
Q: What type of soil is best for hibiscus?
A: Well-draining soil that is slightly acidic (pH 6.0-6.5) is best for hibiscus.
Q: How much sunlight does a hibiscus need?
A: Hibiscus needs at least 6 hours of direct sunlight per day.
8. Conclusion
Yellow hibiscus leaves are a common issue, but with the right knowledge and care, you can restore your plant’s health and vibrancy. Remember to address any underlying issues promptly, and your hibiscus will reward you with beautiful blooms.
If you’re still struggling to figure out why your hibiscus leaves are turning yellow, don’t hesitate to reach out to the experts at WHY.EDU.VN. We’re here to help you diagnose the problem and find the best solution for your plant. Our team of experienced horticulturists can provide personalized advice and guidance to help you keep your hibiscus healthy and thriving. Contact us at 101 Curiosity Lane, Answer Town, CA 90210, United States, or Whatsapp: +1 (213) 555-0101. You can also visit our website at why.edu.vn for more information and resources.