Why Are My Instagram Posts Blurry? Let’s explore the reasons behind blurry Instagram posts and provide effective solutions to enhance your image quality with advice from WHY.EDU.VN. This guide will cover image optimization techniques and troubleshooting steps to ensure your photos look sharp and professional. Discover the secrets to crystal-clear Instagram uploads and avoid common pitfalls that lead to fuzzy photos using these image quality tips and post-processing techniques.
1. Understanding Why Your Instagram Posts Appear Blurry
It can be frustrating when the photos you carefully craft for Instagram appear blurry after uploading. Several factors can contribute to this issue, affecting the visual appeal of your posts. Let’s delve into the common reasons behind blurry Instagram posts to help you understand the problem better.
1.1. Image Compression by Instagram
Instagram automatically compresses photos to optimize storage space and bandwidth. This compression can sometimes reduce image quality, leading to blurry posts. Understanding how Instagram handles image compression is crucial for maintaining clarity. The platform prioritizes speed and efficiency, which means that larger files are often compressed more aggressively.
1.2. Incorrect Image Dimensions and Aspect Ratios
Uploading images with incorrect dimensions or aspect ratios can force Instagram to resize them, resulting in blurriness. Adhering to Instagram’s recommended specifications is essential for optimal quality. If your images don’t fit the standard aspect ratios, the platform might crop or stretch them, leading to a loss of detail and sharpness.
1.3. Poor Original Image Quality
If the original photo is of low quality, uploading it to Instagram will only amplify the problem. Starting with a high-resolution image is the first step to achieving clear and sharp posts. Low-resolution images lack the necessary detail and information to withstand Instagram’s compression, resulting in a final product that is noticeably blurry.
1.4. Unstable Internet Connection
A slow or unstable internet connection can disrupt the uploading process, causing Instagram to compress photos further, resulting in blurriness. Ensuring a stable connection is vital for preserving image quality during upload. When your internet connection fluctuates, Instagram might reduce the file size to ensure a quicker upload, which often compromises the image’s clarity.
1.5. Instagram Data Saving Settings
Instagram’s data-saving settings can reduce image quality to conserve data. Disabling these settings can help maintain the sharpness of your posts. These settings are designed to minimize data usage, but they often come at the cost of visual quality, making your images appear less crisp.
1.6. File Format Incompatibilities
Using file formats other than JPEG can sometimes lead to conversion issues, causing Instagram to compress the image and make it blurry. Sticking to JPEG is generally the best practice for Instagram uploads. Other formats might not be fully compatible, leading to automatic conversions that degrade image quality.
2. Step-by-Step Solutions to Fix Blurry Instagram Photos
Now that we’ve identified the common reasons behind blurry Instagram photos, let’s explore step-by-step solutions to fix this issue and ensure your posts look their best. These solutions cover various aspects, from adjusting Instagram settings to optimizing your images before uploading.
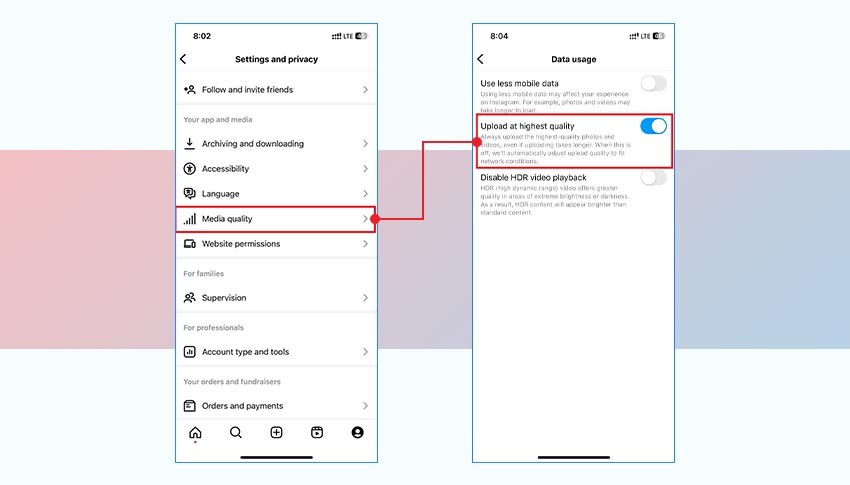
2.1. Adjusting Instagram Data Settings for High-Quality Uploads
One of the simplest ways to improve your Instagram photo quality is to adjust the data settings within the app. By disabling data-saving options, you allow Instagram to upload your photos at the highest possible quality.
Steps:
- Open Instagram: Launch the Instagram app on your device.
- Go to Profile: Tap on your profile icon located in the bottom-right corner.
- Access Settings: Tap the three horizontal lines in the top-right corner and select “Settings and Privacy.”
- Find Media Quality: Scroll down to the “Media quality” section.
- Enable High-Quality Uploads: Toggle the switch next to “Upload at highest quality” to ensure your photos are uploaded in their best possible resolution.
2.2. Checking and Improving Your Internet Connection
A stable and fast internet connection is crucial for uploading high-quality photos to Instagram. Poor connectivity can lead to increased compression, resulting in blurry images.
Tips:
- Run a Speed Test: Use an online speed test tool to check your internet speed.
- Switch Networks: If your Wi-Fi is slow, try switching to cellular data, or vice versa.
- Restart Router: Restarting your Wi-Fi router can often resolve connectivity issues.
- Move Closer to Router: Ensure you are close enough to the router for a strong signal.
- Avoid Peak Hours: Upload during off-peak hours to avoid network congestion.
2.3. Clearing Instagram Cache to Optimize Performance
Over time, Instagram accumulates cached data, which can slow down the app and potentially affect image quality. Clearing the cache can help optimize performance and prevent blurriness.
Steps for iOS:
- Go to Settings: Open the “Settings” app on your iPhone.
- Navigate to General: Tap on “General.”
- Select iPhone Storage: Choose “iPhone Storage.”
- Find Instagram: Scroll down and tap on “Instagram.”
- Offload or Delete App: Select “Offload App” to clear the cache while keeping the app installed, or “Delete App” to remove the app and its cache completely. Reinstall the app if you choose the latter option.
Steps for Android:
- Open Settings: Go to “Settings” on your Android device.
- Access Apps: Tap on “Apps” or “Application Management.”
- Find Instagram: Locate and tap on “Instagram.”
- Go to Storage: Select “Storage Usage.”
- Clear Cache: Tap on “Clear Cache” to remove the cached data.
2.4. Maximizing Your Phone’s Camera Quality for Sharper Photos
The quality of your photos starts with your phone’s camera. Maximizing its settings and ensuring proper usage can significantly improve the sharpness of your images.
Tips:
- Clean the Lens: Use a microfiber cloth to clean the camera lens regularly.
- Adjust Focus and Exposure: Tap on the screen to focus and adjust the exposure using the slider.
- Use Good Lighting: Capture photos in well-lit environments to reduce noise and blurriness.
- Explore Camera Features: Familiarize yourself with your phone’s camera features, such as HDR and manual mode, to optimize image quality.
- Avoid Digital Zoom: Use optical zoom if available, or avoid zooming in to maintain image quality.
2.5. Editing Photos with Third-Party Apps for Enhanced Clarity
Third-party photo editing apps offer advanced tools to enhance the clarity and sharpness of your images before uploading them to Instagram.
Recommended Apps:
- Adobe Lightroom: Provides professional-level editing tools for adjusting sharpness, clarity, and detail.
- Snapseed: Offers a range of editing features, including sharpening, structure, and detail enhancement.
- Fotor: An easy-to-use app with various filters and editing options to improve image quality.
- VSCO: Known for its film-like filters and editing tools that can enhance the overall look of your photos.
2.6. Using Photo Repair Software to Fix Corrupted or Blurry Images
If your original photos are blurry due to corruption or damage, photo repair software can help restore them to their original quality.
Recommended Software:
- Stellar Repair for Photo: A powerful tool for repairing blurry, pixelated, and damaged photos.
- EaseUS Fixo Photo Repair: Repairs corrupted or damaged photos, restoring them to their original state.
- Remo Repair Photo: Fixes various types of photo corruption issues, including blurriness and pixelation.
Steps to Fix Corrupt Photos with Stellar Repair for Photo:
- Download and Install: Download and install Stellar Repair for Photo on your computer.
- Add Files: Launch the software and click “Add File” to upload your corrupt photos.
- Repair: Click the “Repair” button to start the repair process.
- Preview: After the repair process, preview the repaired files.
- Save: Save the repaired photos to your desired location.
3. Best Practices to Avoid Blurry Instagram Photos
Preventing blurriness in your Instagram photos involves a combination of proper shooting techniques, optimal image settings, and consistent post-processing practices. Here are some best practices to help you avoid blurry photos and maintain high-quality uploads.
3.1. Cleaning Your Camera Lens Regularly
A dirty camera lens can significantly impact the clarity of your photos. Dust, fingerprints, and smudges can cause blurriness and reduce overall image quality.
Tips:
- Use a Microfiber Cloth: Gently wipe the lens with a clean, lint-free microfiber cloth.
- Avoid Abrasive Materials: Do not use paper towels, tissues, or rough fabrics, as they can scratch the lens.
- Regular Cleaning: Make it a habit to clean your lens before each photo session.
3.2. Focusing Your Smartphone Camera Correctly
Proper focus is essential for capturing sharp and clear photos. Ensure your camera is correctly focused on the subject to avoid blurriness.
Tips:
- Tap to Focus: Tap on the screen to focus on your subject.
- Lock Focus: Use the focus lock feature (if available) to keep the focus on your subject, even if you move the camera.
- Avoid Movement: Keep your camera steady while taking the photo to prevent motion blur.
3.3. Using the Correct Image Format (JPEG) for Uploads
Instagram primarily supports the JPEG (.jpg) image format. Using other formats can lead to compatibility issues and automatic conversions that reduce image quality.
Tips:
- Save as JPEG: Ensure your images are saved as JPEG files before uploading.
- Check File Format: Verify the file format in your camera or editing app settings.
- Convert If Necessary: If your image is in a different format, use a photo editing tool to convert it to JPEG.
3.4. Uploading Photos with the Correct Aspect Ratio
Instagram supports various aspect ratios, but using the recommended dimensions can help prevent cropping and resizing, which can lead to blurriness.
Recommended Aspect Ratios:
- Square (1:1): 1080 x 1080 pixels
- Portrait (4:5): 1080 x 1350 pixels
- Landscape (1.91:1): 1080 x 608 pixels
Tips:
- Crop Before Uploading: Crop your photos to the correct aspect ratio before uploading to avoid automatic resizing by Instagram.
- Use Editing Apps: Use photo editing apps to resize and crop your images accurately.
3.5. Enabling High-Resolution Uploads in Instagram Settings
Ensure that high-resolution uploads are enabled in your Instagram settings to maintain the best possible image quality.
Steps:
- Open Instagram: Launch the Instagram app on your device.
- Go to Profile: Tap on your profile icon.
- Access Settings: Tap the three horizontal lines and select “Settings and Privacy.”
- Find Media Quality: Scroll down to “Media quality.”
- Enable High-Quality Uploads: Toggle the switch to “Upload at highest quality.”
3.6. Avoiding Over-Editing That Can Degrade Image Quality
While editing can enhance your photos, over-editing can lead to a loss of detail and increased blurriness.
Tips:
- Subtle Adjustments: Make subtle adjustments to brightness, contrast, and sharpness.
- Avoid Excessive Sharpening: Over-sharpening can introduce artifacts and make the image look unnatural.
- Check for Artifacts: Regularly zoom in to check for artifacts or distortions caused by editing.
4. Advanced Techniques for Sharper Instagram Posts
Beyond the basic tips, several advanced techniques can further enhance the sharpness and clarity of your Instagram posts. These techniques involve more sophisticated editing and shooting strategies.
4.1. Using Manual Camera Settings for Greater Control
Manual camera settings allow you to control parameters like ISO, aperture, and shutter speed, giving you greater control over image quality.
Benefits:
- Lower ISO: Use lower ISO settings to reduce noise and graininess.
- Optimal Aperture: Adjust the aperture for the desired depth of field.
- Correct Shutter Speed: Use a fast enough shutter speed to avoid motion blur.
Tips:
- Experiment with Settings: Practice using manual settings to understand how they affect your images.
- Use a Tripod: Use a tripod to keep the camera steady when using slower shutter speeds.
4.2. Shooting in RAW Format for More Editing Flexibility
Shooting in RAW format captures more data than JPEG, providing greater flexibility for editing and post-processing.
Benefits:
- More Detail: RAW files retain more detail and dynamic range.
- Better Color Correction: RAW files allow for more accurate color correction.
- Greater Editing Potential: RAW files provide more headroom for making adjustments without losing quality.
Tips:
- Use RAW-Compatible Apps: Use photo editing apps that support RAW files, such as Adobe Lightroom or Capture One.
- Process RAW Files: Convert RAW files to JPEG after editing for Instagram uploads.
4.3. Utilizing Advanced Sharpening Techniques in Photo Editing Software
Advanced sharpening techniques can enhance the clarity and detail of your photos without introducing artifacts.
Techniques:
- Unsharp Masking: Use the unsharp masking filter to sharpen edges and details.
- High Pass Sharpening: Apply a high pass filter to enhance fine details.
- Selective Sharpening: Sharpen specific areas of the image to avoid over-sharpening.
Tips:
- Use Layers: Apply sharpening to a separate layer to maintain flexibility.
- Adjust the Radius and Amount: Experiment with the radius and amount settings to achieve the desired level of sharpness.
4.4. Understanding and Minimizing Digital Noise in Photos
Digital noise can degrade image quality and make photos appear blurry. Understanding the causes of noise and minimizing it can improve the sharpness of your images.
Causes of Noise:
- High ISO: Using high ISO settings increases noise.
- Long Exposure: Long exposure shots can introduce noise.
- Underexposure: Underexposed images tend to have more noise.
Tips:
- Use Lower ISO: Use the lowest possible ISO setting for your shooting conditions.
- Optimize Exposure: Ensure your images are properly exposed.
- Use Noise Reduction: Apply noise reduction filters in photo editing software.
4.5. Using Focus Stacking for Maximum Sharpness
Focus stacking involves combining multiple images taken at different focus points to create an image with maximum sharpness throughout the entire scene.
Steps:
- Take Multiple Shots: Take several photos of the same scene, each with a different focus point.
- Use a Tripod: Use a tripod to keep the camera steady between shots.
- Combine Images: Use photo editing software like Adobe Photoshop to combine the images into a single, sharply focused image.
5. Troubleshooting Common Issues That Lead to Blurry Posts
Even with the best practices and advanced techniques, you might still encounter issues that lead to blurry Instagram posts. Here are some common problems and how to troubleshoot them.
5.1. Images Appearing Blurry After Instagram Stories Upload
Instagram Stories often compress images more aggressively than regular posts, leading to blurriness.
Solutions:
- Use High-Resolution Images: Start with high-resolution images to compensate for compression.
- Optimize for Stories: Use Instagram’s built-in editing tools to optimize images for Stories.
- Avoid Rapid Movements: Minimize rapid camera movements during recording.
5.2. Blurry Carousel Posts Due to Resizing Issues
Carousel posts can sometimes appear blurry due to inconsistencies in image sizes and aspect ratios.
Solutions:
- Use Consistent Dimensions: Ensure all images in the carousel have the same dimensions and aspect ratio.
- Crop Before Uploading: Crop images to the correct dimensions before uploading to avoid resizing.
- Check Image Order: Verify that the images are in the correct order.
5.3. Images Taken with Third-Party Camera Apps Still Look Blurry
Third-party camera apps might not always optimize images for Instagram, resulting in blurriness.
Solutions:
- Use Instagram’s Camera: Use Instagram’s built-in camera for optimal compatibility.
- Check App Settings: Review the settings in your third-party camera app to ensure high-quality output.
- Edit Before Uploading: Edit images in a photo editing app before uploading to Instagram.
5.4. Videos Appearing Blurry After Uploading to Instagram
Videos can also suffer from blurriness due to compression and other factors.
Solutions:
- Shoot in High Resolution: Record videos in high resolution (1080p or higher).
- Stable Recording: Use a tripod or stabilizer to minimize camera shake.
- Optimize Video Settings: Adjust video settings in your camera app to prioritize quality.
5.5. Images Downloaded from Instagram Appearing Low Quality
Images downloaded from Instagram are often compressed, resulting in lower quality.
Solutions:
- Use Original Images: Always use the original, high-resolution images for posting.
- Avoid Downloading: Minimize downloading and re-uploading images to prevent further compression.
- Request Original Files: If you need to share an image, request the original file from the photographer.
6. Why.Edu.Vn: Your Resource for Instagram Photography Questions
At WHY.EDU.VN, we understand the challenges of maintaining high-quality content on social media platforms like Instagram. Our goal is to provide clear, reliable answers to your questions, ensuring you can create stunning visuals that captivate your audience. If you’re struggling with blurry Instagram posts or have other photography-related questions, we’re here to help.
WHY.EDU.VN offers expert advice and step-by-step guidance to help you master the art of Instagram photography. Whether you’re a beginner or an experienced photographer, our resources can help you elevate your skills and create visually appealing content.
7. Common Questions About Instagram Image Quality (FAQ)
Q1: Why do my photos look blurry after uploading to Instagram?
A: Photos can appear blurry due to Instagram’s compression, incorrect image dimensions, poor original image quality, unstable internet connection, or data-saving settings.
Q2: How can I improve the quality of my Instagram photos?
A: Adjust Instagram data settings, check your internet connection, clear Instagram cache, maximize your phone’s camera quality, and edit photos with third-party apps.
Q3: What is the best image format to use for Instagram?
A: The best image format for Instagram is JPEG (.jpg).
Q4: What are the recommended aspect ratios for Instagram photos?
A: Recommended aspect ratios are square (1:1), portrait (4:5), and landscape (1.91:1).
Q5: How do I clear the cache on Instagram?
A: On iOS, offload or delete the app. On Android, clear the cache in the app settings.
Q6: Can photo repair software fix blurry photos for Instagram?
A: Yes, photo repair software like Stellar Repair for Photo can fix corrupted or blurry images.
Q7: How can I avoid blurry photos on Instagram Stories?
A: Use high-resolution images, optimize for Stories, and minimize rapid movements during recording.
Q8: What is focus stacking, and how can it improve my photos?
A: Focus stacking combines multiple images taken at different focus points to create an image with maximum sharpness throughout the entire scene.
Q9: How can I minimize digital noise in my photos?
A: Use lower ISO settings, optimize exposure, and apply noise reduction filters in photo editing software.
Q10: Why do images downloaded from Instagram appear low quality?
A: Images downloaded from Instagram are often compressed, resulting in lower quality. Use original images whenever possible.
8. Final Thoughts: Achieve Crystal-Clear Instagram Posts
Ensuring your Instagram posts are sharp and clear involves a multifaceted approach that includes optimizing your camera settings, understanding Instagram’s requirements, and utilizing effective editing techniques. By following the tips and solutions outlined in this guide, you can significantly improve the quality of your Instagram photos and create a visually appealing feed.
Remember to regularly clean your camera lens, focus correctly, use the right image format, and avoid over-editing. Advanced techniques like shooting in RAW format, using manual camera settings, and focus stacking can further enhance your results.
9. Ready to Enhance Your Instagram Presence?
Are you tired of blurry photos ruining your Instagram feed? Do you want to create visually stunning content that captures your audience’s attention? Visit WHY.EDU.VN today to discover more tips, tricks, and expert advice on Instagram photography.
Our platform offers a wealth of resources to help you master the art of visual storytelling. Whether you’re a beginner or an experienced creator, WHY.EDU.VN has something for everyone. Unlock your full potential and start creating Instagram content that stands out from the crowd.
Have more questions or need personalized advice? Contact our experts at WHY.EDU.VN. We’re here to help you achieve your Instagram goals.
Contact Information:
- Address: 101 Curiosity Lane, Answer Town, CA 90210, United States
- WhatsApp: +1 (213) 555-0101
- Website: why.edu.vn