Is your hibiscus losing its luster? At WHY.EDU.VN, we understand the frustration of seeing your vibrant hibiscus leaves turning yellow. This article provides a comprehensive guide to diagnosing and resolving this common issue, helping you restore your hibiscus to its former glory with expert advice and practical solutions. Discover the secrets to healthy hibiscus foliage and blooming success using these tips and related information.
1. Understanding the Hibiscus Plant
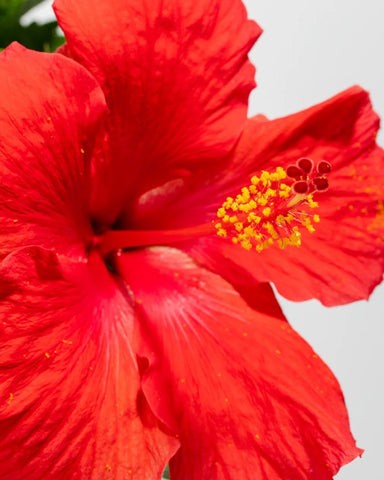
The hibiscus, scientifically known as Hibiscus rosa-sinensis, is a captivating flowering plant celebrated for its vibrant, trumpet-shaped blooms. Native to warm climates, it has become a popular ornamental plant worldwide. These plants, which can grow to impressive heights, offer a burst of color with flowers in shades of red, pink, yellow, orange, and white. While generally considered pet-friendly, it’s still best to keep furry companions from consuming large quantities.
1.1. Optimal Growing Conditions for Hibiscus
Hibiscus plants thrive when provided with specific environmental conditions. Sunlight is a crucial factor, with hibiscus needing at least six hours of direct sun each day to flourish and produce abundant blooms. Well-draining soil is essential to prevent root rot, which can quickly lead to yellowing leaves and other health issues. Regular watering is also vital, particularly during the growing season, but care must be taken not to overwater.
1.2. Common Issues Affecting Hibiscus Health
Despite their beauty, hibiscus plants are susceptible to several common problems. Pests like aphids, spider mites, and whiteflies can infest the foliage, causing damage and discoloration. Nutrient deficiencies, especially a lack of iron, can also lead to yellowing leaves. Furthermore, environmental stressors like temperature fluctuations, improper watering, and inadequate light can significantly impact the plant’s overall health. Understanding these challenges is the first step in maintaining a thriving hibiscus.
2. Identifying the Causes of Yellowing Hibiscus Leaves
Yellowing leaves, or chlorosis, in hibiscus plants can be a sign of various underlying issues. Correctly identifying the cause is crucial for implementing effective solutions. Below are the primary reasons why your hibiscus leaves might be losing their green color.
2.1. Watering Problems: Overwatering vs. Underwatering
One of the most common causes of yellowing leaves is improper watering. Overwatering can lead to root rot, where the roots are deprived of oxygen and begin to decay. Signs of overwatering include consistently soggy soil, wilting leaves, and a musty odor. Conversely, underwatering can cause drought stress, resulting in yellowing leaves that are dry and brittle. Monitoring soil moisture levels and adjusting your watering schedule accordingly is vital.
2.2. Light Exposure: Insufficient or Excessive Sunlight
Light plays a critical role in the health of hibiscus plants. While they thrive in bright, direct sunlight, too much intense sunlight can scorch the leaves, causing them to turn yellow or brown. Conversely, insufficient light can lead to reduced photosynthesis, resulting in yellowing leaves and stunted growth. Finding the right balance is essential; providing ample sunlight while protecting the plant from harsh midday sun is ideal.
2.3. Nutrient Deficiencies: Lack of Essential Minerals
Nutrient deficiencies can also cause yellowing leaves in hibiscus plants. Key nutrients like nitrogen, iron, and magnesium are essential for chlorophyll production, which gives leaves their green color. A lack of these nutrients can lead to chlorosis, where the leaves turn yellow while the veins remain green. Regular fertilization with a balanced fertilizer can help prevent nutrient deficiencies.
2.4. Pest Infestations: Common Pests Affecting Hibiscus
Pests can wreak havoc on hibiscus plants, causing yellowing leaves and other damage. Common pests include aphids, spider mites, whiteflies, and mealybugs. These pests suck sap from the leaves, weakening the plant and causing discoloration. Regular inspection of the plant and prompt treatment with insecticidal soap or neem oil can help control pest infestations.
2.5. Temperature Stress: Cold or Heat Exposure
Temperature extremes can also contribute to yellowing leaves in hibiscus plants. Hibiscus plants are sensitive to cold temperatures, and exposure to frost can damage the leaves, causing them to turn yellow and drop. Similarly, excessive heat can stress the plant, leading to dehydration and yellowing leaves. Maintaining a stable temperature range of 60-85°F (15-29°C) is ideal for hibiscus plants.
2.6. Soil Conditions: pH Imbalance and Poor Drainage
Soil conditions play a crucial role in the health of hibiscus plants. A pH imbalance can affect the plant’s ability to absorb nutrients from the soil, leading to yellowing leaves. Hibiscus plants prefer slightly acidic soil with a pH between 6.0 and 6.5. Poor drainage can also cause waterlogged soil, leading to root rot and yellowing leaves. Ensuring well-draining soil and testing the pH regularly can help maintain optimal soil conditions.
3. Step-by-Step Solutions to Fix Yellowing Hibiscus Leaves
Once you’ve identified the cause of the yellowing leaves, it’s time to take action. Here’s a step-by-step guide to help you restore your hibiscus to its vibrant self.
3.1. Adjusting Your Watering Routine
Proper watering is essential for healthy hibiscus plants. Here’s how to adjust your watering routine:
- Check Soil Moisture: Use your finger to check the soil moisture about an inch below the surface. If it feels dry, it’s time to water.
- Water Deeply: Water the plant deeply until water drains out of the bottom of the pot. This ensures the roots are thoroughly hydrated.
- Avoid Overwatering: Allow the soil to dry slightly between waterings to prevent root rot.
- Improve Drainage: Ensure the pot has adequate drainage holes to prevent water from pooling at the bottom.
3.2. Optimizing Light Exposure
Hibiscus plants need plenty of sunlight, but too much direct sun can be harmful. Here’s how to optimize light exposure:
- Provide Bright, Indirect Light: Place the plant in a location where it receives bright, indirect sunlight for most of the day.
- Protect from Harsh Sun: During the hottest part of the day, provide some shade to protect the leaves from scorching.
- Rotate the Plant: Rotate the plant regularly to ensure all sides receive equal light exposure.
- Use Grow Lights: If natural light is limited, consider using grow lights to supplement the plant’s light needs.
3.3. Implementing a Fertilization Plan
Regular fertilization is crucial for providing hibiscus plants with the nutrients they need. Here’s how to implement a fertilization plan:
- Choose a Balanced Fertilizer: Use a balanced fertilizer with equal proportions of nitrogen, phosphorus, and potassium (e.g., 10-10-10 or 20-20-20).
- Fertilize Regularly: Feed the plant every 2-4 weeks during the growing season (spring and summer).
- Avoid Overfertilizing: Overfertilization can lead to burned, yellowing leaves. Follow the instructions on the fertilizer label carefully.
- Supplement with Chelated Iron: If iron deficiency is suspected, supplement with chelated iron to improve leaf color.
3.4. Controlling Pests Naturally
Pests can quickly damage hibiscus plants if left unchecked. Here’s how to control pests naturally:
- Inspect Regularly: Check the plant regularly for signs of pests, such as aphids, spider mites, or whiteflies.
- Use Insecticidal Soap: Spray the plant with insecticidal soap to kill pests on contact.
- Apply Neem Oil: Neem oil is an effective natural insecticide that can help control a variety of pests.
- Remove Infested Leaves: Prune away any heavily infested leaves to prevent the pests from spreading.
3.5. Maintaining Proper Temperature and Humidity
Hibiscus plants thrive in warm, humid conditions. Here’s how to maintain proper temperature and humidity:
- Maintain Warm Temperatures: Keep the plant in a location where the temperature stays between 60-85°F (15-29°C).
- Avoid Cold Drafts: Protect the plant from cold drafts, which can damage the leaves.
- Increase Humidity: Increase humidity by misting the plant regularly or placing it on a pebble tray filled with water.
- Use a Humidifier: If the air is particularly dry, consider using a humidifier to maintain optimal humidity levels.
3.6. Improving Soil Health and Drainage
Healthy soil is essential for healthy hibiscus plants. Here’s how to improve soil health and drainage:
- Use Well-Draining Soil: Plant the hibiscus in well-draining soil to prevent waterlogging.
- Amend the Soil: Amend the soil with organic matter, such as compost or peat moss, to improve drainage and nutrient content.
- Check Soil pH: Test the soil pH regularly and adjust as needed to maintain a pH between 6.0 and 6.5.
- Repot as Needed: Repot the plant every 1-2 years to refresh the soil and provide more room for the roots to grow.
4. Troubleshooting Other Common Hibiscus Problems
In addition to yellowing leaves, hibiscus plants can experience other common problems. Here’s how to troubleshoot some of these issues.
4.1. Addressing Drooping Leaves
Drooping leaves can be a sign of underwatering, overwatering, or heat stress. Check the soil moisture levels and adjust your watering routine as needed. Provide shade during intense heat to prevent leaf drooping.
4.2. Treating Brown Spots
Brown spots on hibiscus leaves are often caused by fungal infections or insect damage. Trim the affected leaves and avoid wetting the foliage during watering sessions. Apply a fungicide if the problem persists.
4.3. Fixing Curling Leaves
Curling leaves can be caused by pests, nutrient deficiencies, or environmental stress. Check for pests and remove them. Make sure the plant is getting enough nutrients by fertilizing it properly. Keep the hibiscus in a stable environment, avoiding frost and drafts.
4.4. Dealing with Holes in Leaves
Holes in hibiscus leaves are often caused by insects like caterpillars or beetles. Inspect the plant and remove any visible pests. Use insecticidal soap or neem oil to treat and prevent further damage.
5. Preventative Measures for Healthy Hibiscus
Preventing problems before they start is the best way to ensure your hibiscus remains healthy and vibrant. Consider these preventative measures.
5.1. Regular Inspection and Maintenance
- Routine Checks: Conduct regular inspections of your hibiscus plants, ideally once a week, to catch early signs of pests, diseases, or nutrient deficiencies. Look closely at the leaves, stems, and soil surface.
- Pruning: Prune your hibiscus regularly to remove dead or yellowing leaves, which can harbor pests and diseases. Pruning also encourages new growth and better air circulation.
5.2. Optimizing Environmental Conditions
- Stable Temperature: Ensure that your hibiscus plants are kept in a stable temperature range, avoiding sudden fluctuations.
- Consistent Humidity: Maintain consistent humidity levels, especially during dry seasons, by using humidifiers or pebble trays.
5.3. Proper Planting and Repotting Practices
- Choosing the Right Pot: Select pots with adequate drainage holes to prevent waterlogging. The size of the pot should be appropriate for the size of the plant to avoid root-bound conditions.
- Repotting: Repot your hibiscus plants every 1-2 years to refresh the soil and provide more room for root growth. This also allows you to inspect the root system for any signs of disease or damage.
5.4. Best Practices for Watering and Feeding
- Deep Watering: Water deeply but infrequently, allowing the soil to dry slightly between waterings.
- Balanced Fertilization: Use a balanced, slow-release fertilizer to provide a steady supply of nutrients. Avoid over-fertilizing, which can lead to salt buildup in the soil.
6. Expert Tips and Tricks for Thriving Hibiscus
Here are some additional expert tips and tricks to help your hibiscus thrive:
6.1. Choosing the Right Hibiscus Variety
Select a hibiscus variety that is well-suited to your local climate and growing conditions. Some varieties are more tolerant of cold or heat than others.
6.2. Using Natural Soil Amendments
Amend the soil with natural materials like compost, aged manure, or leaf mold to improve soil structure and nutrient content.
6.3. Implementing Companion Planting
Companion planting can help deter pests and improve the overall health of your hibiscus plants. Consider planting herbs like basil or marigolds nearby.
6.4. Monitoring Soil pH
Regularly test the soil pH and adjust as needed to maintain a slightly acidic level.
6.5. Seasonal Care Adjustments
Adjust your care routine based on the season. Reduce watering and fertilization during the winter months when the plant is dormant.
7. Frequently Asked Questions (FAQs) About Hibiscus Care
Here are some frequently asked questions about hibiscus care:
Q1: Should I cut off the yellow leaves on Hibiscus?
A: Yes, remove yellow leaves to encourage new growth and prevent disease spread.
Q2: Do Hibiscus lose their leaves in the winter?
A: Yes, some leaf drop is normal as the plant enters dormancy.
Q3: What does an overwatered Hibiscus look like?
A: Swollen, yellow leaves and soggy soil are signs of overwatering.
Q4: Why are the leaves on my Hibiscus wilting?
A: Wilting can be caused by underwatering, overwatering, or extreme temperatures.
Q5: What are the benefits of Hibiscus leaves?
A: Hibiscus leaves are rich in antioxidants and offer various health benefits.
Q6: How do I know if my Hibiscus has spider mites?
A: Look for fine webs and damaged leaves, indicating spider mite infestation.
Q7: What kills fungus on Hibiscus?
A: Neem oil, baking soda mixtures, and commercial fungicides can combat fungal infections.
Q8: How often should I fertilize my hibiscus?
A: Fertilize every 2-4 weeks during the growing season with a balanced fertilizer.
Q9: What type of soil is best for hibiscus?
A: Use well-draining, slightly acidic soil with a pH between 6.0 and 6.5.
Q10: How much sunlight does a hibiscus need?
A: Hibiscus plants need at least 6 hours of direct sunlight daily.
8. Conclusion: A Vibrant Hibiscus Awaits
Yellowing hibiscus leaves can be a sign of various issues, but with the right knowledge and care, you can restore your plant to its vibrant health. Remember to adjust your watering routine, optimize light exposure, implement a fertilization plan, control pests naturally, maintain proper temperature and humidity, and improve soil health. By following these steps, you can ensure your hibiscus plant thrives and blooms beautifully.
To delve deeper into the world of plant care and find solutions to any gardening questions you may have, visit WHY.EDU.VN. Our community of experts is ready to help you cultivate a thriving garden. Have a question about your hibiscus or any other plant? Contact us at 101 Curiosity Lane, Answer Town, CA 90210, United States, or reach out via WhatsApp at +1 (213) 555-0101. Let why.edu.vn be your guide to a greener, more beautiful world.