Keyboards are essential tools for interacting with computers, so it can be incredibly frustrating when they suddenly stop working. If you’re facing a non-responsive keyboard, you’re not alone. Many users encounter this issue, and luckily, in most cases, it can be resolved without needing to replace your device.
There are numerous potential reasons why your keyboard might have stopped functioning. Sometimes, it’s a simple software glitch or a loose connection. In other instances, outdated drivers, accidental damage, or even power settings can be the culprit. Whether you’re using a wired USB keyboard or a wireless Bluetooth model, understanding the common causes is the first step towards getting your keyboard back up and running.
This comprehensive guide will walk you through the most frequent reasons behind keyboard malfunctions and provide step-by-step solutions to troubleshoot and fix these problems. We’ll cover everything from basic checks to more advanced troubleshooting techniques, ensuring you have the knowledge to diagnose and resolve your keyboard issues effectively.
Common Reasons Why Your Keyboard Stopped Working
Before diving into complex solutions, it’s crucial to understand the common culprits behind a malfunctioning keyboard. Identifying the potential cause will help you narrow down the troubleshooting process and find the right fix faster.
Outdated or Corrupted Keyboard Drivers
One of the most frequent reasons for keyboard problems is issues with the driver software. Drivers are essential programs that allow your operating system to communicate correctly with hardware devices, including your keyboard. If these drivers become outdated, corrupted, or are missing altogether, your keyboard may not function as expected.
This is especially common when you’ve recently switched keyboards, as old drivers can sometimes conflict with new hardware. Ensuring your keyboard drivers are up-to-date is a crucial step in maintaining your computer’s overall health and the proper functioning of all connected peripherals.
Faulty Motherboard Issues
While less common, a faulty motherboard can be a more serious reason for keyboard unresponsiveness. The motherboard is the central circuit board of your computer, managing communication between all hardware components, including the keyboard. If there’s a problem with the motherboard itself, it can disrupt the keyboard’s functionality, leading to intermittent or complete failure.
If you suspect a motherboard issue, it’s best to seek professional help. An experienced IT technician can perform diagnostic tests to determine if the motherboard is indeed the root of the problem and recommend appropriate repair or replacement options.
Accidental Damage and Debris
Accidental damage, particularly from spills or accumulated debris, is a very common cause of keyboard problems, especially when only some keys are not working. Crumbs, dust, liquids, and other particles can easily find their way under the keys, interfering with their mechanisms and preventing them from registering keystrokes.
Regularly cleaning your keyboard is essential to prevent debris buildup and maintain its optimal performance. Simple actions like turning your keyboard upside down and gently shaking it can dislodge loose particles. For sticky keys caused by spills, more thorough cleaning might be necessary.
Low Battery or Wireless Connection Problems (Wireless Keyboards)
If you’re using a wireless keyboard, battery issues or connection problems are often the first things to check. Wireless keyboards rely on batteries for power and Bluetooth or radio frequency (RF) for communication with your computer.
A low battery can lead to intermittent connectivity or complete failure. Similarly, disruptions in the wireless connection, due to interference or pairing issues, can cause your keyboard to become unresponsive. Ensuring your wireless keyboard is charged or has fresh batteries and that the wireless connection is stable are crucial troubleshooting steps.
Incorrect USB Port Connection (Wired Keyboards)
For wired USB keyboards, a surprisingly simple yet often overlooked issue is connecting to the wrong USB port. While most USB ports should work, sometimes certain ports might have connectivity issues or power delivery problems.
Trying different USB ports on your computer is a quick and easy way to rule out a port-related problem. Additionally, testing your keyboard on another computer can help determine if the issue lies with the keyboard itself or your computer’s USB ports.
System Updates and Software Conflicts
Occasionally, recent system updates can inadvertently cause conflicts with peripheral devices like keyboards. While updates are generally designed to improve performance and security, they can sometimes introduce bugs or alter settings that affect hardware compatibility.
While less frequent with laptop keyboards, external keyboards can sometimes become unresponsive after a system update. In such cases, rolling back the update or checking for updated drivers can help resolve the conflict.
Power Saving Features Interfering with Keyboard
Power-saving features on laptops are designed to conserve battery life by reducing power consumption to various components when the device is idle or running on battery. These features can sometimes aggressively manage peripheral devices, including keyboards, potentially disconnecting them after periods of inactivity to save power.
If you are using an external keyboard with your laptop, especially a wireless one, power-saving settings might be interfering with its operation. Adjusting these settings to allow for continuous power to USB ports or Bluetooth connections can sometimes solve the issue.
Step-by-Step Guide to Fix a Non-Working Keyboard
When your keyboard stops typing, it can feel like a digital emergency. Fortunately, there are several troubleshooting steps you can take to diagnose and fix the problem. Before you assume the worst, follow these steps to try and get your keyboard working again.
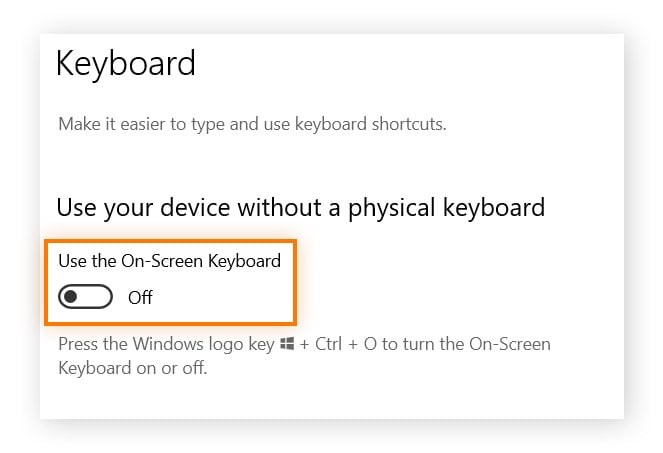
1. Utilize the On-Screen Keyboard for Initial Navigation
When your physical keyboard is unresponsive, the on-screen keyboard becomes your temporary input solution. This virtual keyboard, built into most operating systems, allows you to navigate your computer and perform basic tasks using your mouse or trackpad.
To activate the on-screen keyboard:
-
Use your mouse to navigate to the Windows Start Menu.
-
Click on Settings (the gear icon).
-
Select Ease of Access.
-
Choose Keyboard from the left-hand menu.
-
Toggle the switch under “Use the On-Screen Keyboard” to the “On” position.
With the on-screen keyboard active, you can proceed with the following troubleshooting steps.
2. Restart Your Computer and Keyboard
A simple restart often resolves temporary software glitches or connectivity issues that might be causing your keyboard to malfunction. This is usually the first and easiest troubleshooting step to try.
For wired keyboards:
- Unplug the keyboard from the USB port.
- Restart your computer using the on-screen keyboard and mouse.
- Once your computer has restarted, plug the keyboard back in.
For wireless keyboards:
- Turn off the keyboard.
- Restart your computer.
- After restarting, turn the keyboard back on. You might need to re-pair it with your computer if it doesn’t reconnect automatically.
3. Disable Power Saving Features for USB Devices
As mentioned earlier, power-saving features can sometimes interfere with the operation of peripheral devices. Disabling selective suspend settings for USB devices can ensure that your keyboard receives continuous power.
On Windows:
-
Open Control Panel (you can type “control panel” in the Windows search bar).
-
Go to Hardware and Sound.
-
Click on Power Options.
-
Click “Change plan settings” next to your currently selected power plan.
-
Click “Change advanced power settings“.
-
Expand the “USB settings” section.
-
Expand “USB selective suspend setting” and set it to “Disabled” for both “On battery” and “Plugged in”.
-
Click Apply and then OK.
On macOS:
-
Open System Settings (from the Apple menu).
-
Click on Battery.
-
Click on Options.
-
Under “Put hard disks to sleep when possible“, ensure this is unchecked.
-
Under “Wake for network access“, you can choose your preferred setting, but ensure it’s enabled if you rely on network connectivity for peripherals.
-
Under “Low Power Mode“, select “Never” from the dropdown menu to prevent power saving from affecting peripherals.
4. Thoroughly Clean Your Keyboard
Physical cleaning can often resolve issues caused by debris buildup. Whether it’s crumbs, dust, or spilled liquids, cleaning your keyboard can restore the functionality of sticky or unresponsive keys.
- Turn off your computer and unplug the keyboard (for desktop computers).
- Turn the keyboard upside down and gently shake it to dislodge loose particles.
- Use a can of compressed air to blow out dust and debris from between the keys.
- Use a small brush (like a soft toothbrush or cleaning brush) to gently loosen and remove stubborn debris.
- For sticky keys, use a cotton swab or lint-free cloth lightly dampened with isopropyl alcohol to gently clean around the keys. Avoid getting liquid directly inside the keyboard.
- Allow the keyboard to air dry completely before plugging it back in and turning on your computer.
5. Disable Filter Keys and Sticky Keys
Windows accessibility features like Filter Keys and Sticky Keys are designed to assist users with motor impairments. However, if accidentally enabled, they can interfere with normal keyboard operation, causing unexpected behavior or unresponsiveness.
To disable these features:
-
Type “Control Panel” in the Windows search bar and open the Control Panel.
-
Click on Ease of Access.
-
Select “Change how your keyboard works” under the “Ease of Access Center”.
-
Uncheck the boxes for “Turn on Filter Keys” and “Turn on Sticky Keys“.
-
Click Apply and then OK.
6. Update or Reinstall Keyboard Drivers
Ensuring you have the latest keyboard drivers can fix compatibility issues and resolve driver-related malfunctions. You can update drivers manually or use driver updater software.
Manual Driver Update (Windows):
-
Right-click on the Start Menu and select “Device Manager“.
-
Expand the “Keyboards” category.
-
Right-click on your keyboard device and select “Update driver“.
-
Choose “Search automatically for drivers” and follow the on-screen instructions.
Manual Driver Update (macOS):
Drivers on macOS are typically updated automatically with system updates. To check for updates:
-
Open the Apple Menu and select “App Store“.
-
Click on “Updates” in the sidebar.
-
Install any available updates for macOS, as these often include driver updates.
Using Driver Updater Software:
Software like Avast Driver Updater can automate the process of scanning for and updating outdated drivers, including keyboard drivers. This can save time and ensure all your drivers are up-to-date.
[Free trial
Download Avast Driver Updater ](https://www.avast.com/download-thank-you.php?product=DRW)
7. Disable Fast Startup (Windows 10/11)
The Fast Startup feature in Windows can sometimes cause issues with hardware initialization, including keyboards. Disabling Fast Startup can sometimes resolve keyboard problems, especially after system updates.
-
Press the Windows key + R to open the Run dialog box.
-
Type “control” and click OK to open Control Panel.
-
Go to Hardware and Sound.
-
Click on Power Options.
-
Click “Choose what the power buttons do” on the left-hand side.
-
Click “Change settings that are currently unavailable” to unlock the settings below.
-
Uncheck the box next to “Turn on fast startup (recommended)“.
-
Click “Save changes” and restart your computer.
What to Do If Your Keyboard Layout Has Changed
Sometimes, your keyboard might be working, but the layout seems to be different, causing you to type incorrect characters. This usually happens when the keyboard language or layout settings are accidentally changed.
Changing Keyboard Layout on Windows:
- Press and hold the Windows key + Spacebar. This will cycle through the installed keyboard layouts.
- Select your desired layout from the options.
To add or remove keyboard layouts:
- Go to Settings > Time & Language > Language.
- Under “Preferred languages“, click “Add a language” to install a new layout.
- To remove a layout, select it and click “Remove“.
Changing Keyboard Layout on macOS:
- Open System Settings > Keyboard.
- Click on “Input Sources“.
- Click the “+” button to add a new input source (keyboard layout).
- Select your desired language and layout from the list and click “Add“.
- To remove a layout, select it and click the “–” button.
Keeping Your System Optimized
Maintaining your computer’s overall health can prevent various issues, including keyboard malfunctions. Regularly cleaning up your system, updating software, and managing drivers can contribute to smoother performance and reduce the likelihood of problems.
Software like Avast Cleanup can help you optimize your system by removing unnecessary files, updating software, and improving overall performance. Regularly using system maintenance tools can contribute to a more stable and efficient computing experience.
Download Avast CleanupFree trial
Frequently Asked Questions (FAQs)
Why is my Chromebook keyboard not working?
For Chromebook keyboard issues, try restarting your device first. If the problem persists, sign in as a Guest user. If the keyboard works in Guest mode, the issue might be with your user profile. Try deleting and re-adding your account.
How to unlock a keyboard?
Some keyboards have a lock function, often activated by pressing the Fn key + F-Lock or a similar combination. Try pressing the Fn key and then Scroll Lock or Num Lock keys to see if this unlocks your keyboard.
What causes dead keys on a keyboard?
Dead keys are typically caused by physical damage, spills, debris buildup, or wear and tear. If cleaning and basic troubleshooting steps don’t work, hardware damage might be the cause, and you might need to repair or replace the keyboard.
How to reset a keyboard?
To reset a keyboard in Windows:
- Open Device Manager.
- Expand “Keyboards“.
- Uninstall your keyboard driver.
- Restart your computer, and Windows will automatically reinstall the driver.
To reset a keyboard on macOS:
- Open System Settings > Keyboard.
- Click “Modifier Keys“.
- Click “Restore Defaults“.
What are ghost keys on a keyboard?
Keyboard ghosting occurs when certain key combinations are not registered correctly, especially when pressing multiple keys simultaneously. This is often a hardware limitation of older or cheaper keyboards. If you experience ghosting issues, especially during gaming, consider using a higher-quality keyboard with anti-ghosting features.
By following these troubleshooting steps and understanding the common causes of keyboard problems, you should be able to resolve most keyboard issues and get back to typing smoothly. If the problem persists despite trying these solutions, it might indicate a hardware failure, and seeking professional repair or considering a keyboard replacement might be necessary.