Is your external hard drive not showing up on your Mac? This issue can be frustrating, but don’t worry; WHY.EDU.VN is here to help. This guide will walk you through various troubleshooting steps to resolve the problem and regain access to your important files. We’ll cover everything from simple fixes to more advanced solutions, ensuring you have the knowledge to tackle this issue head-on and explore data recovery options.
1. Understanding Why Your Hard Drive Isn’t Showing Up
Several reasons can cause a hard drive not to appear on your Mac. Identifying the root cause is the first step to finding the right solution. Here are some common culprits:
- Connection Issues: A faulty cable, loose connection, or a damaged port can prevent your Mac from recognizing the hard drive.
- Power Problems: External hard drives require power to operate. If the drive isn’t getting enough power, it won’t show up.
- macOS Settings: macOS has settings that control which devices appear on the desktop and in Finder. If these settings are not configured correctly, your hard drive might be hidden.
- File System Errors: The file system on your hard drive might be corrupted, preventing macOS from mounting the drive.
- Driver Issues: Although less common with external drives, driver problems can sometimes cause recognition issues.
- Hardware Failure: In the worst-case scenario, the hard drive itself might be failing.
2. Initial Checks and Simple Solutions
Before diving into more complex troubleshooting, start with these basic checks:
2.1. Check the Physical Connection
Ensure the cable connecting your hard drive to your Mac is securely plugged into both the drive and the Mac’s ports. Try a different USB port on your Mac to rule out a faulty port. If you’re using a USB hub, connect the hard drive directly to the Mac instead. Cables can fail, so trying a different cable is an easy way to eliminate this possibility.
2.2. Verify Power Supply
External hard drives require sufficient power to operate. If your drive has an external power adapter, ensure it’s properly connected and the power outlet is working. If the drive is powered via USB, try connecting it to a powered USB hub or directly to a USB port on your Mac. Some older Macs have USB ports that don’t supply enough power for certain external drives.
2.3. Check Finder Preferences
macOS allows you to control which items appear on your desktop and in Finder. Follow these steps to ensure external hard drives are set to be visible:
- Open Finder.
- Go to Finder in the menu bar and select Preferences.
- Click on the General tab.
- Make sure the checkbox next to External disks is checked to show external drives on the desktop.
- Click on the Sidebar tab.
- Under Locations, make sure the checkbox next to External disks is checked to show external drives in the Finder sidebar.
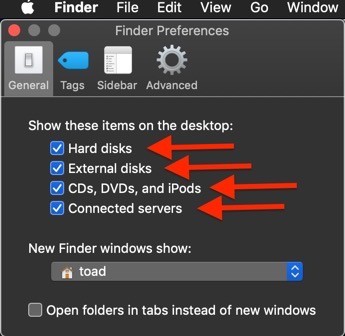 Finder Preferences General External Disks
2.4. Restart Your Mac
A simple restart can often resolve minor software glitches that might be preventing your Mac from recognizing the hard drive. Go to the Apple menu and select Restart.
3. Using Disk Utility to Diagnose and Repair
Disk Utility is a built-in macOS tool that can help you diagnose and repair disk-related issues. Here’s how to use it:
3.1. Open Disk Utility
- Go to Applications > Utilities.
- Open Disk Utility.
3.2. Check if the Hard Drive is Listed
In the Disk Utility window, look for your external hard drive in the sidebar on the left. If the drive is listed but grayed out, it means macOS recognizes the drive but it’s not mounted. If the drive isn’t listed at all, it could indicate a more serious problem with the connection or the drive itself.
3.3. Mount the Hard Drive
If the hard drive is listed but not mounted, select it in the sidebar and click the Mount button in the toolbar. If the drive mounts successfully, you should be able to access it in Finder.
3.4. Run First Aid
First Aid is a Disk Utility feature that can repair minor file system errors. To run First Aid:
- Select the external hard drive in the sidebar.
- Click the First Aid button in the toolbar.
- Click Run to start the repair process.
- Follow any on-screen instructions.
Disk Utility will check the disk for errors and attempt to repair them. This process can take some time, depending on the size and condition of the drive.
3.5. Erase and Reformat (Last Resort)
If First Aid fails or if you’re still unable to access the drive, you might need to erase and reformat it. Warning: This will erase all data on the drive. Only proceed with this option if you have a backup of your data or if you’re willing to lose the data on the drive.
- Select the external hard drive in the sidebar.
- Click the Erase button in the toolbar.
- Enter a name for the drive.
- Choose a format. For macOS, APFS or Mac OS Extended (Journaled) are good choices. If you need to use the drive with Windows computers as well, choose ExFAT.
- Click Erase to start the formatting process.
4. Advanced Troubleshooting Steps
If the simple solutions and Disk Utility don’t resolve the issue, try these more advanced troubleshooting steps:
4.1. Reset SMC (System Management Controller)
The SMC controls various hardware functions on your Mac. Resetting the SMC can sometimes resolve issues with external devices. The process for resetting the SMC varies depending on your Mac model. Refer to Apple’s support documentation for instructions specific to your Mac: How to reset the SMC of your Mac – Apple Support.
4.2. Reset NVRAM/PRAM
NVRAM (Non-Volatile Random-Access Memory) or PRAM (Parameter RAM) stores certain system settings. Resetting NVRAM/PRAM can sometimes resolve issues with hardware recognition. To reset NVRAM/PRAM:
- Shut down your Mac.
- Turn on your Mac, then immediately press and hold these four keys together: Option, Command, P, and R.
- Release the keys after about 20 seconds, during which your Mac might appear to restart.
- When your Mac finishes starting up, you might need to adjust any system settings that were reset. Refer to Apple’s support documentation for instructions specific to your Mac: Reset NVRAM on your Mac – Apple Support.
4.3. Check System Information
System Information can provide details about the hardware connected to your Mac. To check System Information:
- Go to Applications > Utilities.
- Open System Information.
- In the sidebar, under Hardware, select USB.
- Look for your external hard drive in the list of connected USB devices. If the drive is listed, it means your Mac recognizes it at a hardware level, even if it’s not mounting. If it’s not listed, it could indicate a more serious hardware issue.
4.4. Check Disk Permissions
Sometimes, incorrect disk permissions can prevent your Mac from accessing the hard drive. To check and repair disk permissions:
- Open Disk Utility.
- Select the external hard drive in the sidebar.
- Click the First Aid button. Disk Utility in newer macOS versions automatically handles permissions during the First Aid process.
4.5. Boot into Safe Mode
Safe Mode starts your Mac with a minimal set of drivers and extensions. This can help you determine if a third-party software conflict is causing the issue. To boot into Safe Mode:
- Shut down your Mac.
- Restart your Mac and immediately press and hold the Shift key.
- Release the Shift key when you see the login window.
- Try connecting the external hard drive in Safe Mode. If it works in Safe Mode, it’s likely that a third-party software conflict is the cause.
4.6. Test on Another Computer
To rule out a problem with your Mac, try connecting the external hard drive to another computer, preferably a different Mac or a Windows PC. If the drive works on another computer, the issue is likely specific to your Mac. If the drive doesn’t work on any computer, it could indicate a hardware failure.
5. Data Recovery Options
If you suspect that your hard drive has failed or if you’re unable to access your data after trying the troubleshooting steps above, you might need to consider data recovery options.
5.1. Data Recovery Software
Several data recovery software programs are available that can help you recover data from a failing or corrupted hard drive. Some popular options include:
- EaseUS Data Recovery Wizard: A user-friendly data recovery tool with a good track record.
- Stellar Data Recovery: A comprehensive data recovery solution with advanced features.
- Disk Drill: A versatile data recovery tool that can recover data from various types of storage devices.
5.2. Professional Data Recovery Services
If the data on your hard drive is critical and you’re not comfortable attempting data recovery yourself, you might want to consider using a professional data recovery service. These services have specialized equipment and expertise to recover data from severely damaged hard drives. Some reputable data recovery services include:
- DriveSavers: A well-known data recovery service with a high success rate.
- Ontrack Data Recovery: A global data recovery provider with extensive experience.
- Secure Data Recovery: A data recovery service with a focus on security and confidentiality.
6. Preventing Future Hard Drive Issues
To minimize the risk of encountering hard drive issues in the future, follow these tips:
- Regular Backups: Back up your data regularly to an external hard drive, cloud storage, or both. This ensures that you have a copy of your important files in case of a hard drive failure or other data loss event.
- Safely Eject Drives: Always use the “eject” function in Finder or on the desktop before disconnecting an external hard drive. This prevents file system corruption.
- Handle Drives with Care: Avoid dropping or bumping external hard drives, as this can damage the internal components.
- Keep Drives Cool: Overheating can shorten the lifespan of a hard drive. Ensure that your external hard drive has adequate ventilation.
- Monitor Drive Health: Use Disk Utility or third-party tools to monitor the health of your hard drive and detect potential problems early on.
- Use a High-Quality Cable: A damaged or low-quality cable can cause connection problems and data corruption. Use a high-quality cable that is specifically designed for data transfer.
- Avoid Overfilling the Drive: A hard drive that is constantly near its capacity can become fragmented and slow down. Leave at least 10-15% of the drive’s capacity free.
- Keep Your Mac Updated: Software updates often include bug fixes and improvements that can improve the stability and performance of your Mac and its peripherals. Keep your macOS and firmware up to date.
7. Understanding Hard Drive Formats
The format of your external hard drive can impact its compatibility with different operating systems. Here’s a brief overview of common hard drive formats:
| Format | Description | Compatibility |
|---|---|---|
| APFS | Apple File System. The default file system for macOS High Sierra and later. | Best for macOS. May not be compatible with older macOS versions or Windows without additional software. |
| Mac OS Extended (Journaled) | Also known as HFS+. The traditional file system for macOS. | Compatible with macOS and older versions of macOS. Read-only compatibility with Windows using additional software. |
| ExFAT | Extended File Allocation Table. Designed for flash drives and external hard drives. | Compatible with macOS and Windows. Ideal for drives that need to be used with both operating systems. No file size limit. |
| FAT32 | File Allocation Table 32. An older file system that is widely compatible. | Compatible with macOS, Windows, and other operating systems. Limited to a maximum file size of 4GB. Not recommended for large hard drives. |
| NTFS | NT File System. The default file system for Windows. | Read-only compatibility with macOS. Requires additional software for full read-write compatibility. Best for Windows-based drives. |
Choosing the right format depends on how you plan to use the drive and which operating systems you need to support.
8. Addressing Specific Scenarios
Here are some specific scenarios and potential solutions:
8.1. Hard Drive Not Showing Up After macOS Update
After updating macOS, some users experience issues with external hard drives not showing up. This can be due to compatibility issues or changes in system settings. Try the following:
- Restart your Mac.
- Check Finder Preferences.
- Reset SMC and NVRAM/PRAM.
- Update drive firmware (if available).
- Reinstall macOS (as a last resort).
8.2. Hard Drive Not Showing Up After Connecting to a USB Hub
USB hubs can sometimes cause issues with external hard drives, especially if the hub is not powered or if it’s not providing enough power to the drive. Try the following:
- Connect the hard drive directly to your Mac.
- Use a powered USB hub.
- Try a different USB hub.
- Ensure the USB hub is compatible with your Mac and the hard drive.
8.3. Hard Drive Not Showing Up on a New Mac
If you’re trying to use an old hard drive on a new Mac, it might not be compatible due to the file system format. Try the following:
- Determine the file system format of the drive.
- If the drive is formatted with NTFS, install software on your Mac that allows you to read and write to NTFS drives (e.g., NTFS for Mac by Paragon Software).
- If the drive is formatted with an older format that is not compatible with your new Mac, back up the data on the drive and reformat it to a compatible format (e.g., ExFAT).
8.4. Hard Drive Showing Up But Not Accessible
If the hard drive is showing up in Disk Utility but you can’t access the files on it, it could indicate a file system error or permission issue. Try the following:
- Run First Aid in Disk Utility.
- Check disk permissions.
- Try to recover data using data recovery software.
- Reformat the drive (as a last resort).
9. The Role of Firmware Updates
Firmware is the software embedded in your hard drive that controls its basic functions. Manufacturers sometimes release firmware updates to improve performance, fix bugs, and enhance compatibility. Check the manufacturer’s website for your specific hard drive model to see if any firmware updates are available. Follow the manufacturer’s instructions carefully when updating the firmware. A failed firmware update can render your hard drive unusable.
10. Understanding S.M.A.R.T. Status
S.M.A.R.T. (Self-Monitoring, Analysis, and Reporting Technology) is a monitoring system built into most hard drives that tracks various indicators of drive health. You can use Disk Utility or third-party tools to check the S.M.A.R.T. status of your hard drive. A “Verified” or “OK” status indicates that the drive is functioning normally. A “Failing” status indicates that the drive is experiencing problems and might fail soon. If your hard drive has a “Failing” S.M.A.R.T. status, back up your data immediately and replace the drive.
11. External SSD vs. HDD: Which is Better?
When choosing an external storage device, you’ll typically have two options: Solid State Drive (SSD) or Hard Disk Drive (HDD). Here’s a comparison:
| Feature | SSD | HDD |
|---|---|---|
| Speed | Much faster (up to several times faster) | Slower |
| Durability | More durable (no moving parts) | Less durable (moving parts) |
| Noise | Silent | Can be noisy |
| Power Consumption | Lower | Higher |
| Price | More expensive per gigabyte | Less expensive per gigabyte |
| Fragmentation | Not susceptible to fragmentation | Susceptible to fragmentation |
| Lifespan | Limited write cycles, but typically long enough for most users | Potentially longer lifespan if handled carefully |
| Use Cases | Ideal for performance-critical tasks, frequent use, and portability | Suitable for large storage needs, backups, and less frequent access |
For most users, an external SSD is the better choice due to its speed and durability. However, if you need a large amount of storage and are on a budget, an HDD might be a more cost-effective option.
12. Securely Erasing a Hard Drive
If you’re planning to sell or dispose of your hard drive, it’s important to securely erase it to prevent your data from being recovered. Simply deleting files or formatting the drive is not enough. Securely erasing a hard drive overwrites the data multiple times, making it very difficult to recover. Disk Utility includes a secure erase option, but it’s only available for HDDs, not SSDs. For SSDs, the standard erase function in Disk Utility is sufficient to securely erase the data. You can also use third-party software designed for securely erasing SSDs.
13. Troubleshooting Disk Utility Errors
While using Disk Utility, you might encounter errors such as “Operation Failed” or “Disk Utility Can’t Repair This Disk.” These errors can indicate a serious problem with the hard drive. Try the following:
- Run First Aid multiple times.
- Try a different cable and port.
- Boot into Recovery Mode and run Disk Utility from there.
- Use third-party disk repair software.
- Consult a professional data recovery service.
14. Understanding Disk Partitioning
Disk partitioning is the process of dividing a hard drive into multiple logical volumes, each with its own file system. Partitioning can be useful for organizing your data, running multiple operating systems, or creating separate backups. Disk Utility allows you to create, delete, and modify partitions on your hard drive. However, be careful when partitioning a drive, as errors can result in data loss.
15. Optimizing External Hard Drive Performance
To optimize the performance of your external hard drive, consider the following tips:
- Defragment the drive (HDDs only): Over time, files on an HDD can become fragmented, slowing down performance. Use Disk Utility or third-party software to defragment the drive. This is not necessary for SSDs.
- Keep the drive clean: Remove unnecessary files and programs from the drive to free up space and improve performance.
- Use a fast interface: Use a USB 3.0 or Thunderbolt connection for the fastest data transfer speeds.
- Avoid running resource-intensive tasks directly from the external drive: Copy files to your Mac’s internal drive for tasks that require high performance.
- Optimize Spotlight indexing: Exclude the external drive from Spotlight indexing to prevent it from slowing down your Mac.
- Disable Time Machine backups to the drive (if not needed): Time Machine backups can consume significant resources and slow down the drive.
16. Checking for macOS Compatibility
Ensure that your external hard drive is compatible with the version of macOS you are running. Check the manufacturer’s website for compatibility information. Older hard drives might not be fully compatible with newer versions of macOS, and vice versa.
17. The Impact of Malware
In rare cases, malware can interfere with the recognition or mounting of external hard drives. Run a full system scan with a reputable antivirus program to check for malware. Remove any malware that is detected.
18. Using the Terminal
For advanced users, the Terminal provides powerful tools for troubleshooting hard drive issues. You can use Terminal commands to mount, unmount, repair, and gather information about your hard drive. However, be careful when using Terminal commands, as incorrect commands can result in data loss or system damage.
19. Seeking Professional Help
If you’ve tried all the troubleshooting steps and are still unable to resolve the issue, it might be time to seek professional help. An Apple Store or an authorized Apple service provider can diagnose and repair hardware or software problems.
20. Keeping Your Data Safe
The most important thing is to keep your data safe. Regular backups, safe handling practices, and proactive maintenance can help prevent hard drive issues and data loss.
FAQ: Common Questions About Hard Drives Not Showing Up on Mac
Q1: Why is my external hard drive not showing up on my Mac’s desktop?
A: Ensure that the “External disks” option is checked in Finder Preferences under the General tab. This setting controls whether external drives appear on your desktop.
Q2: My external hard drive is not mounting on my Mac. What should I do?
A: Open Disk Utility and select the drive. Click the “Mount” button in the toolbar. If it still doesn’t mount, try running First Aid to repair any file system errors.
Q3: How do I know if my external hard drive is failing?
A: Check the S.M.A.R.T. status of the drive in Disk Utility. A “Failing” status indicates that the drive is experiencing problems and might fail soon.
Q4: What file system format should I use for my external hard drive on a Mac?
A: For macOS, APFS or Mac OS Extended (Journaled) are good choices. If you need to use the drive with Windows computers as well, choose ExFAT.
Q5: Can I recover data from a hard drive that is not showing up on my Mac?
A: Yes, it might be possible to recover data using data recovery software or a professional data recovery service. The success of data recovery depends on the extent of the damage to the drive.
Q6: What is the difference between an SSD and an HDD external hard drive?
A: SSDs are faster, more durable, and more expensive per gigabyte than HDDs. HDDs are slower, less durable, and less expensive per gigabyte than SSDs.
Q7: How do I safely eject an external hard drive from my Mac?
A: Drag the drive icon to the Trash (which turns into an Eject icon) or right-click the drive icon on the desktop and select “Eject.” You can also use the Eject button in the Finder sidebar.
Q8: Why does my hard drive not show up after a macOS update?
A: This can be due to compatibility issues or changes in system settings. Try restarting your Mac, checking Finder Preferences, and resetting SMC and NVRAM/PRAM.
Q9: What should I do if Disk Utility says “Operation Failed” when trying to repair my hard drive?
A: Try running First Aid multiple times, using a different cable and port, booting into Recovery Mode and running Disk Utility from there, or using third-party disk repair software.
Q10: Is it safe to use Terminal commands to troubleshoot hard drive issues on my Mac?
A: Terminal commands can be powerful tools for troubleshooting, but they can also be dangerous if used incorrectly. Only use Terminal commands if you are comfortable with the command line interface and understand the commands you are using.
Conclusion
Encountering a hard drive that won’t show up on your Mac can be a daunting experience. However, by systematically following the steps outlined in this comprehensive guide, you can effectively diagnose and resolve the issue. From simple connection checks to advanced troubleshooting techniques, you now have the knowledge to tackle this problem head-on. Remember the importance of regular backups and safe handling practices to prevent future occurrences.
If you’re still facing difficulties or have more specific questions, don’t hesitate to seek further assistance. WHY.EDU.VN is here to provide expert solutions and in-depth answers to all your tech-related queries. Visit our website at WHY.EDU.VN, located at 101 Curiosity Lane, Answer Town, CA 90210, United States, or reach out to us via WhatsApp at +1 (213) 555-0101. Our team of experts is ready to help you navigate any technical challenge you may encounter. Let why.edu.vn be your trusted resource for reliable and comprehensive answers!