Why Did All My Notes Disappeared On My Iphone? Facing the sudden disappearance of crucial notes on your iPhone can be a distressing experience, and WHY.EDU.VN is here to provide answers. We’ll explore potential causes and effective solutions to recover your lost notes and prevent future occurrences, including iCloud sync issues, accidental deletion, and software glitches, offering you peace of mind and restoring your valuable information with note retrieval, data recovery methods, and troubleshooting tips.
1. Understanding Why Your Notes Disappeared
The disappearance of notes from your iPhone can stem from various reasons. Identifying the cause is the first step toward finding a solution. Here are some common culprits:
- iCloud Sync Issues: Notes are often synced with iCloud for backup and accessibility across devices. If the sync process is interrupted or encounters errors, notes may disappear from your iPhone.
- Accidental Deletion: It’s easy to accidentally delete notes, especially when managing multiple files or quickly navigating through the Notes app.
- Software Glitches: Bugs or glitches in the iOS operating system can sometimes cause notes to disappear. This is more common after software updates or during periods of system instability.
- Incorrect Account Settings: Notes can be stored in different accounts (iCloud, Gmail, etc.). If the default account setting is changed, notes might seem to vanish.
- iOS Updates: Occasionally, iOS updates can cause unexpected changes to app data. While rare, this can lead to notes disappearing.
- Storage Problems: Although less common, if your iPhone is critically low on storage, it might affect how apps, including Notes, function.
Understanding these potential causes can help you narrow down the appropriate troubleshooting steps. Let’s explore each of these causes in more detail.
1.1. iCloud Synchronization Problems
iCloud is designed to keep your data consistent across all your Apple devices. However, synchronization issues can arise due to several factors:
- Network Connectivity: A weak or unstable internet connection can disrupt the synchronization process. iCloud requires a stable connection to properly upload and download data.
- iCloud Status: Apple’s iCloud service occasionally experiences outages or maintenance. You can check the Apple System Status page to see if there are any known issues.
- iCloud Account Issues: Problems with your Apple ID or iCloud account, such as incorrect login credentials or billing issues, can prevent synchronization.
- Conflicting Settings: Incorrect settings on your iPhone or other devices connected to the same iCloud account can cause conflicts. For example, if notes are set to sync from one device but not another, discrepancies can occur.
1.2. Accidental Deletion of Notes
Accidental deletion is a common cause of missing notes. The Notes app does have a “Recently Deleted” folder, but it only retains notes for a limited time. Here are some scenarios where accidental deletion can occur:
- Unintentional Swipe: Swiping left on a note in the Notes app can easily lead to accidental deletion if you’re not careful.
- Bulk Actions: Performing bulk actions, such as organizing or moving notes, can sometimes result in unintentional deletion.
- Child’s Play: If a child is using your device, they might accidentally delete notes without realizing it.
1.3. Software Bugs and Glitches
Software bugs and glitches can cause data loss or app malfunctions. Here’s why they happen:
- iOS Bugs: The iOS operating system, like any software, can have bugs that cause unexpected behavior in apps.
- App-Specific Glitches: The Notes app itself might have glitches that lead to notes disappearing. These can be triggered by specific actions or conditions within the app.
- Memory Issues: Insufficient memory or RAM can sometimes cause apps to crash or behave erratically, potentially leading to data loss.
1.4. Incorrect Account Settings
Notes can be stored in various accounts, leading to confusion if the settings are incorrect. Here’s what to consider:
- Default Account: The default account setting in the Notes app determines where new notes are saved. If this is set to an account you don’t regularly use, your notes might seem to disappear.
- Multiple Accounts: Many users have multiple email accounts (iCloud, Gmail, Exchange) connected to their iPhone. Notes can be stored in any of these accounts.
- Account Changes: Changes to account settings, such as disabling an account or changing its password, can affect the visibility of notes stored in that account.
1.5. Impact of iOS Updates
While iOS updates typically improve device performance, they can sometimes cause unexpected issues:
- Data Migration: During an update, data migration processes can sometimes fail, leading to data loss.
- Compatibility Issues: New iOS versions might introduce compatibility issues with certain apps, including Notes.
- Setting Resets: Updates can sometimes reset app settings to default, which might affect how notes are stored and displayed.
1.6. iPhone Storage Capacity Issues
Running low on storage can impact your iPhone’s functionality:
- Performance Degradation: When your iPhone is nearly full, it can slow down significantly, affecting how apps perform.
- Syncing Problems: Limited storage can prevent iCloud from properly syncing notes and other data.
- Data Corruption: In extreme cases, running out of storage can lead to data corruption, causing notes to disappear or become inaccessible.
By understanding these potential causes, you can take more targeted steps to recover your notes and prevent future incidents. Now, let’s explore how to recover your lost notes effectively.
2. Immediate Steps to Take When Notes Disappear
When you realize your notes have disappeared, taking quick action can improve your chances of recovery. Here are immediate steps to consider:
- Check the “Recently Deleted” Folder: The Notes app has a “Recently Deleted” folder where deleted notes are stored for about 30 days.
- Restart Your iPhone: Restarting your iPhone can resolve temporary software glitches that might be causing the issue.
- Check Your Internet Connection: Ensure you have a stable internet connection to allow iCloud to sync properly.
- Verify iCloud Status: Check the Apple System Status page to see if there are any known iCloud outages.
- Sign Out and Back into iCloud: Signing out and back into your iCloud account can refresh the connection and resolve sync issues.
2.1. Checking the “Recently Deleted” Folder
The “Recently Deleted” folder is the first place to look when notes go missing. Here’s how to access it:
- Open the Notes app on your iPhone.
- Tap the < button in the top-left corner to navigate back to the Folders list.
- Look for the Recently Deleted folder.
- Tap on it to view recently deleted notes.
- If you find your missing note, tap on it, then tap the Move button at the bottom.
- Choose a folder to move the note back to (e.g., Notes, iCloud).
2.2. Restarting Your iPhone
Restarting your iPhone can resolve minor software glitches:
- For iPhones with Face ID:
- Press and hold either the Volume Up or Volume Down button and the Side button until the power-off slider appears.
- Drag the slider to turn your iPhone off.
- After a few seconds, press and hold the Side button again until you see the Apple logo.
- For iPhones with a Home Button:
- Press and hold the Side (or Top) button until the power-off slider appears.
- Drag the slider to turn your iPhone off.
- After a few seconds, press and hold the Side (or Top) button again until you see the Apple logo.
2.3. Checking Your Internet Connection
A stable internet connection is crucial for iCloud syncing:
- Open the Settings app on your iPhone.
- Tap on Wi-Fi and ensure you are connected to a stable network.
- If you’re using cellular data, make sure it is enabled for the Notes app under Settings > Cellular.
- Try toggling Wi-Fi off and on again to refresh the connection.
2.4. Verifying iCloud Status
Check Apple’s System Status page to ensure iCloud is working correctly:
- Visit the Apple System Status page in your web browser.
- Look for the Notes and iCloud services.
- If there is a green dot next to these services, they are functioning normally. If not, there might be an outage or maintenance in progress.
2.5. Signing Out and Back into iCloud
Refreshing your iCloud connection can resolve sync issues:
- Open the Settings app on your iPhone.
- Tap on your Apple ID at the top.
- Scroll down and tap Sign Out.
- Enter your Apple ID password and tap Turn Off.
- Choose which data you want to keep on your iPhone and tap Sign Out.
- Once signed out, sign back in using your Apple ID and password.
By following these immediate steps, you can quickly address common causes of disappearing notes and potentially recover your lost data. If these steps don’t work, more advanced troubleshooting might be necessary. Let’s explore these in the next section.
3. Advanced Troubleshooting Techniques
If the initial steps didn’t restore your notes, more advanced troubleshooting techniques might be needed. These include checking iCloud settings, verifying default account settings, updating your iOS, and freeing up storage space.
- Check iCloud Settings for Notes: Ensure that Notes are enabled in your iCloud settings to sync properly.
- Verify Default Account Settings in Notes: Make sure the default account for saving notes is set correctly.
- Update Your iOS: Ensure your iPhone is running the latest version of iOS to avoid bugs and compatibility issues.
- Free Up Storage Space on Your iPhone: If your iPhone is low on storage, freeing up space can improve performance and syncing.
- Restore from a Backup: If you have a recent backup, restoring your iPhone from that backup can recover your lost notes.
3.1. Checking iCloud Settings for Notes
Verify that Notes are enabled in your iCloud settings:
- Open the Settings app on your iPhone.
- Tap on your Apple ID at the top.
- Tap on iCloud.
- Under Apps Using iCloud, tap Show All.
- Ensure that the toggle next to Notes is turned on (green).
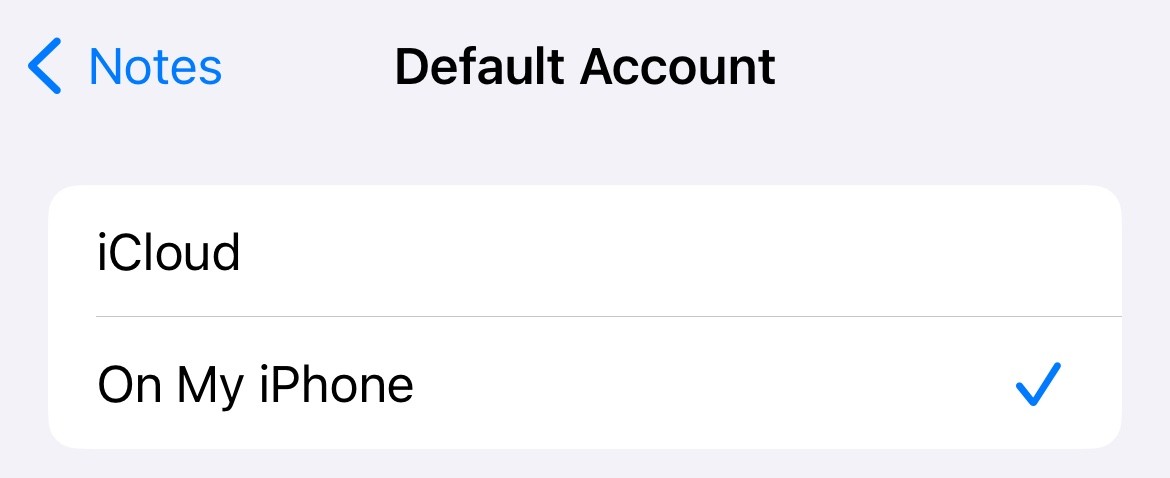
3.2. Verifying Default Account Settings in Notes
Set the default account for saving notes correctly:
- Open the Settings app on your iPhone.
- Scroll down and tap on Notes.
- Tap on Default Account.
- Choose the account you want to use for saving new notes (e.g., iCloud).
3.3. Updating Your iOS
Keep your iPhone updated to the latest iOS version:
- Open the Settings app on your iPhone.
- Tap on General.
- Tap on Software Update.
- If an update is available, tap Download and Install.
- Follow the on-screen instructions to complete the update.
3.4. Freeing Up Storage Space on Your iPhone
Manage your iPhone’s storage to ensure optimal performance:
- Open the Settings app on your iPhone.
- Tap on General.
- Tap on iPhone Storage.
- Review the recommendations for freeing up space, such as offloading unused apps, deleting large files, and optimizing photos.
- Follow the on-screen instructions to free up storage.
3.5. Restoring from a Backup
If you have a recent backup, restoring from it can recover your notes:
- Back Up Your Current Data: Before restoring, back up your current data to avoid losing anything new.
- Erase Your iPhone:
- Open the Settings app on your iPhone.
- Tap on General.
- Tap on Transfer or Reset iPhone.
- Tap on Erase All Content and Settings.
- Follow the on-screen instructions to erase your iPhone.
- Restore from iCloud Backup:
- After your iPhone restarts, follow the on-screen instructions to set it up.
- When you reach the Apps & Data screen, tap Restore from iCloud Backup.
- Sign in to your iCloud account.
- Choose the most recent backup from the list.
- Follow the on-screen instructions to complete the restoration process.
- Restore from a Computer Backup:
- Connect your iPhone to the computer you used to create the backup.
- Open Finder (on macOS Catalina or later) or iTunes (on older macOS versions or Windows).
- Select your iPhone when it appears in Finder or iTunes.
- Click Restore Backup.
- Choose the most recent backup from the list.
- Enter your backup password if prompted.
- Follow the on-screen instructions to complete the restoration process.
By trying these advanced troubleshooting techniques, you increase your chances of recovering your lost notes. However, if you still face issues, professional help might be necessary. Let’s explore professional recovery options in the next section.
4. Professional Data Recovery Options
If you’ve exhausted all troubleshooting steps and still can’t recover your notes, consider professional data recovery services. These services have specialized tools and expertise to retrieve lost data from iPhones.
- Apple Support: Contact Apple Support for guidance and potential solutions. They might be able to offer assistance or recommend authorized service providers.
- Third-Party Data Recovery Services: Several reputable third-party companies specialize in data recovery for iOS devices.
- Local Tech Repair Shops: Some local tech repair shops offer data recovery services. Ensure they have experience with iOS devices and a good reputation.
4.1. Contacting Apple Support
Apple Support can provide guidance and support for data recovery:
- Visit the Apple Support website.
- Choose iPhone from the product list.
- Select Notes or iCloud as the topic.
- Describe your issue and choose a support option (e.g., chat, phone call).
- Follow the instructions provided by Apple Support.
4.2. Using Third-Party Data Recovery Services
Several reputable third-party companies specialize in data recovery for iOS devices:
- EaseUS MobiSaver: Offers data recovery for various iOS devices.
- Dr.Fone: Provides tools to recover data from iPhones and iPads.
- iMyFone D-Back: Specializes in iOS data recovery with multiple recovery modes.
Before using a third-party service, research their reputation and read reviews to ensure they are reliable and trustworthy.
4.3. Exploring Local Tech Repair Shops
Some local tech repair shops offer data recovery services:
- Check for Certifications: Ensure the repair shop has certified technicians experienced with iOS devices.
- Read Reviews: Look for online reviews to gauge the shop’s reputation and reliability.
- Ask About Their Process: Inquire about the data recovery process, success rates, and privacy policies.
By considering professional data recovery options, you can explore all available avenues to retrieve your lost notes. However, prevention is always better than cure. Let’s look at how you can prevent notes from disappearing in the future.
5. Preventing Future Note Loss
To prevent the recurrence of disappearing notes, implement these best practices:
- Regularly Back Up Your iPhone: Consistent backups ensure you have a recent copy of your data.
- Keep iCloud Sync Enabled: Ensure iCloud sync is always enabled for Notes.
- Manage Your iPhone Storage: Keep your iPhone storage at a reasonable level to ensure smooth performance.
- Avoid Beta Software: Beta versions of iOS can be unstable and cause data loss.
- Use Strong Passwords and Security Measures: Protect your Apple ID with strong passwords and enable two-factor authentication.
5.1. Regularly Backing Up Your iPhone
Regular backups are crucial for data protection:
- Back Up to iCloud:
- Open the Settings app on your iPhone.
- Tap on your Apple ID at the top.
- Tap on iCloud.
- Tap on iCloud Backup.
- Ensure iCloud Backup is turned on.
- Tap Back Up Now to start a manual backup.
- Back Up to a Computer:
- Connect your iPhone to your computer.
- Open Finder (on macOS Catalina or later) or iTunes (on older macOS versions or Windows).
- Select your iPhone when it appears in Finder or iTunes.
- Click Back Up Now.
- Choose whether to encrypt the backup and set a password if desired.
5.2. Keeping iCloud Sync Enabled
Ensure iCloud sync is always enabled for Notes:
- Open the Settings app on your iPhone.
- Tap on your Apple ID at the top.
- Tap on iCloud.
- Under Apps Using iCloud, tap Show All.
- Ensure that the toggle next to Notes is turned on (green).
5.3. Managing Your iPhone Storage
Keep your iPhone storage at a reasonable level:
- Open the Settings app on your iPhone.
- Tap on General.
- Tap on iPhone Storage.
- Review the recommendations for freeing up space and follow the on-screen instructions.
5.4. Avoiding Beta Software
Beta versions of iOS can be unstable:
- Stick to Stable Releases: Use only the official, stable releases of iOS for your primary device.
- Test on Secondary Devices: If you want to try beta software, install it on a secondary device that you don’t rely on for important data.
5.5. Using Strong Passwords and Security Measures
Protect your Apple ID with strong passwords and two-factor authentication:
- Open the Settings app on your iPhone.
- Tap on your Apple ID at the top.
- Tap on Password & Security.
- Tap on Change Password and follow the on-screen instructions to create a strong password.
- Ensure Two-Factor Authentication is turned on for added security.
By following these preventive measures, you can significantly reduce the risk of losing your notes in the future. Now, let’s recap the key points and provide additional resources for further assistance.
6. Conclusion: Recovering and Protecting Your Notes
The disappearance of notes on your iPhone can be a frustrating experience, but understanding the potential causes and taking prompt action can improve your chances of recovery. From checking the “Recently Deleted” folder to considering professional data recovery services, there are multiple avenues to explore.
To prevent future incidents, prioritize regular backups, maintain stable iCloud sync settings, manage your iPhone storage, and use strong security measures. By implementing these best practices, you can safeguard your valuable notes and ensure peace of mind.
At WHY.EDU.VN, we understand the importance of having reliable access to your information. If you have more questions or need further assistance, don’t hesitate to reach out to our experts.
Do you need help recovering your lost notes or have more questions about iPhone data management? Visit WHY.EDU.VN today to ask your questions and get expert advice from our community of professionals. Our team is dedicated to providing accurate, reliable, and easy-to-understand answers to all your tech-related queries. Contact us at 101 Curiosity Lane, Answer Town, CA 90210, United States, or WhatsApp us at +1 (213) 555-0101. We’re here to help you stay informed and protected.
7. FAQ: Frequently Asked Questions About Disappearing iPhone Notes
Here are some frequently asked questions about disappearing iPhone notes, along with detailed answers to help you understand and address the issue:
| Question | Answer |
|---|---|
| Why did my notes disappear after updating iOS? | iOS updates can sometimes cause data migration issues or reset app settings. First, check the “Recently Deleted” folder. Then, verify your iCloud settings for Notes and ensure your default account setting is correct. If the issue persists, try restoring from a recent backup. |
| How do I check if my notes are syncing with iCloud? | Open the Settings app on your iPhone, tap on your Apple ID, then tap on iCloud. Under Apps Using iCloud, tap Show All and ensure the toggle next to Notes is turned on (green). This ensures your notes are being synced with iCloud. |
| What is the “Recently Deleted” folder in Notes? | The “Recently Deleted” folder is a temporary storage location for notes that have been deleted. Notes remain in this folder for about 30 days before being permanently deleted. You can access it by opening the Notes app and navigating back to the Folders list. |
| Can low iPhone storage cause notes to disappear? | Yes, if your iPhone is critically low on storage, it can affect how apps function, including the Notes app. Limited storage can prevent iCloud from properly syncing notes and might lead to performance degradation or data corruption. Freeing up storage space can resolve these issues. |
| How can I free up storage space on my iPhone? | Open the Settings app, tap on General, then tap on iPhone Storage. Review the recommendations for freeing up space, such as offloading unused apps, deleting large files, and optimizing photos. Follow the on-screen instructions to free up storage. |
| What should I do if I accidentally deleted a note? | Immediately check the “Recently Deleted” folder in the Notes app. If the note is there, you can move it back to your desired folder. If the note is not in the “Recently Deleted” folder, you may need to restore from a backup or consider professional data recovery services. |
| How often should I back up my iPhone? | It’s recommended to back up your iPhone regularly, ideally at least once a week. This ensures you have a recent copy of your data in case of data loss or other issues. You can back up to iCloud or to a computer. |
| Is it safe to use third-party data recovery services? | Using third-party data recovery services can be helpful, but it’s important to choose a reputable and trustworthy provider. Research their reputation, read reviews, and ask about their data recovery process and privacy policies before entrusting them with your device. |
| How can I protect my Apple ID from unauthorized access? | Protect your Apple ID by using a strong, unique password and enabling two-factor authentication. This adds an extra layer of security by requiring a verification code from a trusted device when you sign in to your Apple ID on a new device. |
| What are the benefits of using iCloud for notes? | Using iCloud for notes allows you to sync your notes across all your Apple devices, ensuring you have access to them wherever you go. iCloud also provides a backup of your notes, protecting them from data loss due to device issues or accidental deletion. |

By understanding these FAQs, you can better manage your iPhone notes and take proactive steps to prevent data loss. Always remember to back up your data regularly and keep your device secure.
8. Glossary of Terms
To help you better understand the concepts discussed in this article, here is a glossary of terms:
| Term | Definition |
|---|---|
| iCloud | Apple’s cloud storage and cloud computing service used to sync data across devices. |
| iOS | The operating system used on Apple iPhones and iPads. |
| Backup | A copy of data that can be used to restore a device to a previous state. |
| Two-Factor Authentication | A security process that requires two methods of authentication to verify a user’s identity. |
| Default Account | The account that is automatically used to save new notes. |
| Data Recovery | The process of retrieving lost, inaccessible, or corrupted data from storage devices. |
| Beta Software | Pre-release versions of software that are used for testing purposes and may contain bugs or instability. |
| Sync | The process of updating data across multiple devices to ensure consistency. |
| Apple ID | The personal account used to access Apple services, such as iCloud, the App Store, and more. |
| System Status | A page on Apple’s website that provides information about the current status of Apple’s services, such as iCloud and Notes. |
| E-E-A-T | Experience, Expertise, Authoritativeness, and Trustworthiness. A Google framework for evaluating content quality. |
| YMYL | Your Money or Your Life. A category of topics that Google considers to potentially impact a person’s future happiness, health, financial stability, or safety. |
By familiarizing yourself with these terms, you’ll be better equipped to understand and address issues related to your iPhone notes and data management.
9. Further Reading and Resources
To expand your knowledge and understanding of iPhone data management and troubleshooting, here are some valuable resources:
- Apple Support Website: The official Apple Support website offers a wealth of information, troubleshooting guides, and tutorials for all Apple products.
- Apple Support Communities: A forum where Apple users can ask questions, share tips, and discuss issues related to Apple products.
- iMore: A website dedicated to providing news, reviews, and tutorials for Apple devices and software.
- 9to5Mac: A website that covers Apple news, rumors, and in-depth analysis of Apple products.
- MacRumors: A website that aggregates Apple news, rumors, and discussions from various sources.
By exploring these resources, you can stay informed about the latest tips, tricks, and troubleshooting techniques for your iPhone and other Apple devices.
10. Disclaimer
The information provided in this article is intended for general informational purposes only and does not constitute professional advice. While we strive to provide accurate and up-to-date information, technology and best practices can change rapidly. Always exercise caution when making changes to your device and consult with a qualified professional if you have any concerns.
why.edu.vn is not responsible for any loss of data or damage to your device that may result from following the steps outlined in this article. Always back up your data before attempting any troubleshooting or data recovery procedures.
This article may contain links to third-party websites or services. We are not responsible for the content or privacy practices of these websites or services. Use them at your own risk.
By using this article, you agree to these terms and conditions. If you do not agree with these terms, please do not use this article.