Is your laptop fan excessively noisy? Don’t worry, WHY.EDU.VN is here to help you understand why your laptop’s cooling fan is making so much noise and provide practical solutions to fix it. We’ll explore potential causes, such as overheating and hardware issues, and provide effective strategies to quiet down your laptop and improve its performance. Let’s explore solutions for fan noise, cooling system performance and thermal management.
1. Understanding the Culprit: Why Laptop Fans Get Loud
A loud laptop fan is a common issue, but it’s crucial to understand the underlying causes to address it effectively. Often, it’s not just a matter of annoyance but also an indicator of potential problems within your device. Let’s explore some common reasons why your laptop fan might be working overtime:
1.1. Overheating: The Primary Suspect
Overheating is often the primary reason behind a noisy laptop fan. This can occur due to several factors:
- Intensive Tasks: Running demanding applications like video games, video editing software, or complex simulations pushes your laptop’s processor and graphics card to their limits. This generates significant heat, forcing the fan to spin faster to dissipate it.
- Dust Accumulation: Over time, dust and debris accumulate inside your laptop, particularly around the fan and vents. This buildup restricts airflow, preventing efficient cooling and causing the components to overheat.
- Ambient Temperature: Using your laptop in a hot environment can also contribute to overheating. The fan has to work harder to maintain a safe operating temperature when the surrounding air is already warm.
1.2. Hardware Issues: When the Fan Itself is the Problem
Sometimes, the fan itself is the source of the noise. This can be due to:
- Physical Damage: A drop or impact can damage the fan blades or bearings, causing them to vibrate or grind against the housing, resulting in a loud, irritating noise.
- Wear and Tear: Like any mechanical component, laptop fans can wear out over time. The bearings may become dry or worn, leading to increased friction and noise.
- Loose Connections: In some cases, the fan might not be properly secured to the heatsink or the laptop’s chassis. This can cause vibrations and noise as the fan spins.
1.3. Software and System Issues: Hidden Contributors
While hardware problems are often the first suspect, software and system issues can also play a role:
- Malware Infections: Viruses and other malicious software can consume system resources, causing the processor to work harder and generate more heat. This, in turn, forces the fan to run at higher speeds.
- Driver Problems: Outdated or corrupted drivers for your graphics card or other components can lead to inefficient performance and increased heat generation.
- Background Processes: Many applications run in the background, consuming system resources even when you’re not actively using them. These processes can contribute to overall heat generation.
1.4. Design Flaws & Limitations
Some laptops are simply more prone to fan noise than others due to their design:
- Thin and Light Designs: Ultra-thin laptops often have limited space for cooling systems. This means the fan has to work harder to dissipate heat effectively.
- Poor Ventilation: Some laptops have poorly designed ventilation systems that restrict airflow, leading to higher operating temperatures.
- Component Placement: The placement of heat-generating components can also affect fan noise. If the processor and graphics card are located close together, the fan may have to work harder to cool both.
Understanding these potential causes is the first step towards diagnosing and resolving the issue of a loud laptop fan. The experts at WHY.EDU.VN have the answers.
2. Immediate Actions: Quick Fixes for a Noisy Fan
When your laptop fan starts roaring, try these immediate actions to alleviate the problem:
2.1. Ensure Proper Ventilation
- Hard, Flat Surface: Place your laptop on a hard, flat surface like a desk or table. Avoid soft surfaces like beds, carpets, or cushions, as they can block the air vents and trap heat.
 Laptop on Desk
Alt text: A laptop placed on a clean desk, showcasing proper ventilation and usage on a flat surface.
- External Cooling Pads: Consider using a laptop cooling pad. These devices typically have built-in fans that provide additional airflow to help dissipate heat.
- Clear Surroundings: Ensure that there is ample space around your laptop for air to circulate freely. Avoid placing it in enclosed spaces or near heat sources.
2.2. Close Unnecessary Programs
- Task Manager (Windows): Press
Ctrl + Shift + Escto open the Task Manager. Identify programs that are consuming a significant amount of CPU or memory and close them. - Activity Monitor (macOS): Open Activity Monitor from the Utilities folder in Applications. Similarly, identify and quit resource-intensive processes.
- Browser Tabs: Close any unnecessary browser tabs, as they can consume significant resources, especially if they contain multimedia content or complex scripts.
2.3. Restart Your Laptop
A simple restart can often resolve temporary software glitches that might be causing the fan to run excessively.
2.4. Adjust Power Settings
- Windows: Go to
Control Panel > Hardware and Sound > Power Optionsand select a power plan that prioritizes energy efficiency over performance. - macOS: Go to
System Preferences > Energy Saverand adjust the settings to reduce energy consumption.
These immediate actions can provide temporary relief and help you determine whether the issue is due to simple factors like blocked vents or excessive resource usage. For more in-depth troubleshooting, continue to the next sections.
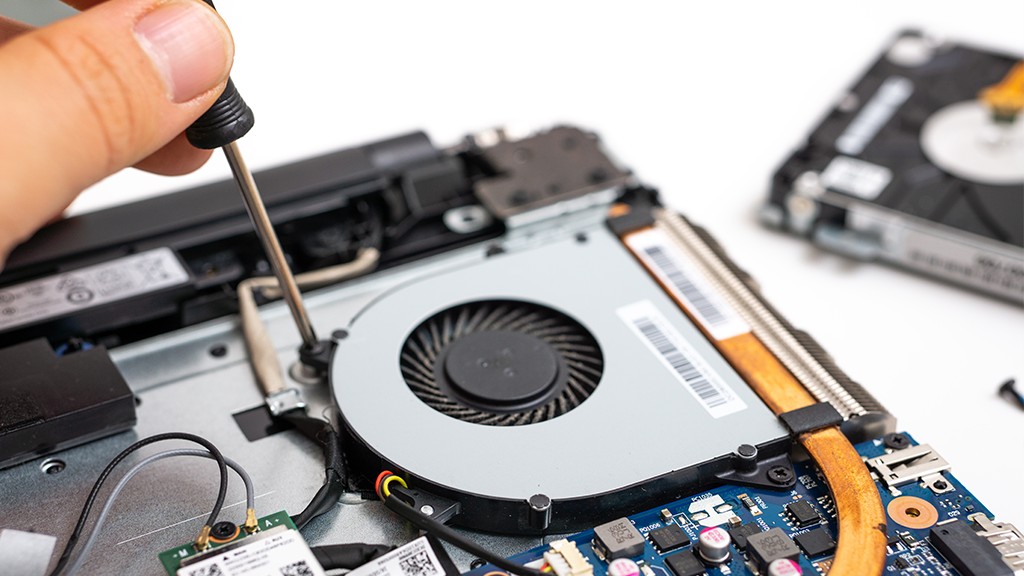
3. Deep Cleaning: Clearing Dust and Debris
Dust accumulation is a common culprit behind noisy laptop fans. Over time, dust and debris clog the vents and heatsinks, restricting airflow and causing the fan to work harder to cool the components. Deep cleaning can significantly improve your laptop’s cooling efficiency and reduce fan noise.
3.1. Tools You’ll Need
- Canned Air: A can of compressed air is essential for blowing dust out of the vents and other hard-to-reach areas.
- Screwdriver Set: You’ll need a set of small screwdrivers to open the laptop’s case. Make sure to use the correct size and type to avoid stripping the screws.
- Soft Brush: A small, soft brush (like a paintbrush or toothbrush) can be used to gently remove dust from delicate components.
- Microfiber Cloth: A microfiber cloth is ideal for wiping down surfaces and removing any remaining dust or debris.
- Anti-Static Wrist Strap (Optional): An anti-static wrist strap can help prevent electrostatic discharge, which can damage sensitive electronic components.
3.2. Safety Precautions
- Power Off: Always turn off your laptop and unplug it from the power adapter before cleaning.
- Ground Yourself: To prevent electrostatic discharge, ground yourself by touching a metal object before touching any internal components.
- Gentle Touch: Be gentle when cleaning delicate components like the fan blades and heatsink fins. Avoid applying excessive pressure.
- Record Everything: Take pictures of each step while disassembling your laptop. This will serve as a visual guide when reassembling it.
3.3. Step-by-Step Cleaning Guide
- Open the Laptop Case:
- Consult your laptop’s manual or online resources to find instructions on how to open the case.
- Carefully remove all screws holding the case together.
- Use a plastic opening tool or your fingers to gently pry the case open, starting from the edges.
- Locate the Fan and Heatsink:
- The fan is usually located near the processor and graphics card.
- The heatsink is a metal structure that sits on top of the processor and graphics card to dissipate heat.
- Clean the Fan:
- Use canned air to blow dust out of the fan blades.
- Hold the can at an angle to avoid spraying liquid propellant into the fan.
- Use a soft brush to gently remove any stubborn dust or debris.
- Clean the Heatsink:
- Use canned air to blow dust out of the heatsink fins.
- Hold the can at an angle to ensure that the air flows through the fins.
- Use a soft brush to gently remove any stubborn dust or debris.
- Clean the Vents:
- Use canned air to blow dust out of the vents on the sides or bottom of the laptop.
- Hold the can at an angle to ensure that the air flows through the vents.
- Reassemble the Laptop:
- Carefully reassemble the laptop case, making sure all components are properly aligned.
- Reinstall all screws, tightening them gently to avoid stripping them.
3.4. When to Seek Professional Help
If you’re not comfortable opening your laptop or if you’re unsure about any of the steps, it’s best to seek professional help. A qualified technician can safely clean your laptop and ensure that no damage is done.
4. Taming Software: Managing Processes and Drivers
Software issues can often contribute to increased fan noise by causing the processor to work harder than necessary. Managing background processes, updating drivers, and scanning for malware can help reduce the load on your system and quiet down the fan.
4.1. Identifying Resource-Intensive Processes
- Windows Task Manager:
- Press
Ctrl + Shift + Escto open the Task Manager. - Click on the “Processes” tab to see a list of running processes.
- Sort the processes by CPU or Memory usage to identify those that are consuming the most resources.
- Press
- macOS Activity Monitor:
- Open Activity Monitor from the Utilities folder in Applications.
- Click on the “CPU” or “Memory” tab to see a list of running processes.
- Sort the processes by “% CPU” or “Memory” to identify those that are consuming the most resources.
4.2. Managing Startup Programs
Many programs are configured to start automatically when you turn on your computer. Disabling unnecessary startup programs can reduce the load on your system and improve boot times.
- Windows:
- Open Task Manager (
Ctrl + Shift + Esc). - Click on the “Startup” tab.
- Disable any programs that you don’t need to start automatically.
- Open Task Manager (
- macOS:
- Go to
System Preferences > Users & Groups. - Select your user account.
- Click on the “Login Items” tab.
- Remove any programs that you don’t need to start automatically.
- Go to
4.3. Updating Drivers
Outdated or corrupted drivers can cause performance issues and increase heat generation. Updating your drivers can often resolve these problems.
- Windows:
- Open Device Manager by searching for it in the Start menu.
- Expand each category to see a list of devices.
- Right-click on each device and select “Update driver”.
- Choose “Search automatically for drivers” to let Windows find and install the latest drivers.
- macOS:
- Click the Apple menu in the corner of your screen, then click “System Preferences”.
- Click “Software Update”. If new software is found, click “Update Now” to install it.
4.4. Scanning for Malware
Malware can consume system resources and cause the processor to work harder, leading to increased fan noise. Run a full system scan with a reputable antivirus program to detect and remove any malware.
5. Advanced Solutions: Fan Control and Thermal Paste
For users who are comfortable with more advanced troubleshooting, controlling fan speeds and reapplying thermal paste can provide significant improvements in cooling performance.
5.1. Fan Control Software
Fan control software allows you to manually adjust the fan speeds based on the temperature of your components. This can be useful for reducing fan noise during light usage or increasing cooling performance during demanding tasks.
- Note: Be cautious when using fan control software, as setting the fan speeds too low can lead to overheating.
5.2. Reapplying Thermal Paste
Thermal paste is a substance that is applied between the processor and the heatsink to improve heat transfer. Over time, thermal paste can dry out or degrade, reducing its effectiveness and causing the processor to overheat.
- Note: Reapplying thermal paste is a delicate process that requires careful attention to detail. If you’re not comfortable with this procedure, it’s best to seek professional help.
5.3. Step-by-Step Guide to Reapplying Thermal Paste
- Gather Supplies: You’ll need thermal paste, isopropyl alcohol, a lint-free cloth, and a small spatula or applicator.
- Remove the Heatsink: Carefully remove the heatsink from the processor.
- Clean the Surfaces: Use a lint-free cloth and isopropyl alcohol to clean the old thermal paste from the processor and the heatsink.
- Apply New Thermal Paste: Apply a small amount of thermal paste to the center of the processor. Use a spatula or applicator to spread it evenly over the surface.
- Reinstall the Heatsink: Carefully reinstall the heatsink onto the processor, making sure it is properly seated.
6. When to Seek Professional Help
If you’ve tried all of the troubleshooting steps outlined in this guide and your laptop fan is still excessively noisy, it’s time to seek professional help. A qualified technician can diagnose the problem and recommend the appropriate solution, whether it’s replacing the fan, repairing the heatsink, or addressing other hardware issues.
7. Prevention: Keeping Your Laptop Cool
Preventing overheating is the best way to keep your laptop fan quiet and extend the life of your device. Follow these tips to maintain optimal cooling performance:
7.1. Regular Cleaning
Clean your laptop’s vents and heatsinks regularly to prevent dust accumulation. Use canned air or a soft brush to remove dust and debris.
7.2. Proper Ventilation
Always use your laptop on a hard, flat surface to ensure proper ventilation. Avoid soft surfaces like beds, carpets, or cushions, as they can block the air vents.
7.3. Monitoring Temperature
Use monitoring software to keep an eye on your laptop’s temperature. If you notice that the temperature is consistently high, take steps to reduce the load on your system.
7.4. Avoid Overclocking
Overclocking can significantly increase heat generation, so avoid overclocking your laptop’s processor or graphics card unless you have adequate cooling.
7.5. Update Software
Keep your operating system, drivers, and applications up to date to ensure optimal performance and efficiency.
8. Choosing the Right Laptop
When purchasing a new laptop, consider the cooling system and thermal design. Look for laptops with efficient cooling systems and well-designed ventilation.
8.1. Research Reviews
Read reviews from reputable sources to learn about the cooling performance of different laptops.
8.2. Consider Your Needs
Choose a laptop that is appropriate for your needs. If you plan to run demanding applications, opt for a laptop with a more powerful cooling system.
9. Addressing Specific Laptop Models
Some laptop models are known to have specific issues with fan noise or cooling performance. Research your specific laptop model to see if there are any known problems or recommended solutions.
9.1. Online Forums
Check online forums and communities for your laptop model to see if other users have experienced similar issues and found solutions.
9.2. Manufacturer Support
Contact the manufacturer’s support team for assistance with any specific problems you may be experiencing.
10. FAQ: Addressing Common Questions About Laptop Fan Noise
Here are some frequently asked questions about laptop fan noise:
10.1. Is it normal for my laptop fan to be loud?
It’s normal for your laptop fan to spin up and become audible when you’re running demanding applications or when the ambient temperature is high. However, if the fan is constantly loud, even during light usage, it could indicate a problem.
10.2. Can a loud fan damage my laptop?
A loud fan itself won’t necessarily damage your laptop, but it’s a sign that your laptop is overheating. Overheating can cause performance issues, shorten the lifespan of components, and even lead to permanent damage.
10.3. How often should I clean my laptop fan?
It’s recommended to clean your laptop fan every 6 months to prevent dust accumulation and maintain optimal cooling performance. If you use your laptop in a dusty environment, you may need to clean it more frequently.
10.4. Can I replace my laptop fan myself?
Replacing a laptop fan is possible, but it requires technical skills and careful attention to detail. If you’re not comfortable with this procedure, it’s best to seek professional help.
10.5. What is thermal paste and why is it important?
Thermal paste is a substance that is applied between the processor and the heatsink to improve heat transfer. It’s important because it helps to dissipate heat away from the processor and prevent overheating.
10.6. How do I know if my thermal paste needs to be replaced?
If your laptop is overheating despite cleaning the fan and vents, it could be a sign that the thermal paste needs to be replaced. You may also notice that the fan is running louder than usual or that the laptop is throttling (reducing performance to prevent overheating).
10.7. Can I use any type of thermal paste?
It’s important to use a high-quality thermal paste that is designed for use with computer processors. Avoid using generic thermal compounds, as they may not provide adequate cooling.
10.8. Can I use compressed air to clean the inside of my laptop?
Yes, you can use compressed air to clean the inside of your laptop, but be careful not to spray liquid propellant into the components. Hold the can at an angle and use short bursts of air.
10.9. Is it safe to use a vacuum cleaner to clean my laptop fan?
It’s not recommended to use a vacuum cleaner to clean your laptop fan, as it can generate static electricity that can damage sensitive components.
10.10. What should I do if my laptop fan is making a grinding noise?
If your laptop fan is making a grinding noise, it could indicate that the fan bearings are worn out or that there is debris stuck in the fan. You may need to replace the fan.
11. Resources and Further Reading
Here are some additional resources that you may find helpful:
- Laptop manufacturer’s website
- Online forums and communities
- Tech support websites
- YouTube tutorials
- Professional repair services
12. Conclusion: Keeping Your Laptop Cool and Quiet
A noisy laptop fan can be a nuisance, but by understanding the causes and following the troubleshooting steps outlined in this guide, you can often resolve the problem and keep your laptop running cool and quiet. Remember to clean your laptop regularly, ensure proper ventilation, manage software processes, and consider advanced solutions like fan control and thermal paste. And when in doubt, don’t hesitate to seek professional help.
Still have questions about your loud laptop fan? Visit WHY.EDU.VN to ask your question and get expert answers from our community of tech professionals. At WHY.EDU.VN, we understand the frustration of dealing with tech issues. Our platform connects you with experts who can provide personalized guidance and solutions. Don’t let a noisy laptop slow you down. Head over to 101 Curiosity Lane, Answer Town, CA 90210, United States, contact us via Whatsapp at +1 (213) 555-0101, or visit our website, why.edu.vn, today and get the answers you need!